Google Tag Manager
Initial SetupDirect link to Initial Setup
Understanding the data layerDirect link to Understanding the data layer
The data layer should have been implemented on your web page by your developers.
A data layer is an object that contains all of the information that you want to share with Google Tag Manager (GTM). Information such as events or variables can be shared to Google Tag Manager via the data layer, and triggers can be set up in Google Tag Manager based on the values of variables (e.g., fire a remarketing tag when purchase_total > $100) or based on the specific events. Variable values can also be shared through to other tags (e.g., add purchase_total into the value field of a tag).
Refer to the GTM developer guide for comprehensive details on how the data layer works.
Example of a data layer:
window.dataLayer = window.dataLayer || []

window.dataLayer.push({
    'email':'jenny.smith@rokt.com',
    'consumer': {
        'firstname' : 'Jenny',
        'lastname' : 'Smith'
    },
    'ecommerce': {
        'transaction': {
            'amount' : '12.36'
        }
    },
    'event':'gtm.transactionComplete'
});
Add Rokt integrationDirect link to Add Rokt integration
Add a triggerDirect link to Add a trigger
Click Triggering.
Test the integrationDirect link to Test the integration
Integrate the Rokt Click ID with Google Tag ManagerDirect link to Integrate the Rokt Click ID with Google Tag Manager
The following are instructions to integrate Rokt Click ID on your landing page with Google Tag Manager. More information on Rokt Click ID.
If you'd like to integrate the Rokt Click ID on your landing page directly, please see this integration guide.
-
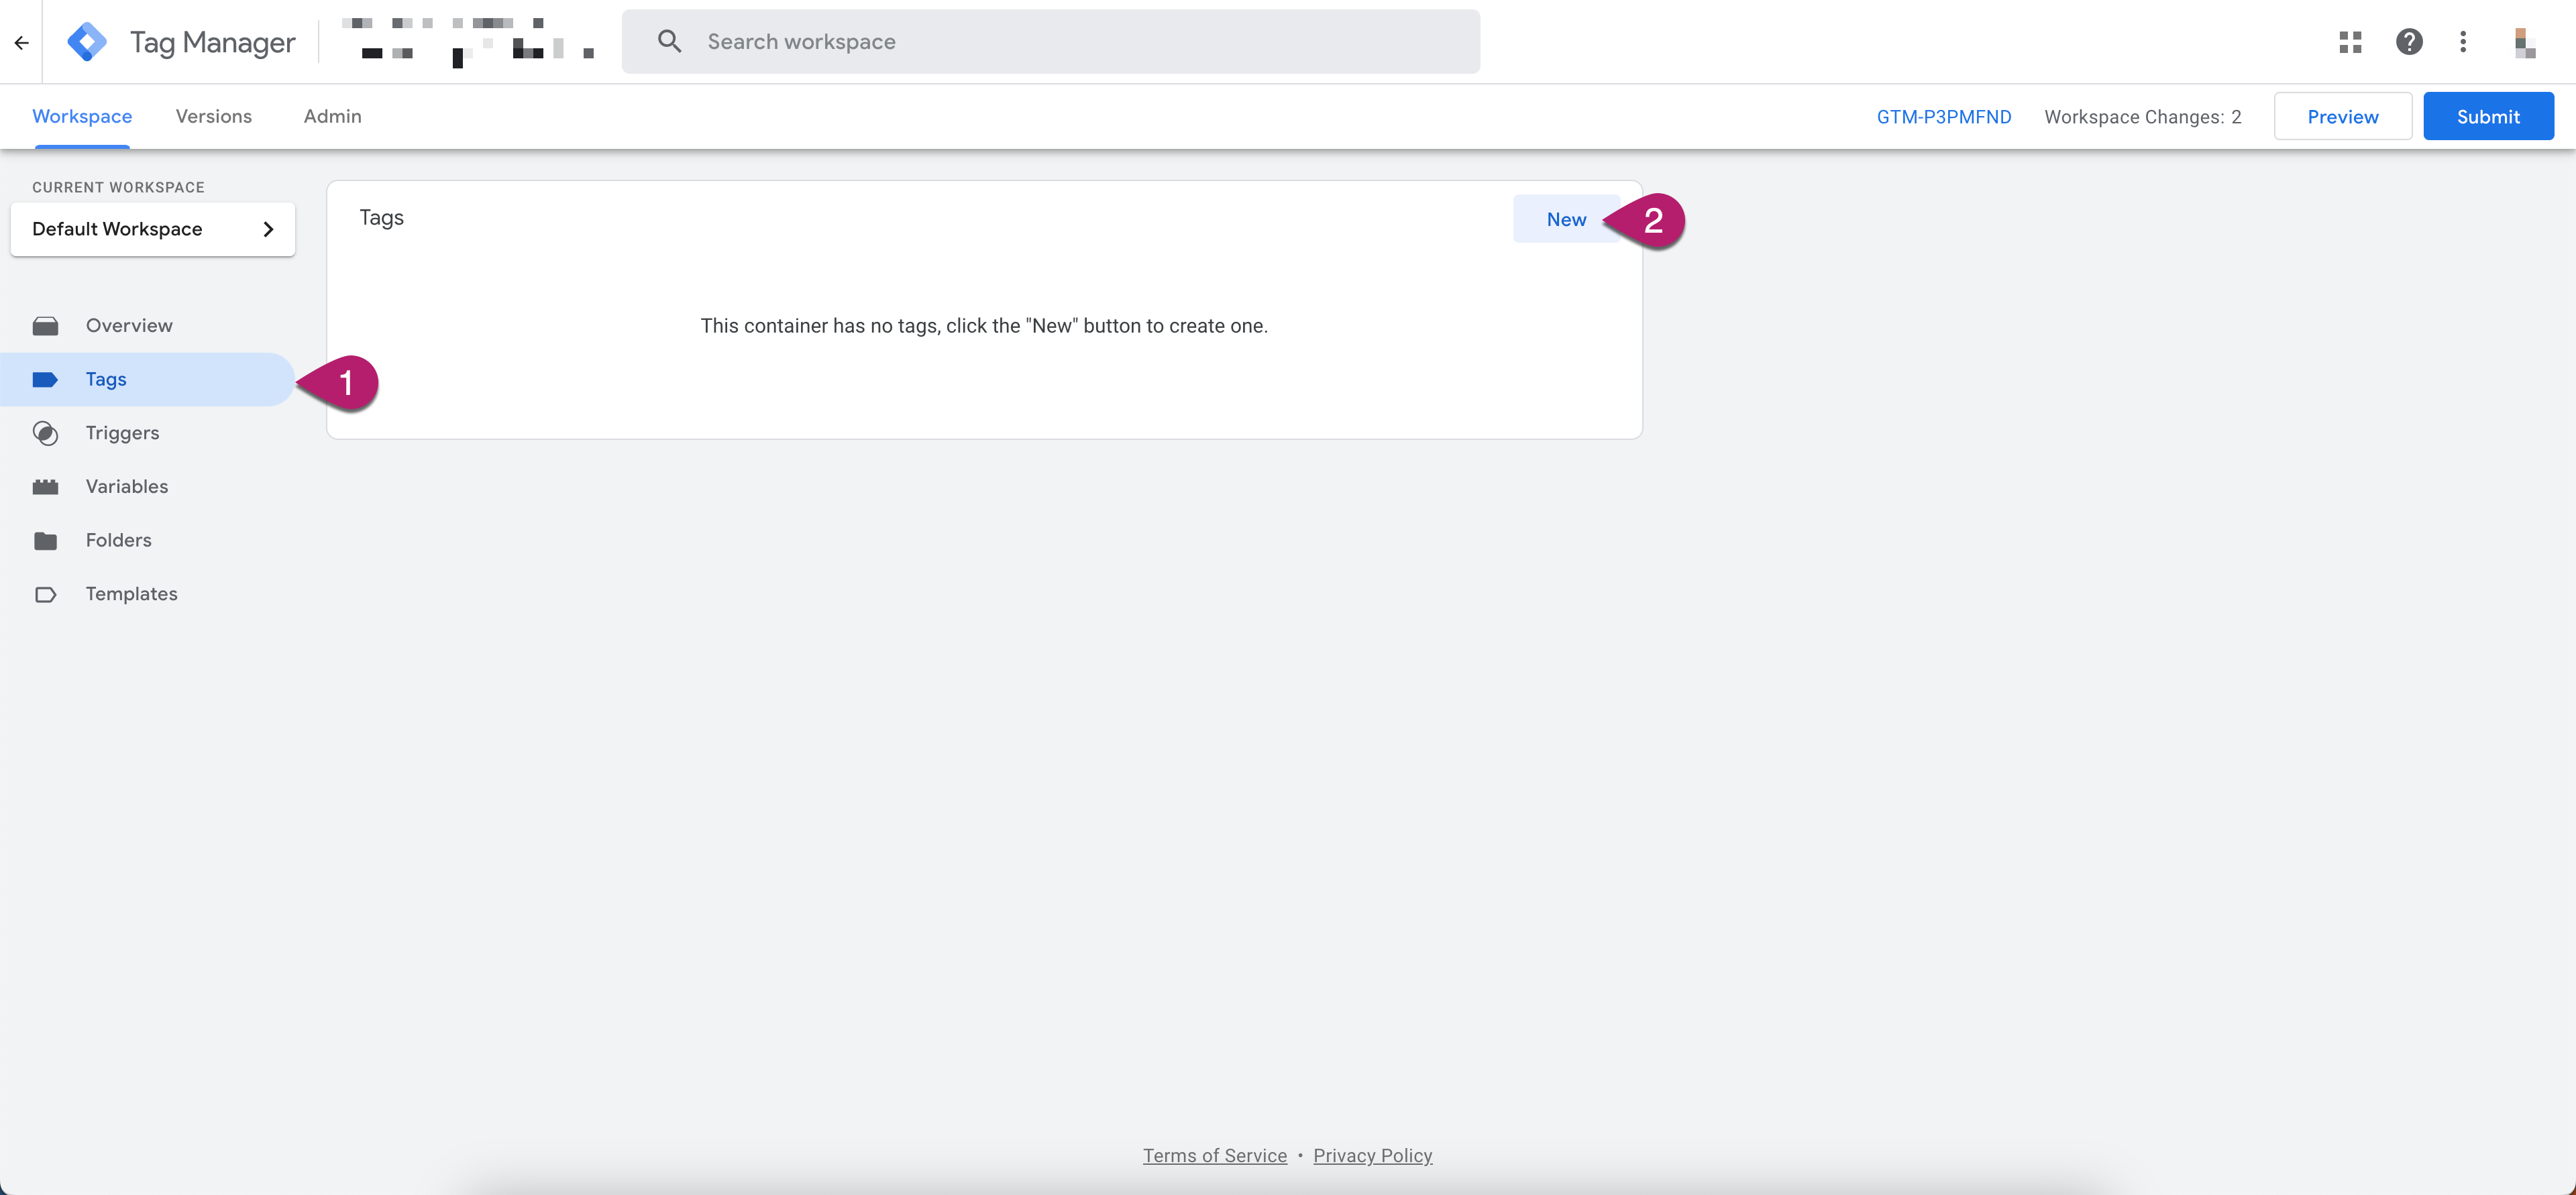
Open Google Tag Manager.
-
Click Tags.
-
Click New.
-
Name your tag.
-
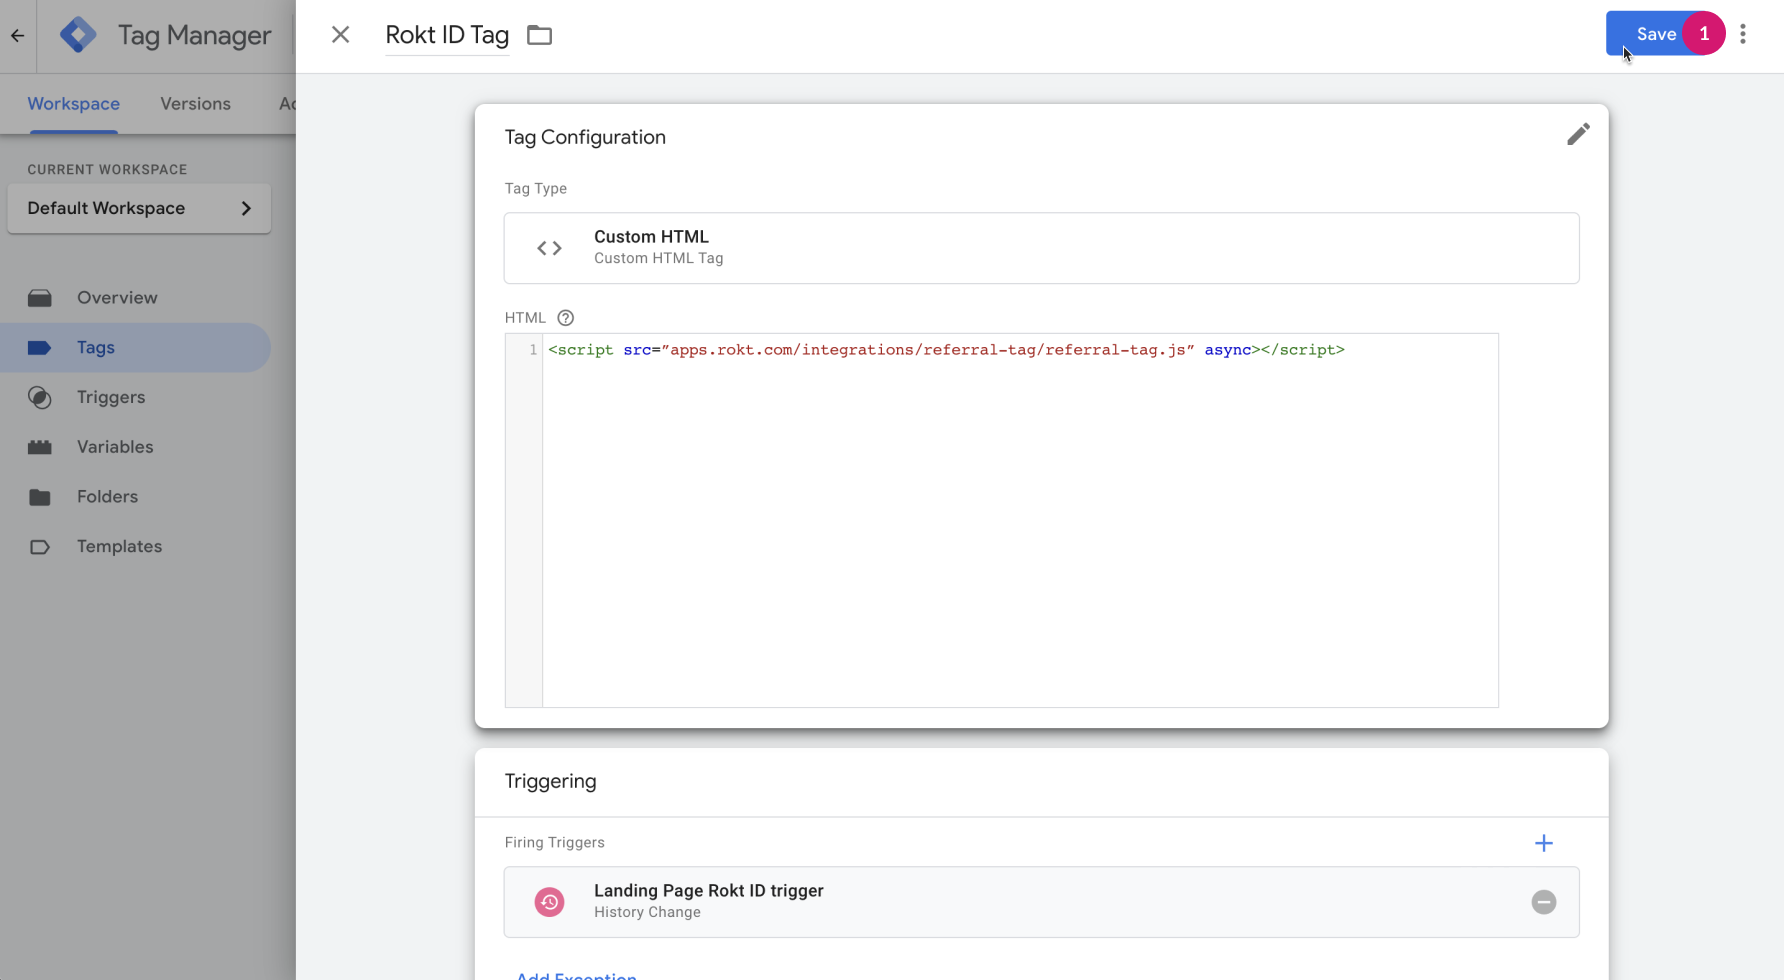
Click Tag Configuration.
-
Select Custom HTML.
-
Add one of the following code snippets into the HTML field depending on whether your website is using one or multiple subdomains.
For single subdomain:<script src="https://apps.rokt.com/integrations/referral-tag/referral-tag.js" async></script>For multiple subdomains:<script>
var scriptElement = document.createElement('script');
scriptElement.src = 'https://apps.rokt.com/integrations/referral-tag/referral-tag.js';
scriptElement.async = true;
scriptElement.setAttribute('data-fp-domain', 'your_base_domain');
document.head.appendChild(scriptElement);
</script>

-
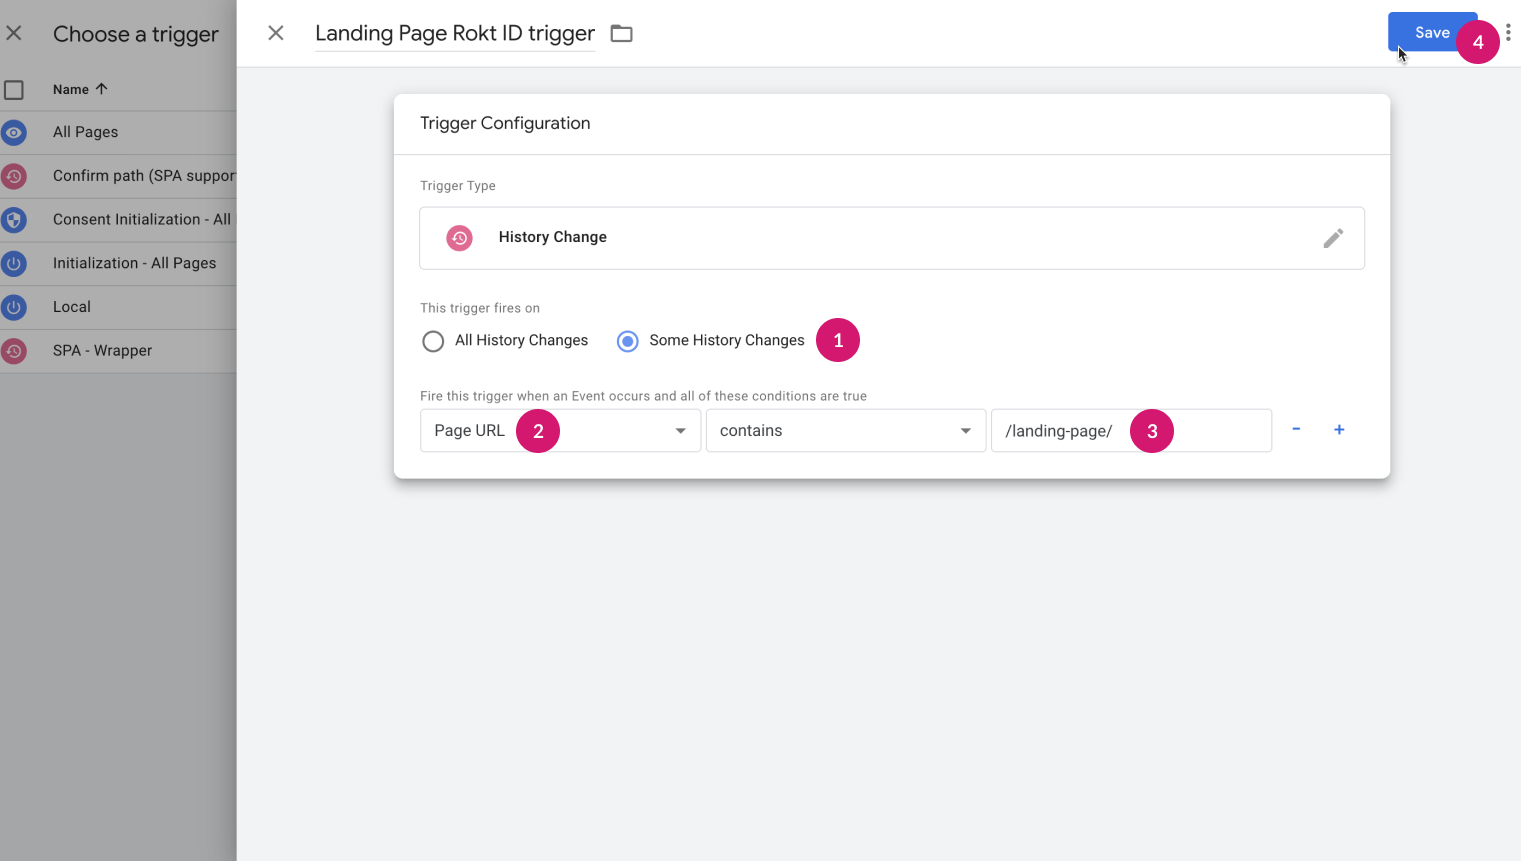
Setup a trigger to fire the Rokt Click ID tag on the correct page. This will most likely be your landing page.
- Click the Plus icon in the top right to create a new trigger and then name it. If your webapp is a Single Page Application, choose the trigger type History Change, otherwise pick Page View.

- Change the trigger firing rules to Some History Changes or Some Page Views.
- Enter the URL parameter that identifies the page where the tag should fire. For example, if your confirmation page is
example.com/cart/payment/shippingthe identifying parameter can be any ofcart,payment, orshipping. . - Click Save.
- Click the Plus icon in the top right to create a new trigger and then name it. If your webapp is a Single Page Application, choose the trigger type History Change, otherwise pick Page View.
-
Click Save.
Testing and validationDirect link to Testing and validation
-
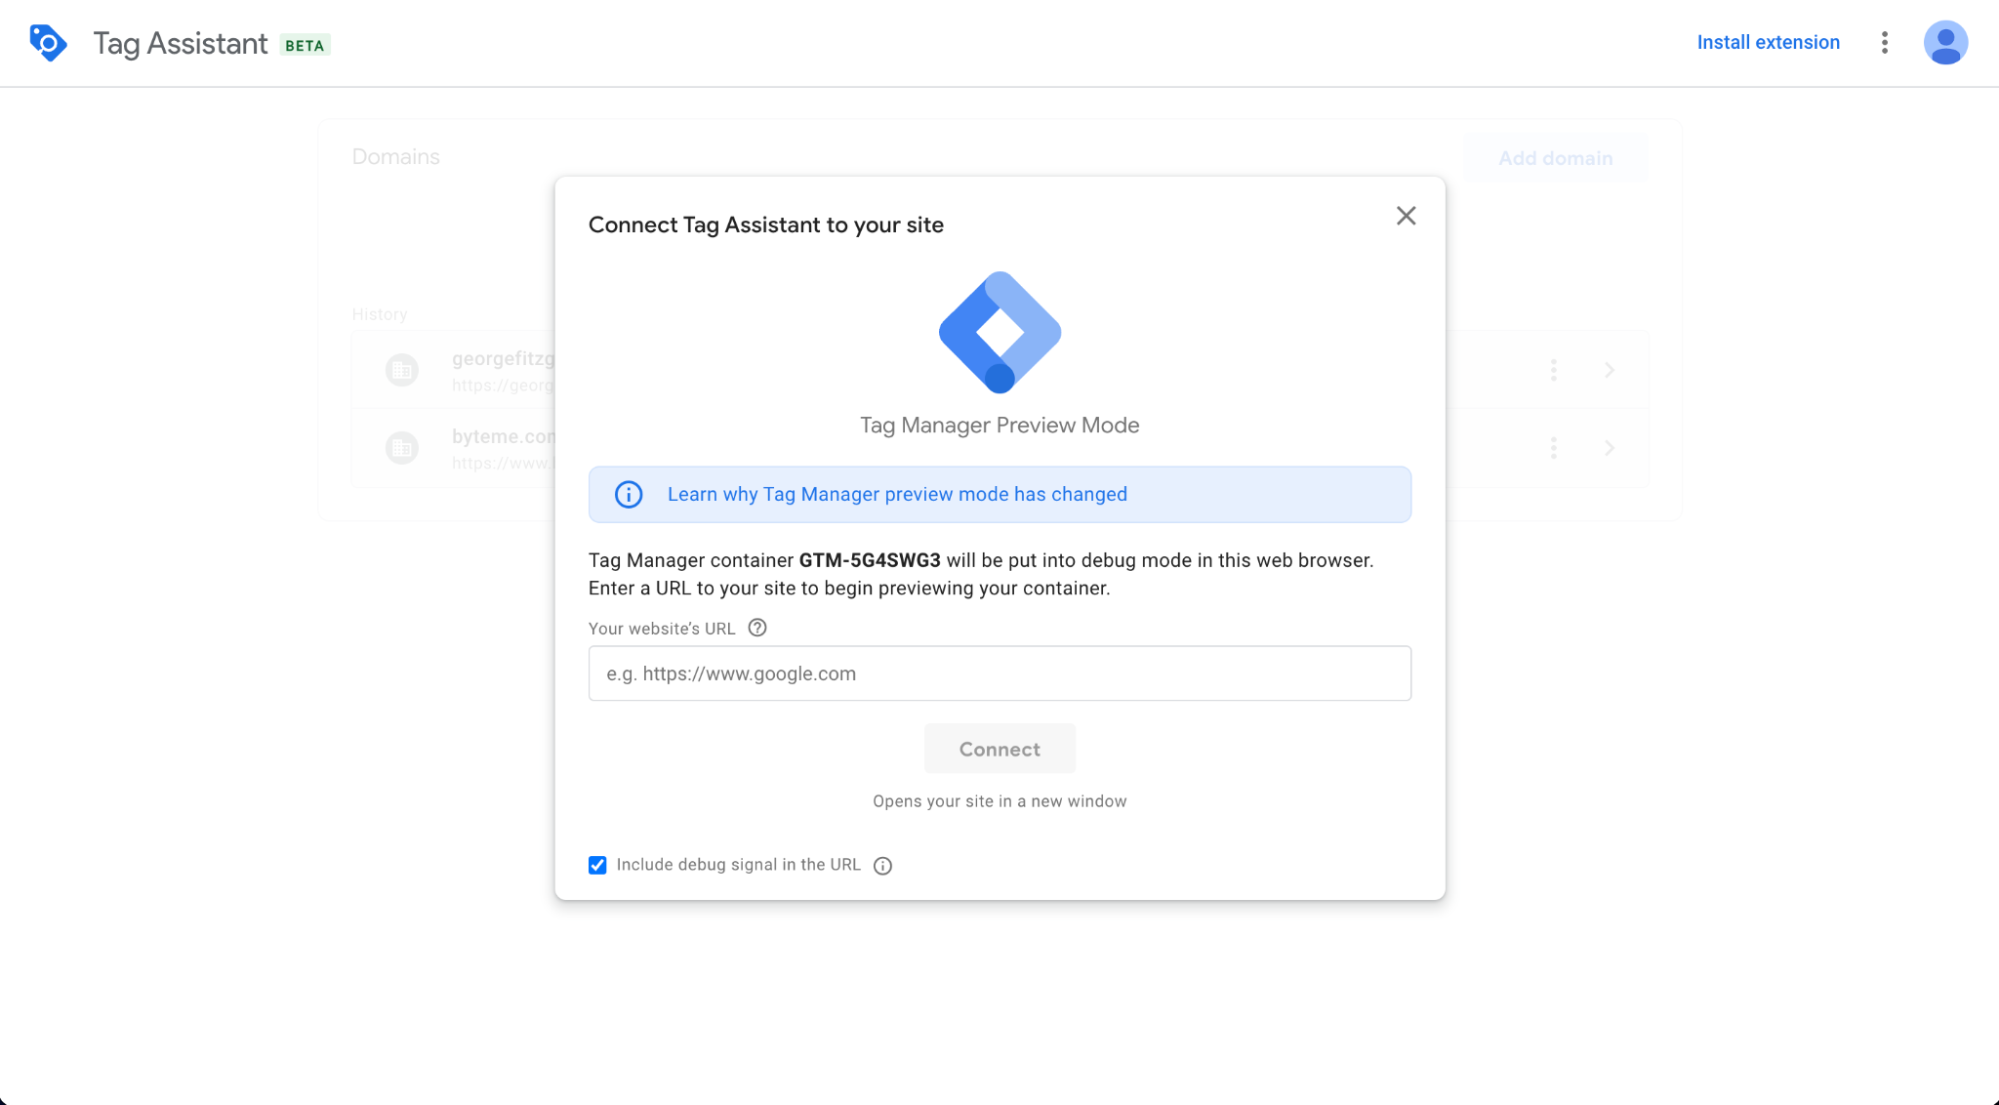
From Google Tag Manager go to your workspace and choose Preview.
- Enter the URL of your site.
- Choose Connect. This should open a new window running the newly set up Rokt Click ID.
-
Copy the URL of the newly opened window and forward this to your Rokt account manager. They perform the testing and QA for the Rokt Click ID tag integration.
Identify your variable nameDirect link to Identify your variable name
Variables are set up in your GTM and are matched to the data layer. Refer to the GTM developer guide for more details about variables.
The structure of your data layer on your page affects the data layer variable name in your GTM.
Example data layer script 1:
window.dataLayer.push({
    'email':'jenny.smith@rokt.com'
});
Data layer variable name: email
Example data layer script 2:
window.dataLayer.push({
    'consumer': {
        'firstname' : 'Jenny'
    }
});
Data layer variable name: consumer.firstname
Example data layer script 3:
window.dataLayer.push({
    'ecommerce': {
        'transaction': {
            'amount' : '12.36'
        }
    }
});
Data layer variable name: ecommerce.transaction.amount
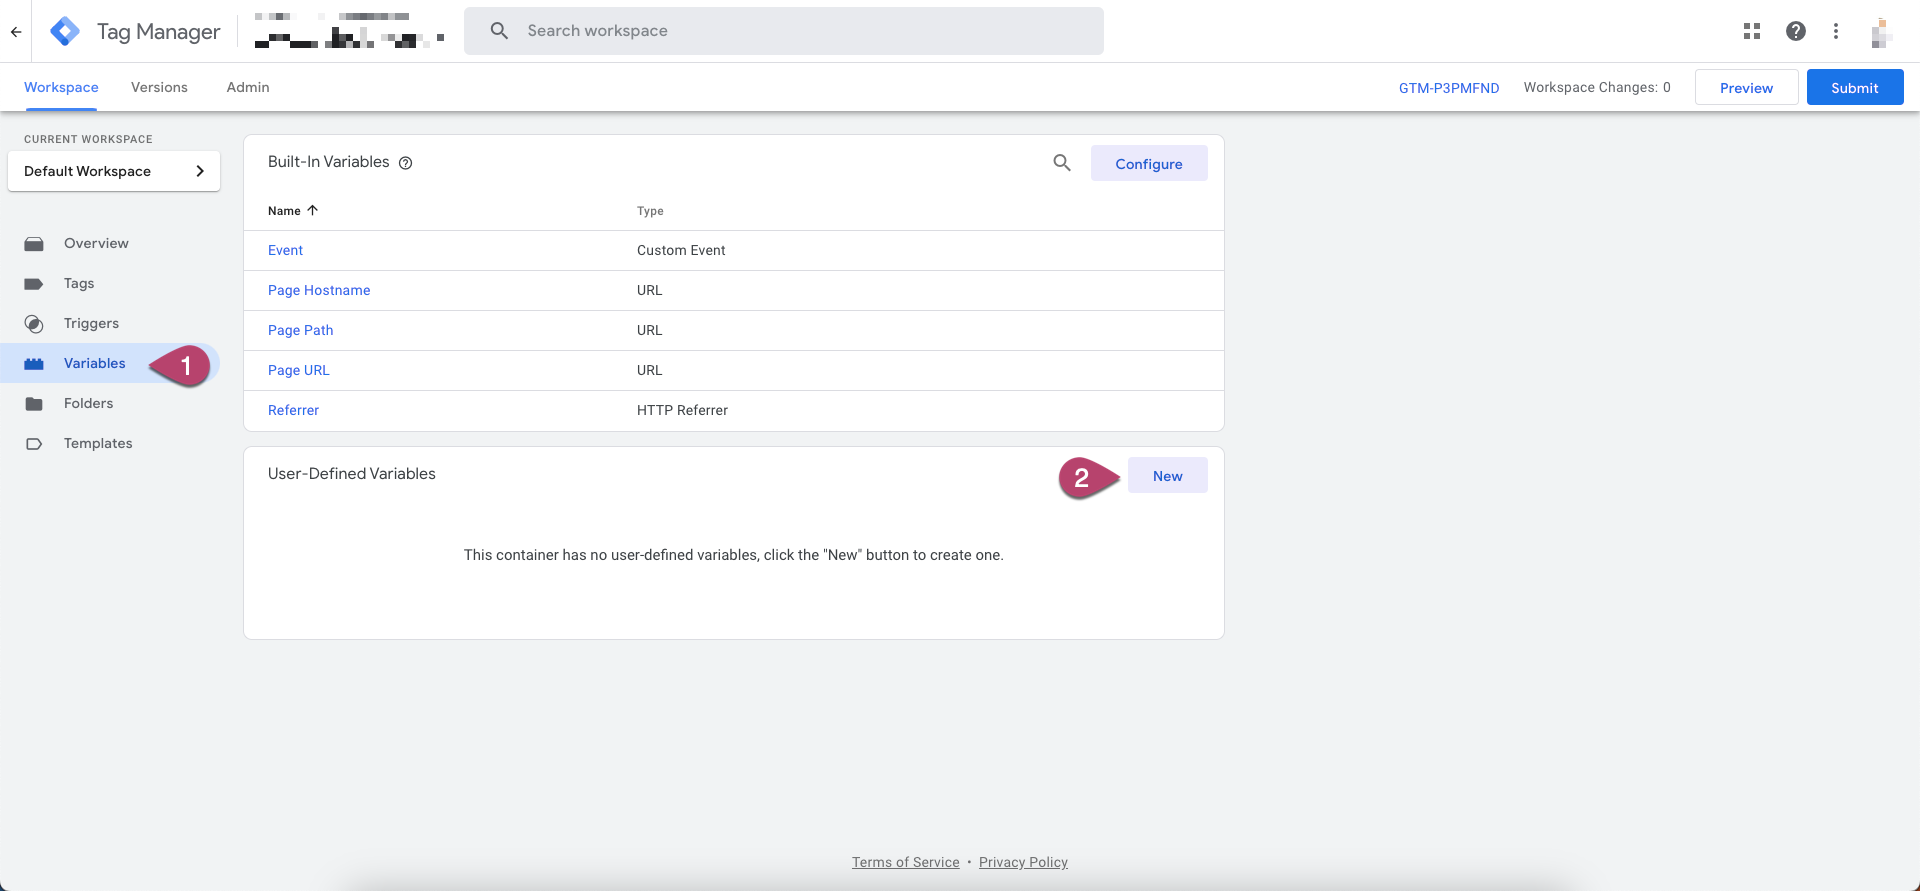
Set up variables in GTMDirect link to Set up variables in GTM
-
Open Google Tag Manager.
-
Click Variables,
-
Under User-defined variables, click New.
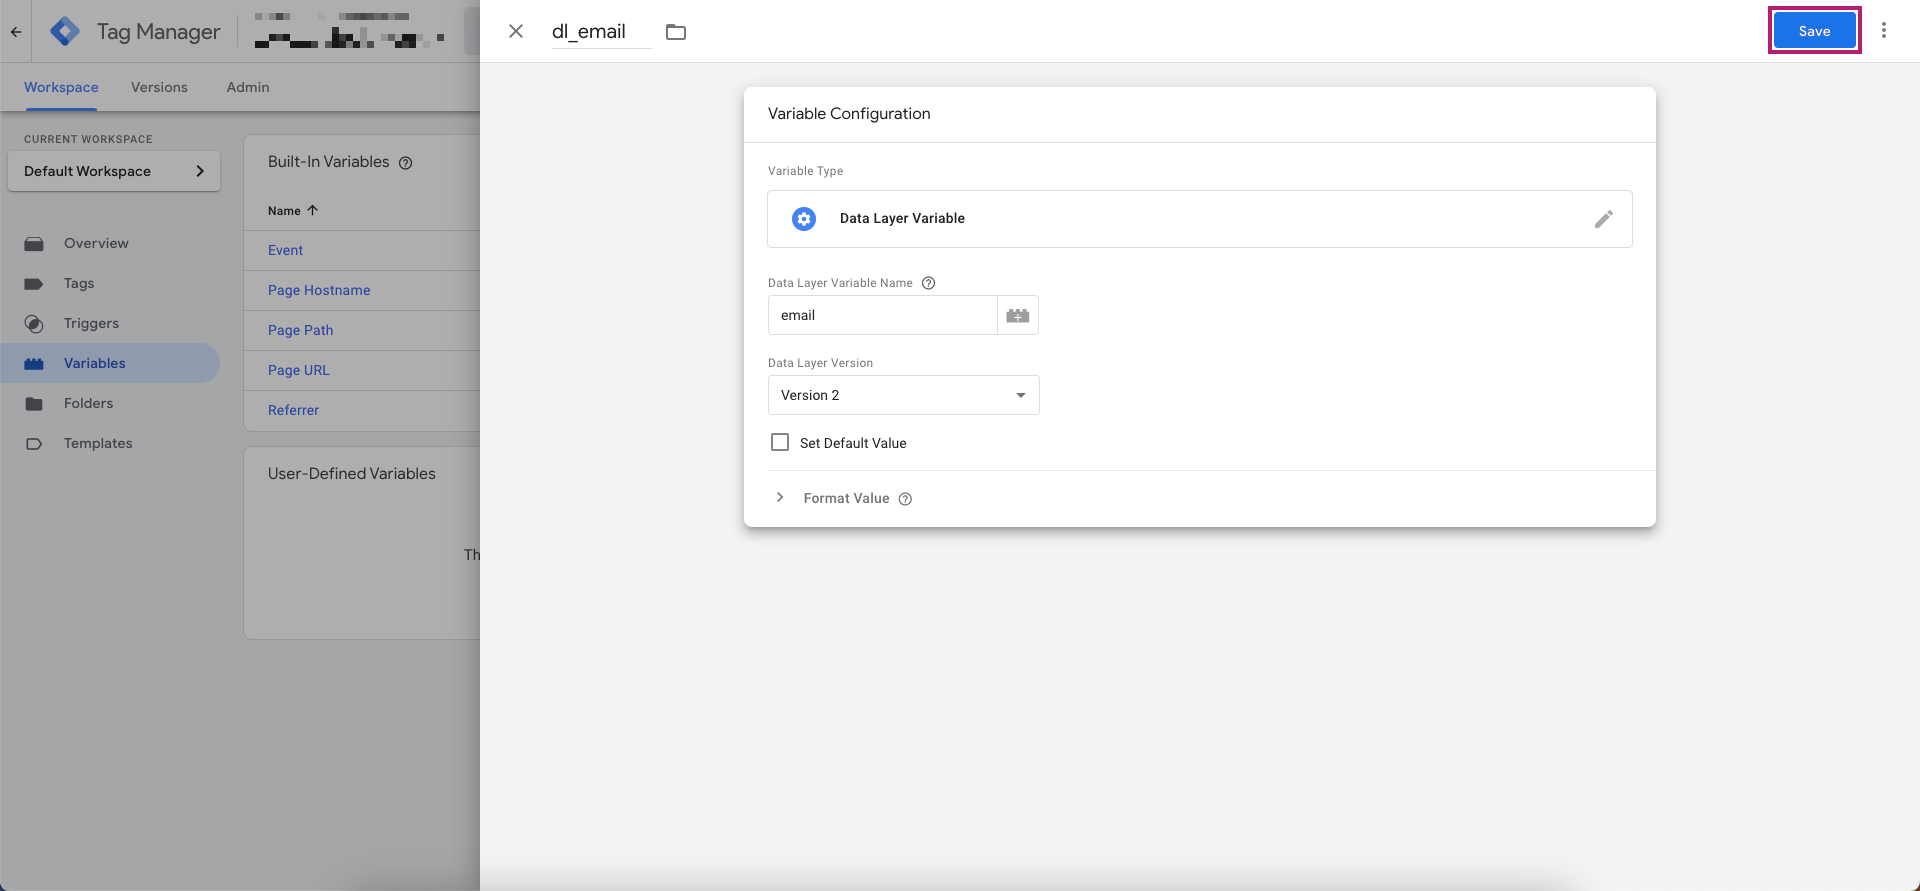
-
Name your variable.
In the example below, the name is
dl_email -
Set Variable Type as Data Layer Variable.
-
Enter the Data Layer Variable Name. See the examples above to identify the variable name based on your data layer structure.
-
Click Save.
GDPR and CCPA ComplianceDirect link to GDPR and CCPA Compliance
Advertisers using the Rokt Click ID solution should assess their own compliance obligations under applicable privacy laws, including the GDPR, ePrivacy Directive, and CCPA.
Under the GDPR, the Rokt SDK implementation and associated data processing is supported by the legal basis of legitimate interest for the purpose of conversion tracking and campaign performance optimization. The processing is:
- Necessary for measuring advertising outcomes and optimizing marketing performance (i.e. serving valid commercial interests),
- Based on pseudonymized data with best practice encryption
- Limited to the checkout context, without profiling or repurposing, and restricted within Rokt’s closed network (cf the open web RTB ecosystem)
- Transparent and proportionate, with clear rights for users to object under Article 21 GDPR.
In this context, advertisers are able to deploy the Rokt Click ID tag without requiring prior consent, provided they meet transparency and objection requirements, such as informing users appropriately in the privacy policy and offering a clear opt-out mechanism.
For advertisers who prefer or are required to use consent-based deployment—such as when aligning with broader CMP frameworks—Rokt Click ID can be implemented conditionally via a Consent Management Platform (CMP) or Tag Manager, including Google Tag Manager. If other conversion tags are already configured to respect user consent, the Rokt Click ID tag can be set up in a similar way.
If this is your first time conditionally deploying conversion tags based on user consent or if you need implementation support, please contact your Rokt account manager.
For more information on the Rokt Click ID solution described in this section, please refer to our Cookie Policy.