Google Tag Manager Integration for Ecommerce
This page explains how to implement the Rokt SDK for Ecommerce using Google Tag Manager to deliver more relevant customer experiences at checkout. The SDK allows you to trigger and track these experiences (like displaying offers on confirmation pages) by firing on configured pages and passing user and transaction data back to Rokt for personalization and measurement.
You'll learn how to:
- Create GTM variables that read values from your site's data layer
- Create GTM tags to initialize the Rokt SDK, identify users, and render Rokt placements
Before you startDirect link to Before you start
Make sure you have:
- Access to the correct Google Tag Manager container for your site
- A data layer already implemented on your site (typically done by your developers)
- Your Rokt API key (provided by your Rokt account manager)
Understanding the data layerDirect link to Understanding the data layer
Your developers should implement the data layer on your site.
A data layer is an object that contains all of the information that you want to share with Google Tag Manager (GTM). Information such as events or variables can be shared to Google Tag Manager via the data layer, and triggers can be set up in Google Tag Manager based on the values of variables (e.g., fire a remarketing tag when purchase_total > $100) or based on the specific events. Variable values can also be shared through to other tags (e.g., add purchase_total into the value field of a tag).
Refer to Google's GTM developer guide for comprehensive details on how the data layer works.
Example of a data layer:
window.dataLayer = window.dataLayer || [];

window.dataLayer.push({
  email: "jenny.smith@rokt.com",
  user: {
    firstname: "Jenny",
    lastname: "Smith",
  },
  ecommerce: {
    transaction: {
      amount: "12.36",
    },
  },
  event: "gtm.transactionComplete",
});
Identify your variable namesDirect link to Identify your variable names
Variables are set up in your GTM account and are matched to the data layer. Refer to the GTM developer guide for more details about variables.
The structure of your data layer on your page affects the data layer variable name in your GTM.
Example data layer script 1:
window.dataLayer.push({
  email: "jenny.smith@rokt.com",
});
Data layer variable name: email
Example data layer script 2:
window.dataLayer.push({
  user: {
    firstname: "Jenny",
  },
});
Data layer variable name: user.firstname
Example data layer script 3:
window.dataLayer.push({
  ecommerce: {
    transaction: {
      amount: "12.36",
    },
  },
});
Data layer variable name: ecommerce.transaction.amount
Create your variables in Google Tag ManagerDirect link to Create your variables in Google Tag Manager
- Log in to your Google Tag Manager container.
- Click Variables.
- Under User-defined variables, click New.
- Enter a name for your variable.
- Click Choose a variable type to begin setup...
- Under Page Variables select Data Layer Variable.
- Enter the Data Layer Variable Name. See the examples above to identify the variable name based on your data layer structure.
- Click Save.
Rokt recommends creating variables for the attributes you plan to send to Rokt, such as:
emailfirstnamelastnamemobileagegenderbillingaddress1billingaddress2confirmationrefbillingzipcodeamountpaymenttypeccbincountrylanguagecurrency
Configure the Initialization and Log Page Views TagDirect link to Configure the Initialization and Log Page Views Tag
The mParticle by Rokt - Initialization and Log Page View tag can:
- Initialize the Rokt SDK
- Log page views
Use these steps to create the Initialization and Log Page Views tag:
- Click Tags in the left-hand navigation from your container and click New.
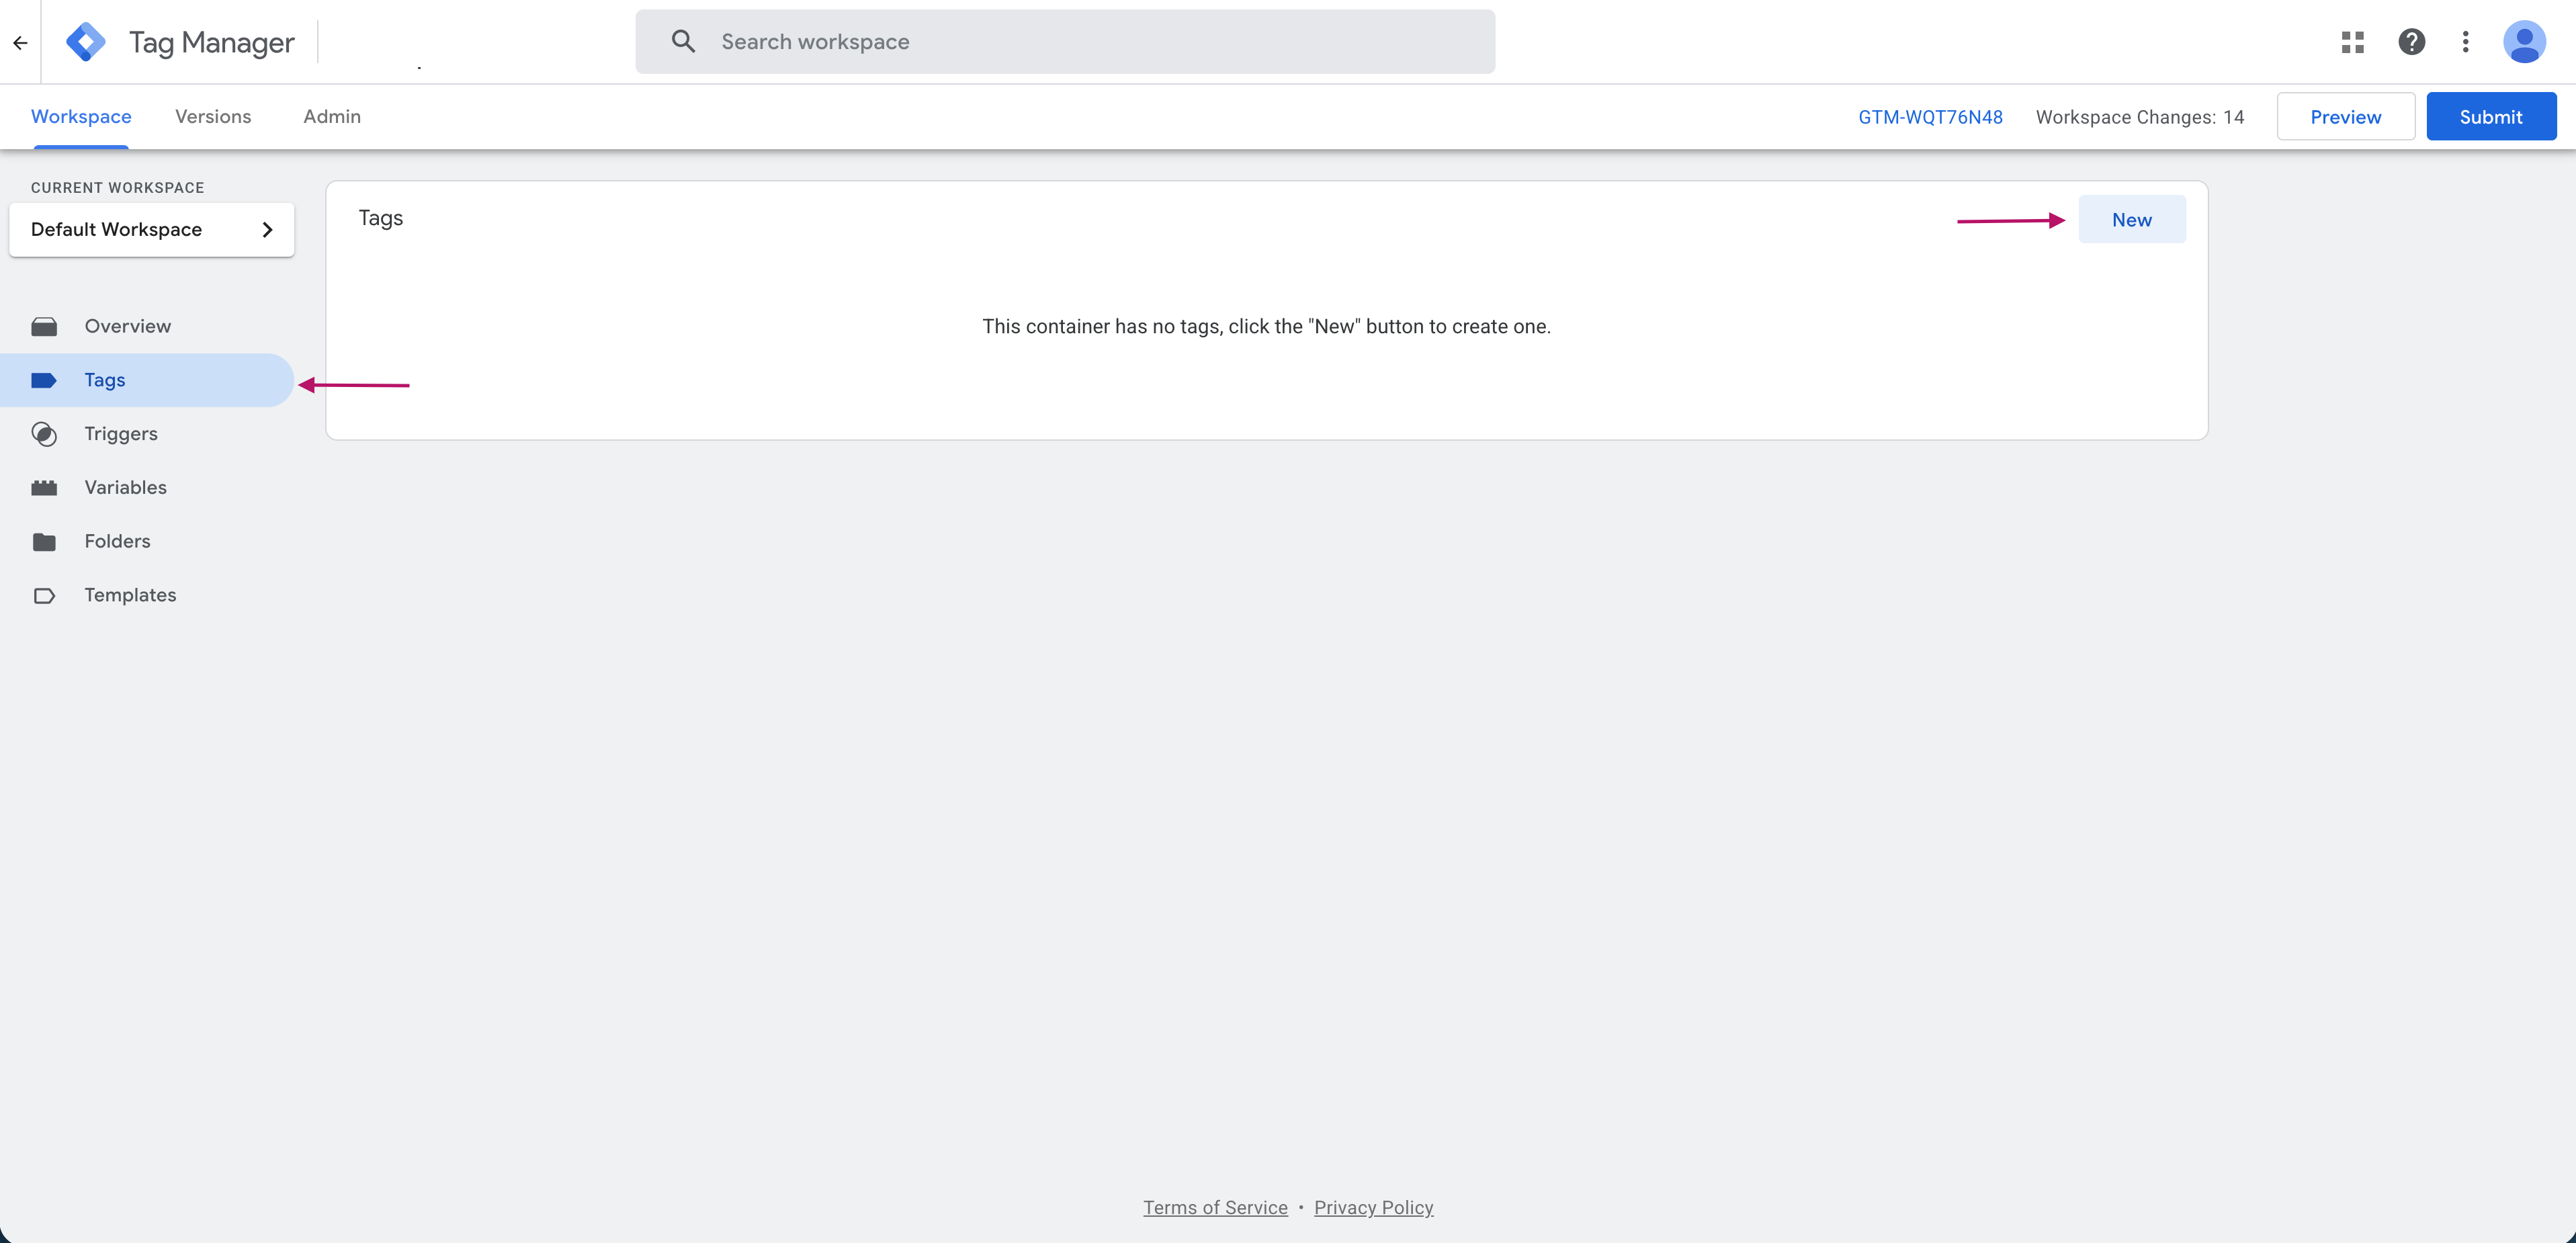
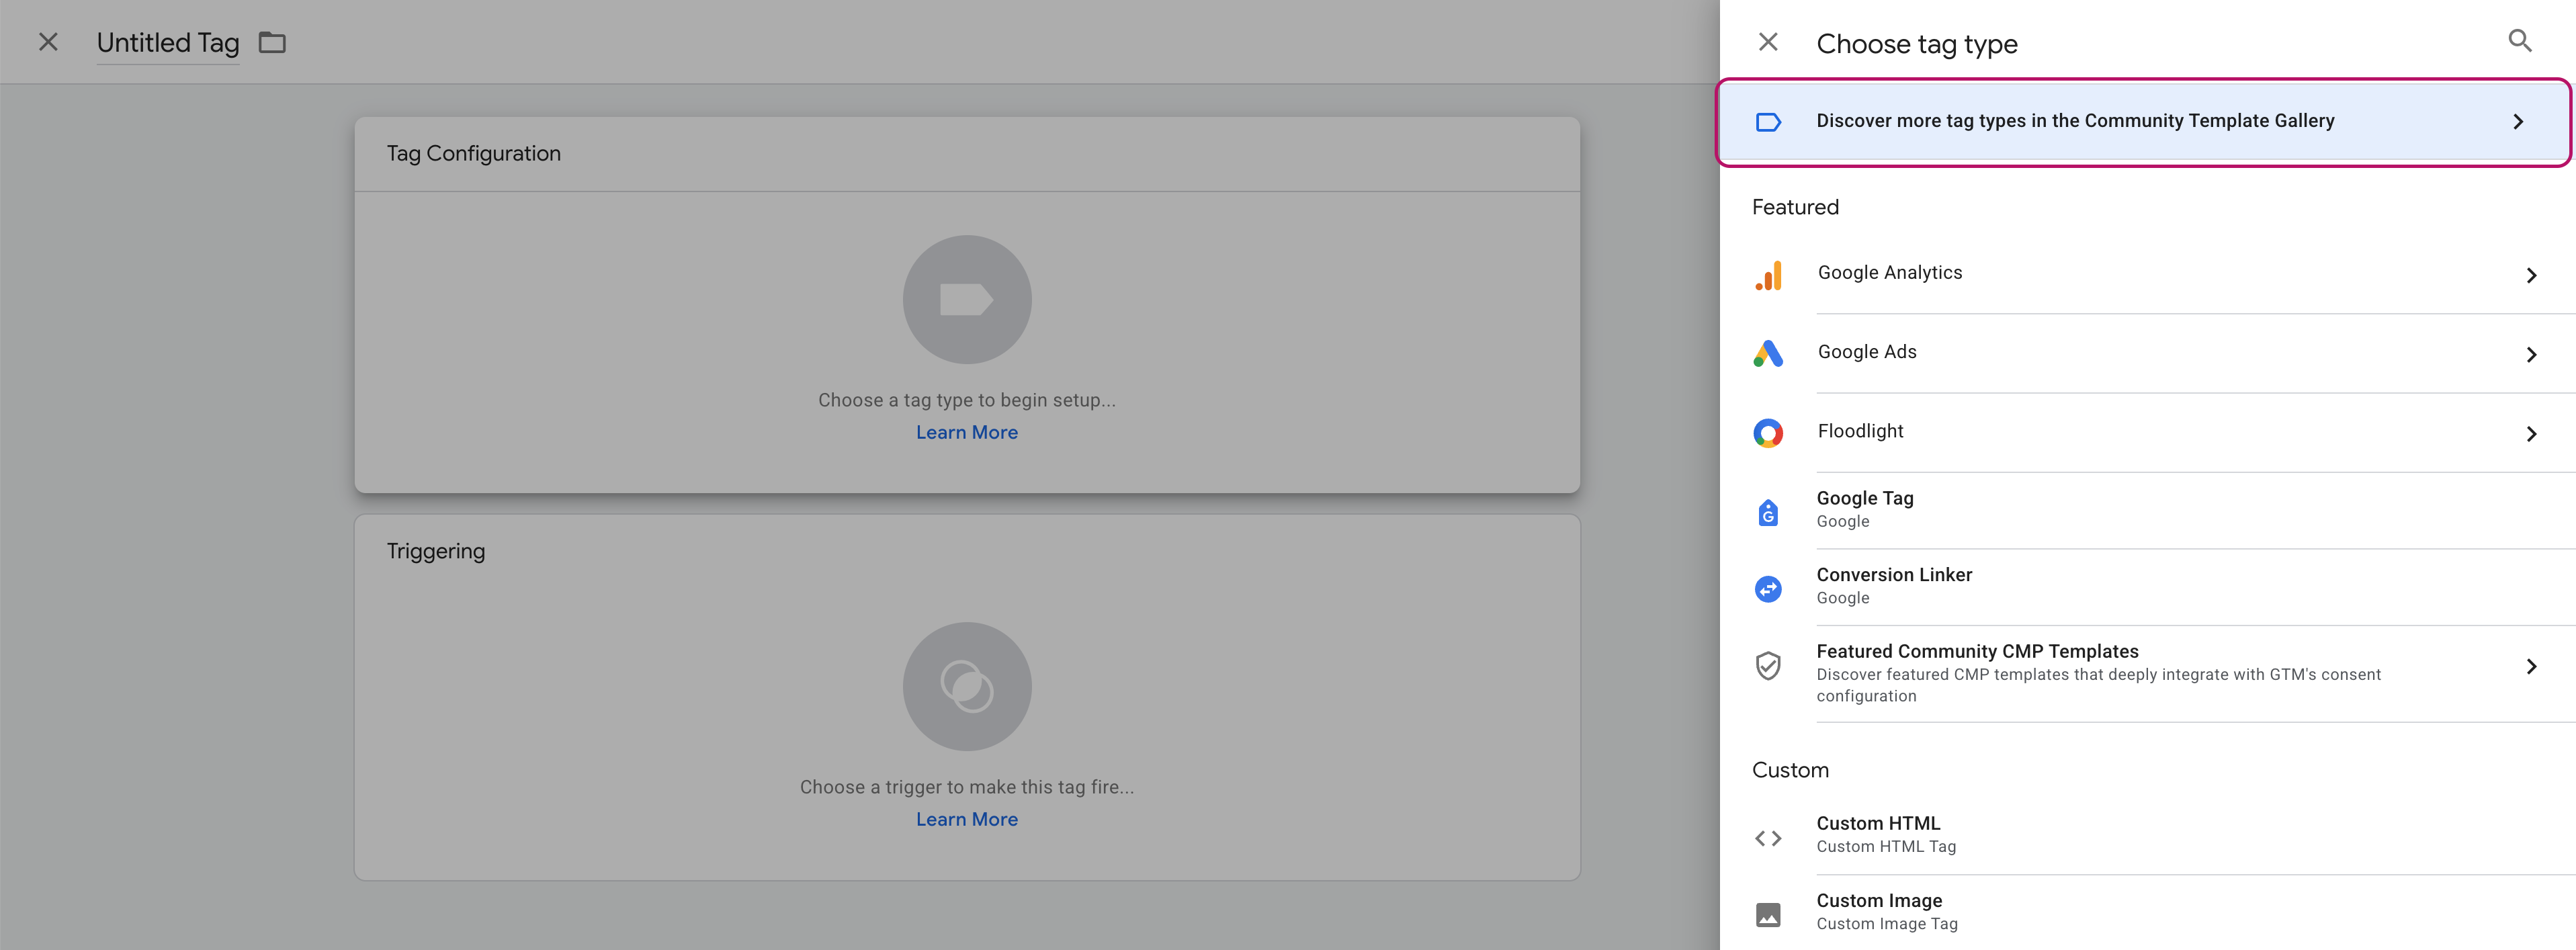
- Select Tag Configuration.
- Select Discover more tag types in the Community Template Gallery.
- Search for
Roktand select mParticle by Rokt - Initialization and Log Page View.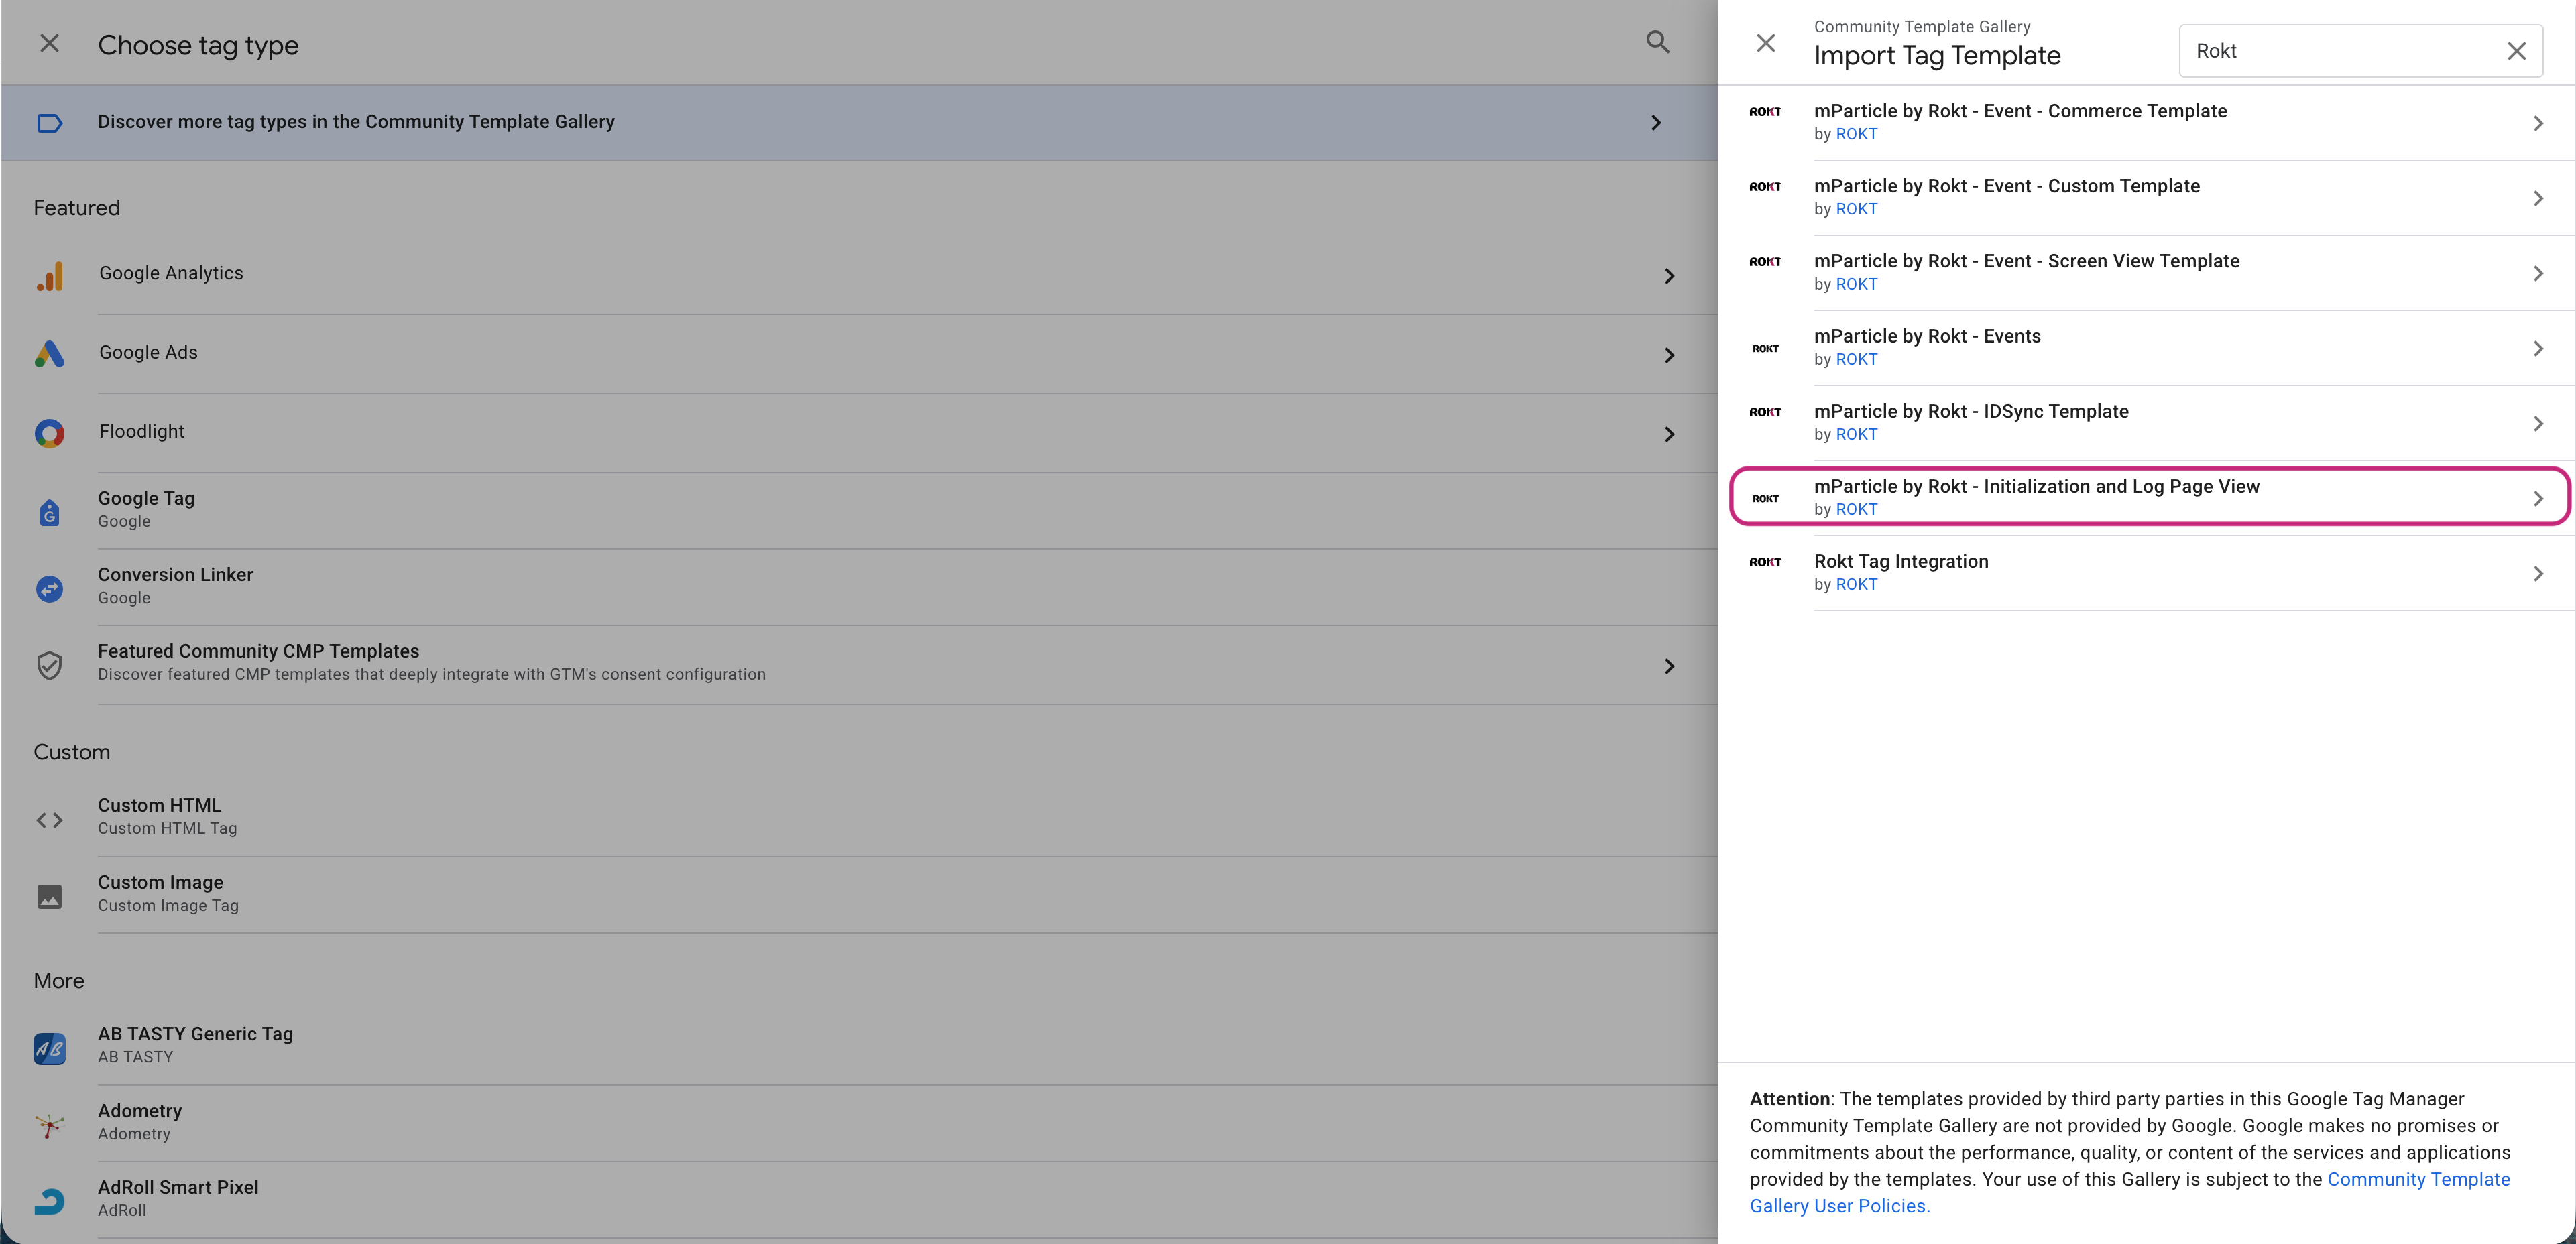
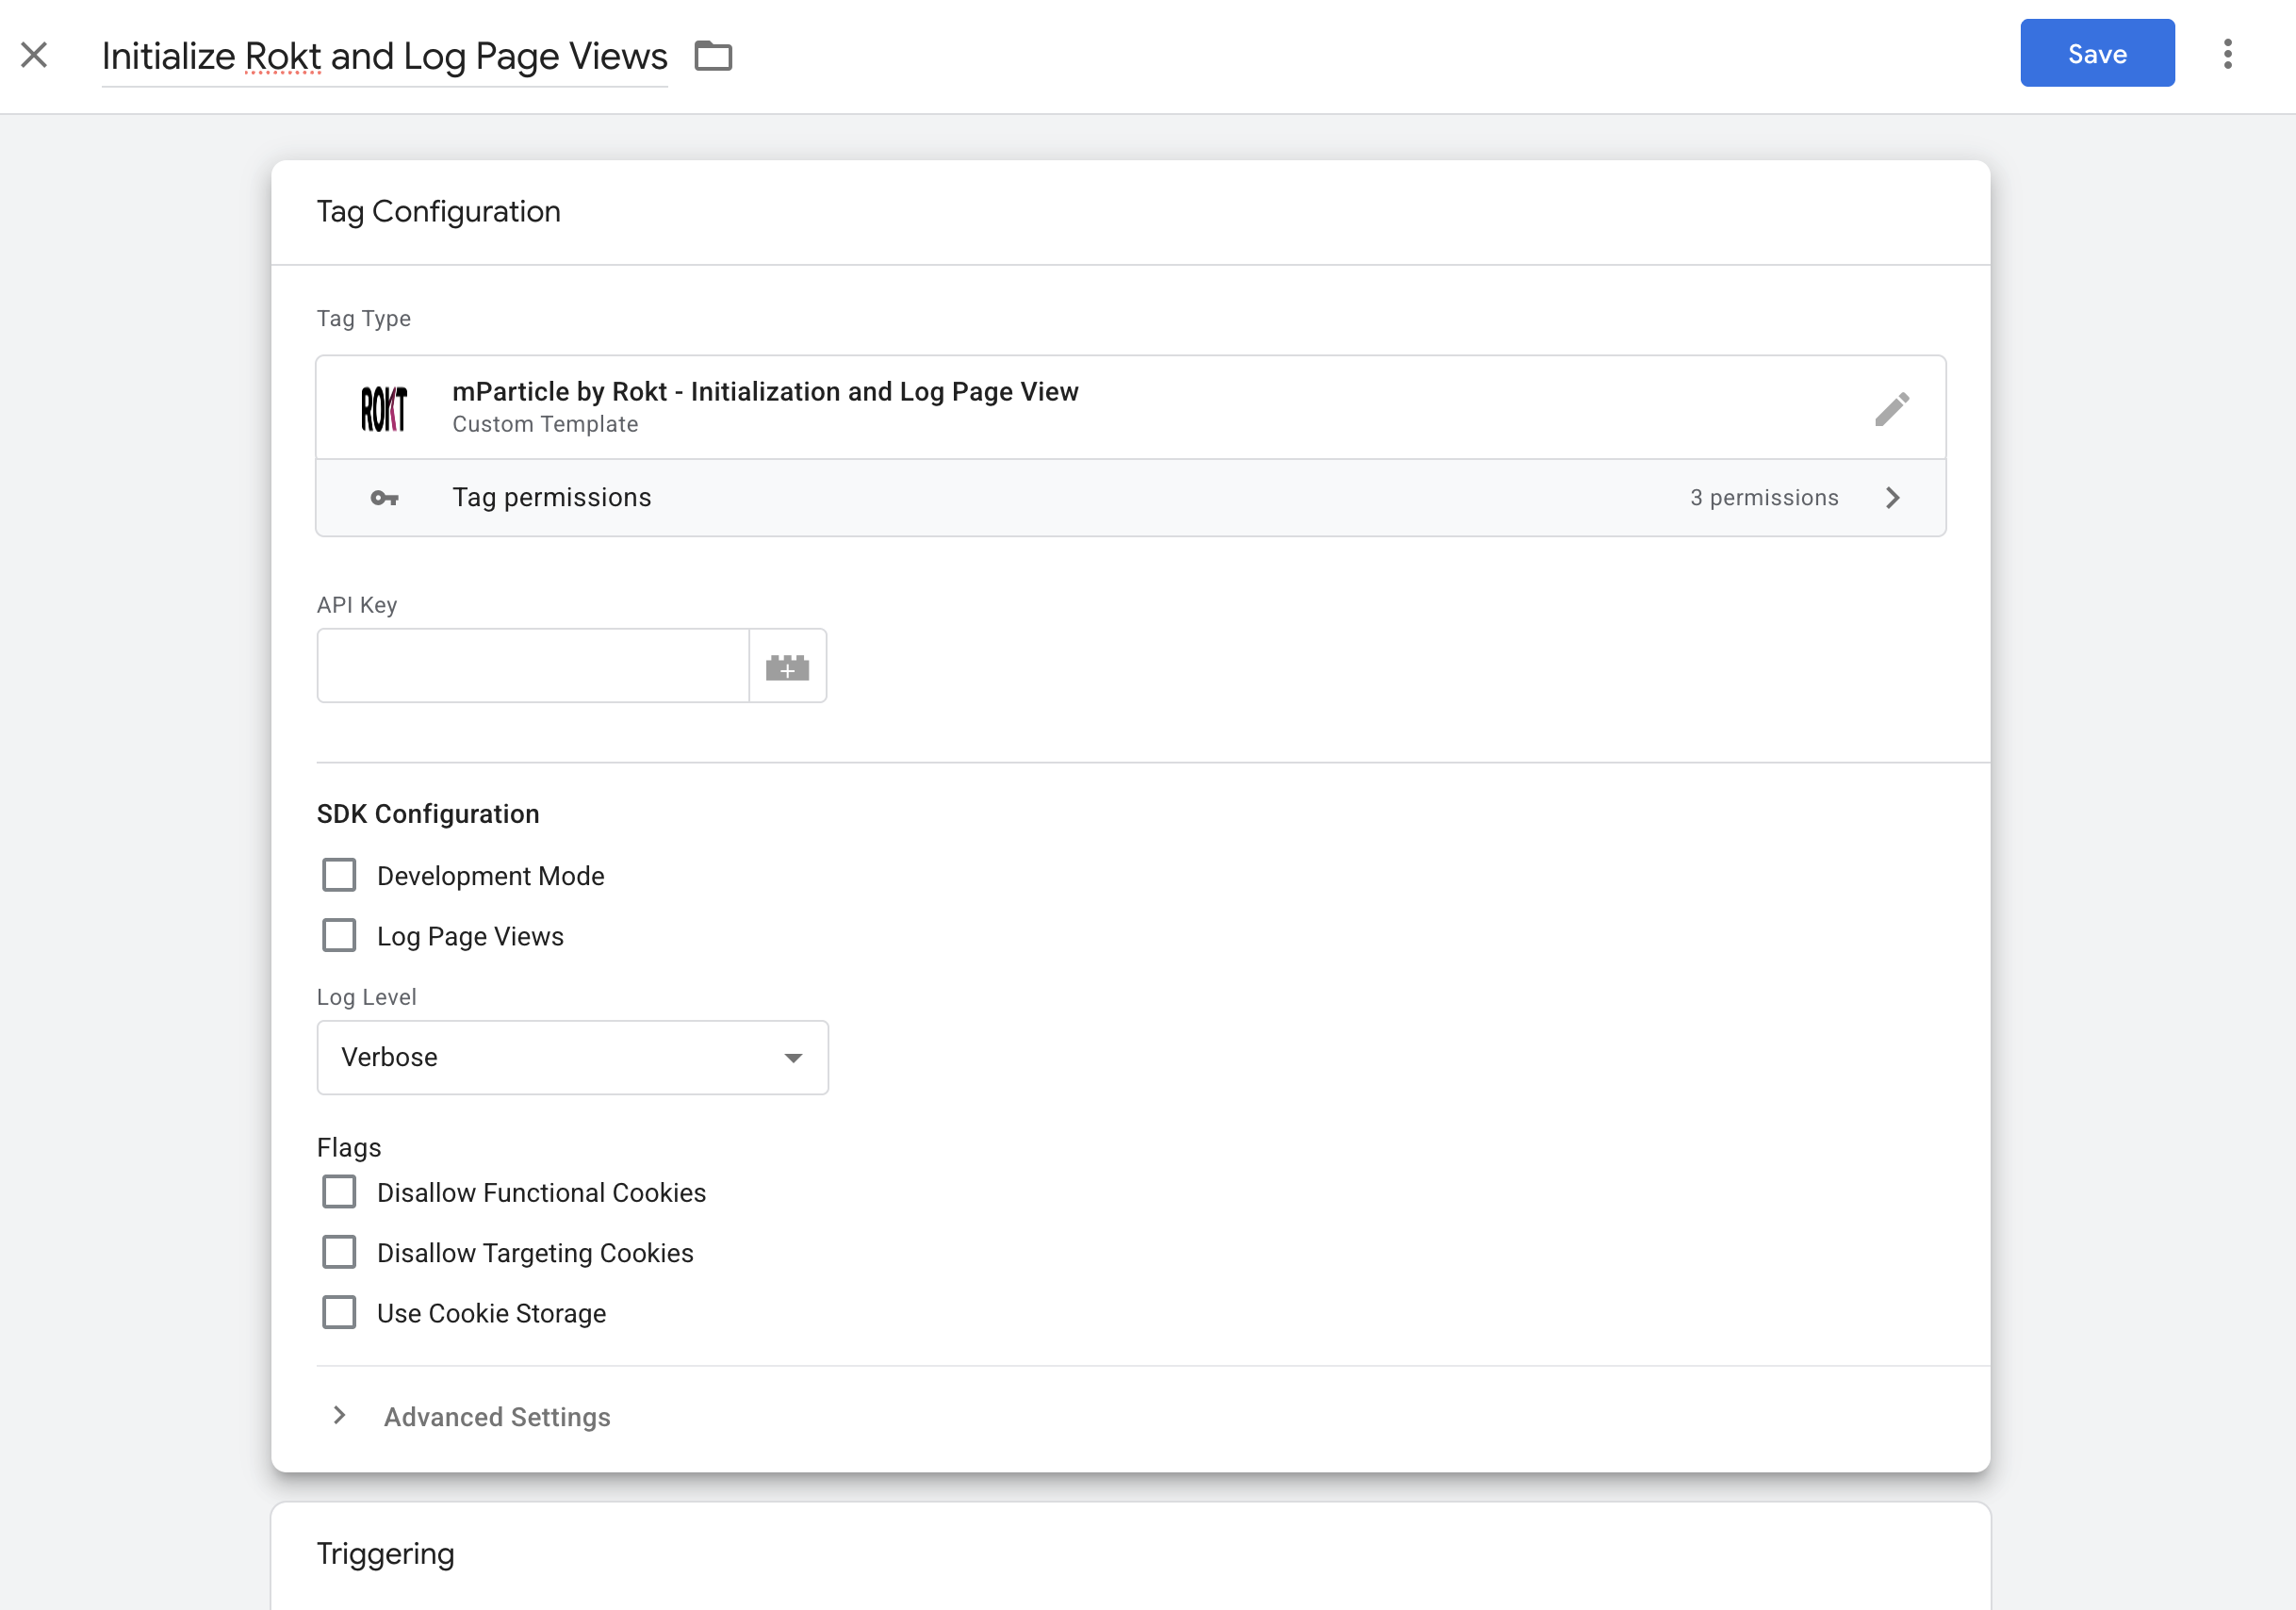
- Enter a descriptive name for your tag (for example,
[Rokt] Initialize and Log Page Views). - Enter configuration settings:
- API Key: Enter your Rokt API key (this is provided by your Rokt account manager).
- Development Mode: If you are testing your integration, check the Development Mode box. If you are ready to use your tag for production, uncheck this box.
- Log Page Views: Logging page views records a page view event (with attributes like screen_name, url, and referring-page) as soon as each page loads.
- Your page view event attributes will correspond to attributes on your site (for example, if you are on the "payment" screen, your
screen_namewill bepayment). - You should log page views as soon as each page in the user's transaction journey is loaded.
- Your page view event attributes will correspond to attributes on your site (for example, if you are on the "payment" screen, your
- Log Level: In the dropdown, select your preferred level of logging (Verbose, Warning, None).
- Disallow Functional Cookies: Functional cookies are used to enhance the usability and performance of a site or an app. For more details, see cookie preferences.
- Disallow Targeting Cookies: Targeting cookies are used to enable advertising, retargeting, and marketing personalization. For more details, see cookie preferences.
- Use Cookie Storage: Cookie storage for an SDK integration is used to persist key values (such as identifiers or consent state) so the SDK can maintain continuity across pages and sessions.
- Configure the trigger for this GTM tag. The next steps vary depending on whether your site is a multipage application (MPA) or a single page application (SPA):
- Trigger configuration for multipage applications
- Select All Pages from the list.
- Trigger configuration for single page applications
- Select All Pages and History Change from the list.
The Initialization & Log Page View tag should be loaded on all pages. The exact trigger configuration may vary depending on your implementation. If you have questions about the implementation strategy, reach out to your Rokt account manager.
- Enter a descriptive name for your trigger, like All Pages or History Change.
- Add exceptions if necessary.
- Click Save.
As part of the Initialization & Log Page View tag execution, a custom event roktInitComplete will be pushed to the data layer when initialization completes. It is highly recommended to use a GTM Custom Event trigger with event name roktInitComplete for subsequent mParticle by Rokt - Events tags.
Configure the Events TagDirect link to Configure the Events Tag
The mParticle by Rokt - Events tag can:
- Identify users
- Render Rokt placements
- Send user and event attributes to Rokt
Although you can enable multiple actions in a single Events tag, some implementations require one GTM tag per action (for example, one tag for Identity and one tag for Select Placements). If you have questions about the implementation strategy, reach out to your Rokt account manager.
Ensure the Initialization & Log Page View tag runs before any Events tags. Use the roktInitComplete data layer event in your triggers so Events tags fire only after initialization.
Use these steps each time you create a new Events tag (for example, one for Identity and one for Select Placements):
- Click Tags in the left-hand navigation from your container and click New.
- Select Tag Configuration.
- Select Discover more tag types in the Community Template Gallery.
- Search for
Roktand select mParticle by Rokt - Events.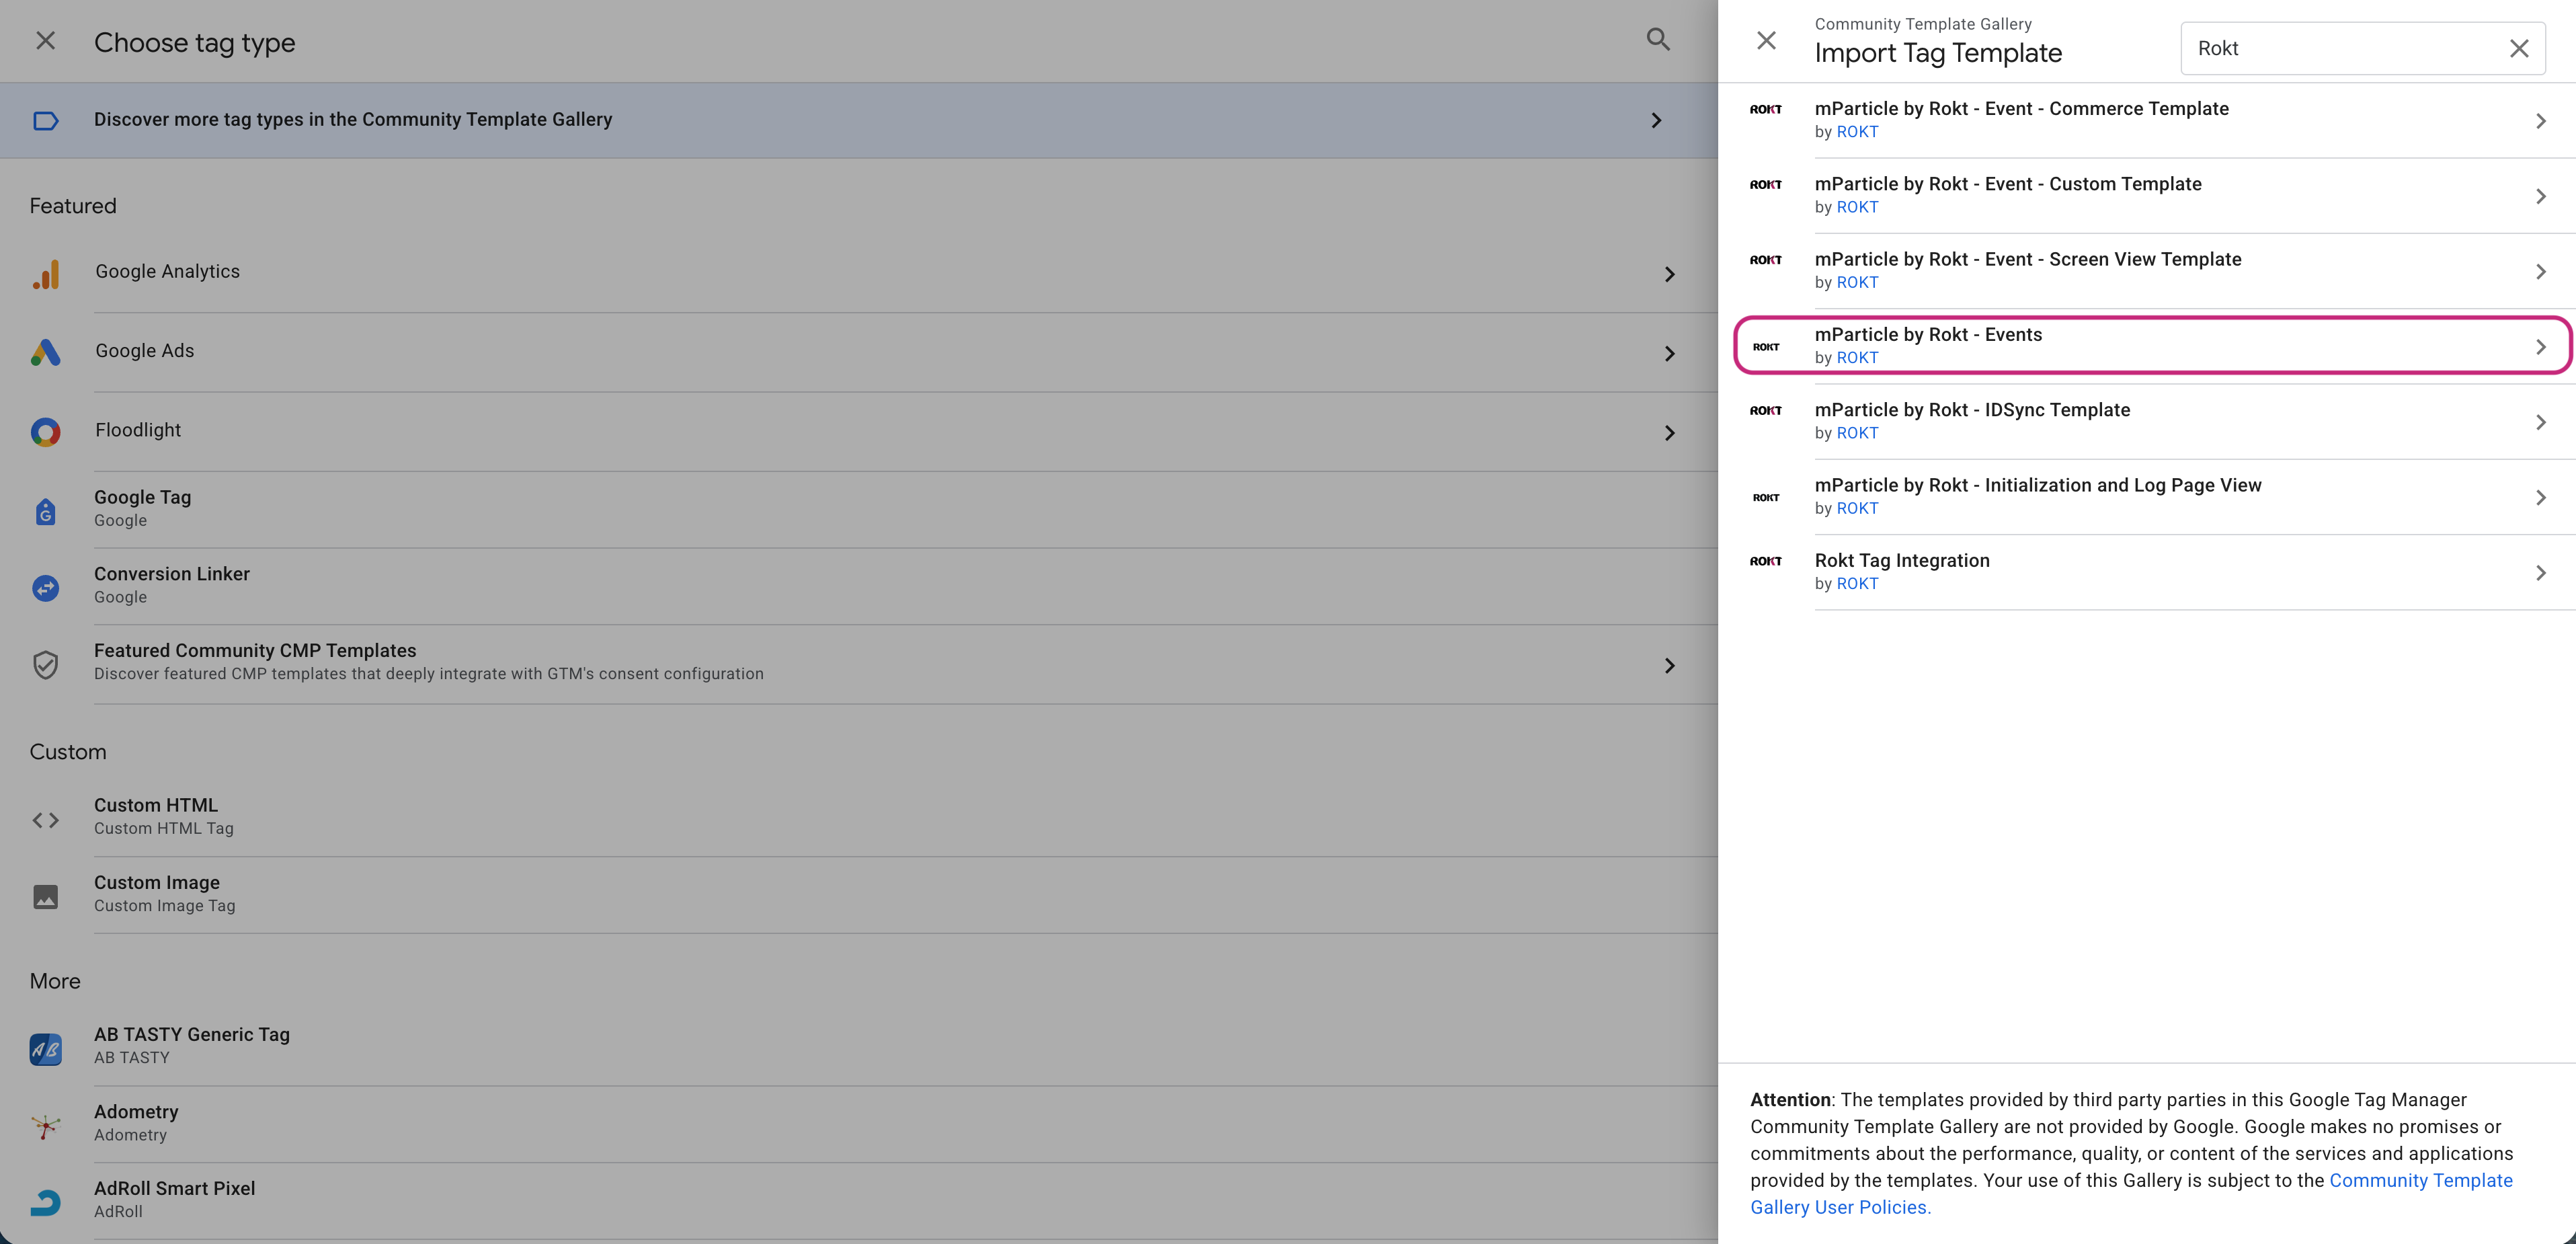
- Enter a descriptive name for your tag (for example,
[Rokt] Identify user,[Rokt] Select placements).
You can enable one or more actions in a single Events tag (Identity, Select Placements, and/or Log Event). Configure all the actions you want for this tag instance first, then click Save when you are finished.
If you need the tag to fire multiple times (for example, once to identify a user and later to render a placement), create multiple GTM tags using the same Events template.
Identify the UserDirect link to Identify the User
Rokt recommends identifying the current user (for example, by email) so offers can be more relevant. Configure this tag to fire as soon as the user's email is available in your data layer.
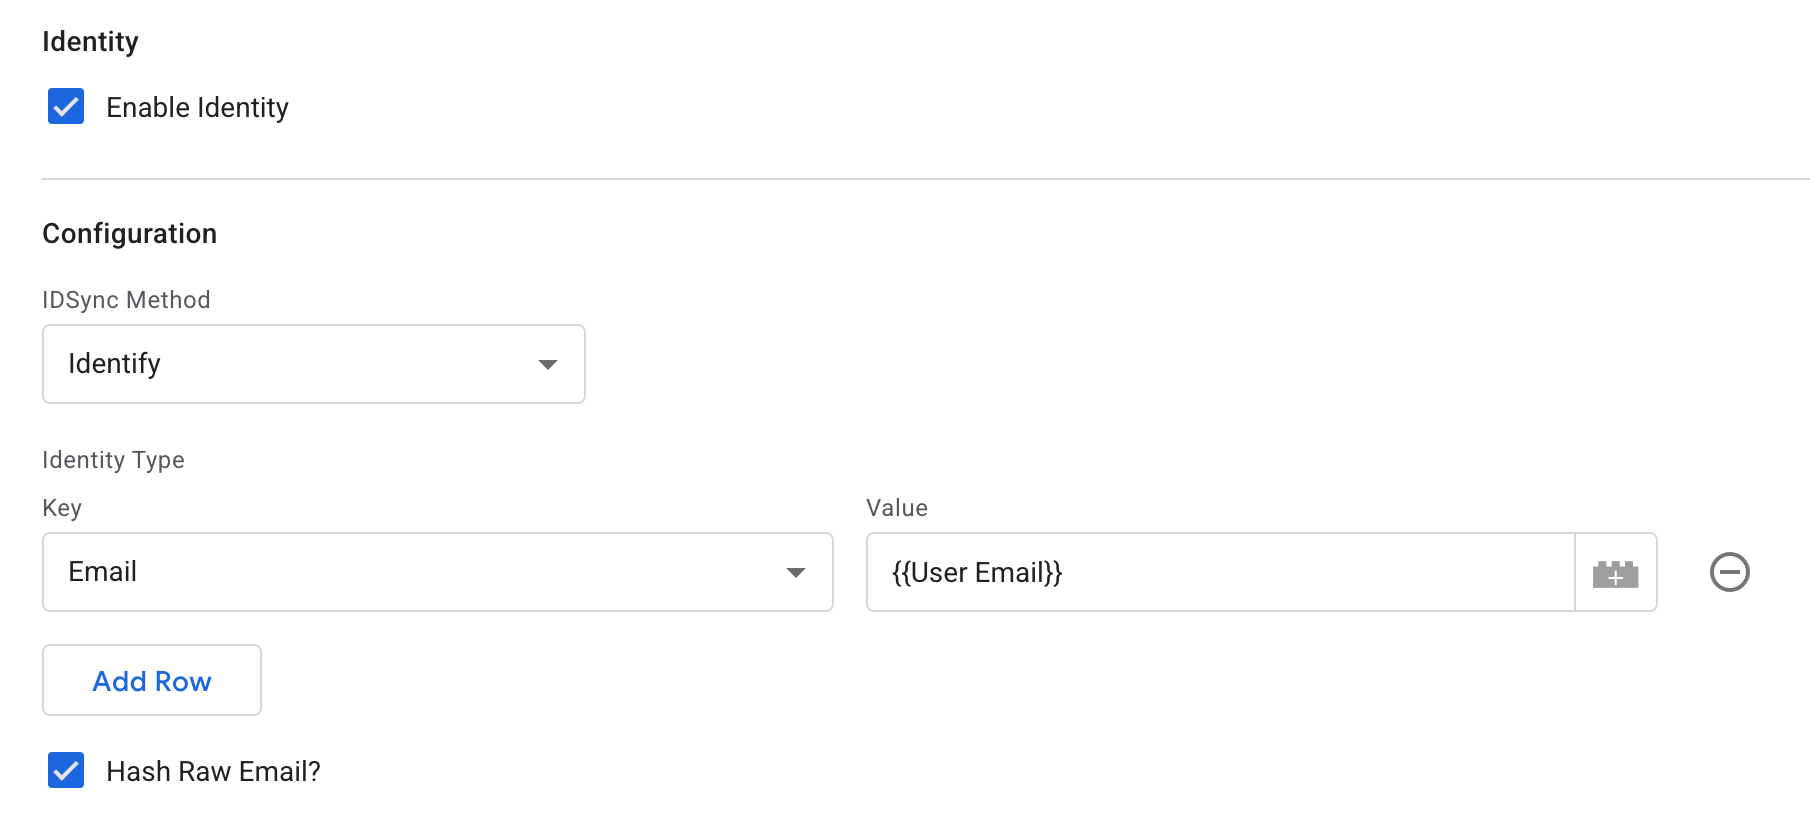
- In the mParticle by Rokt - Events tag, navigate to the Identity section and select Enable Identity.
- Under the IDSync Method dropdown, select Identify.
- Under Identity Type, click Add Row and select your desired identity type:
- If you are sending a raw email address, select
Emailfrom the Key dropdown and enter your GTM variable for raw email.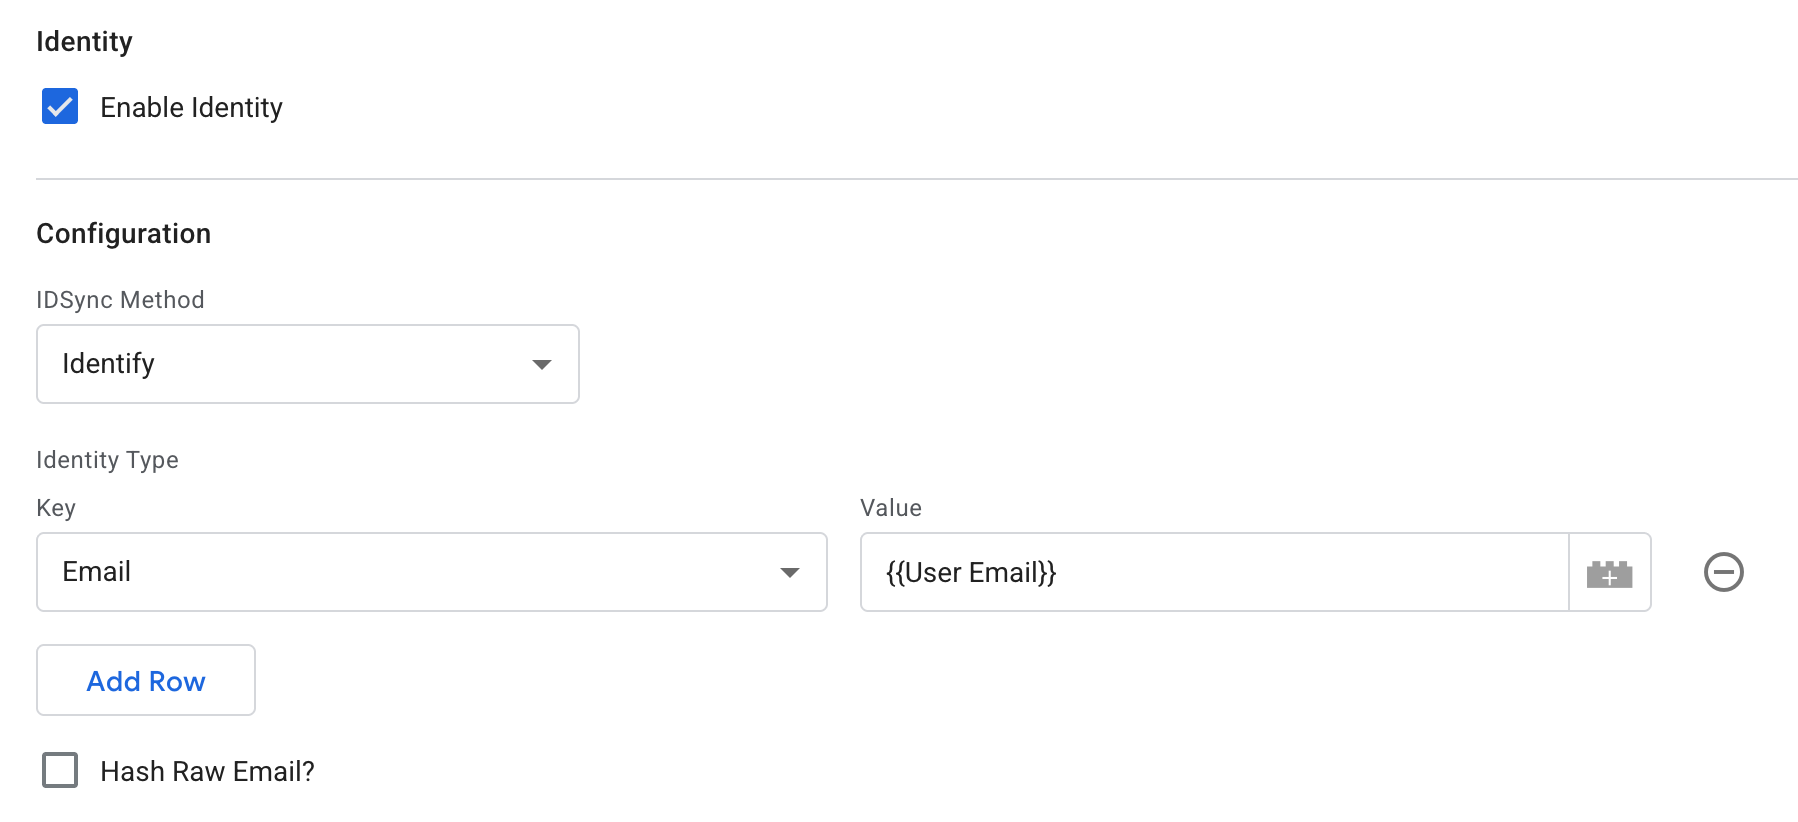
- If you are sending a hashed email value, select
Otherfrom the Key dropdown and enter your GTM variable for hashed email.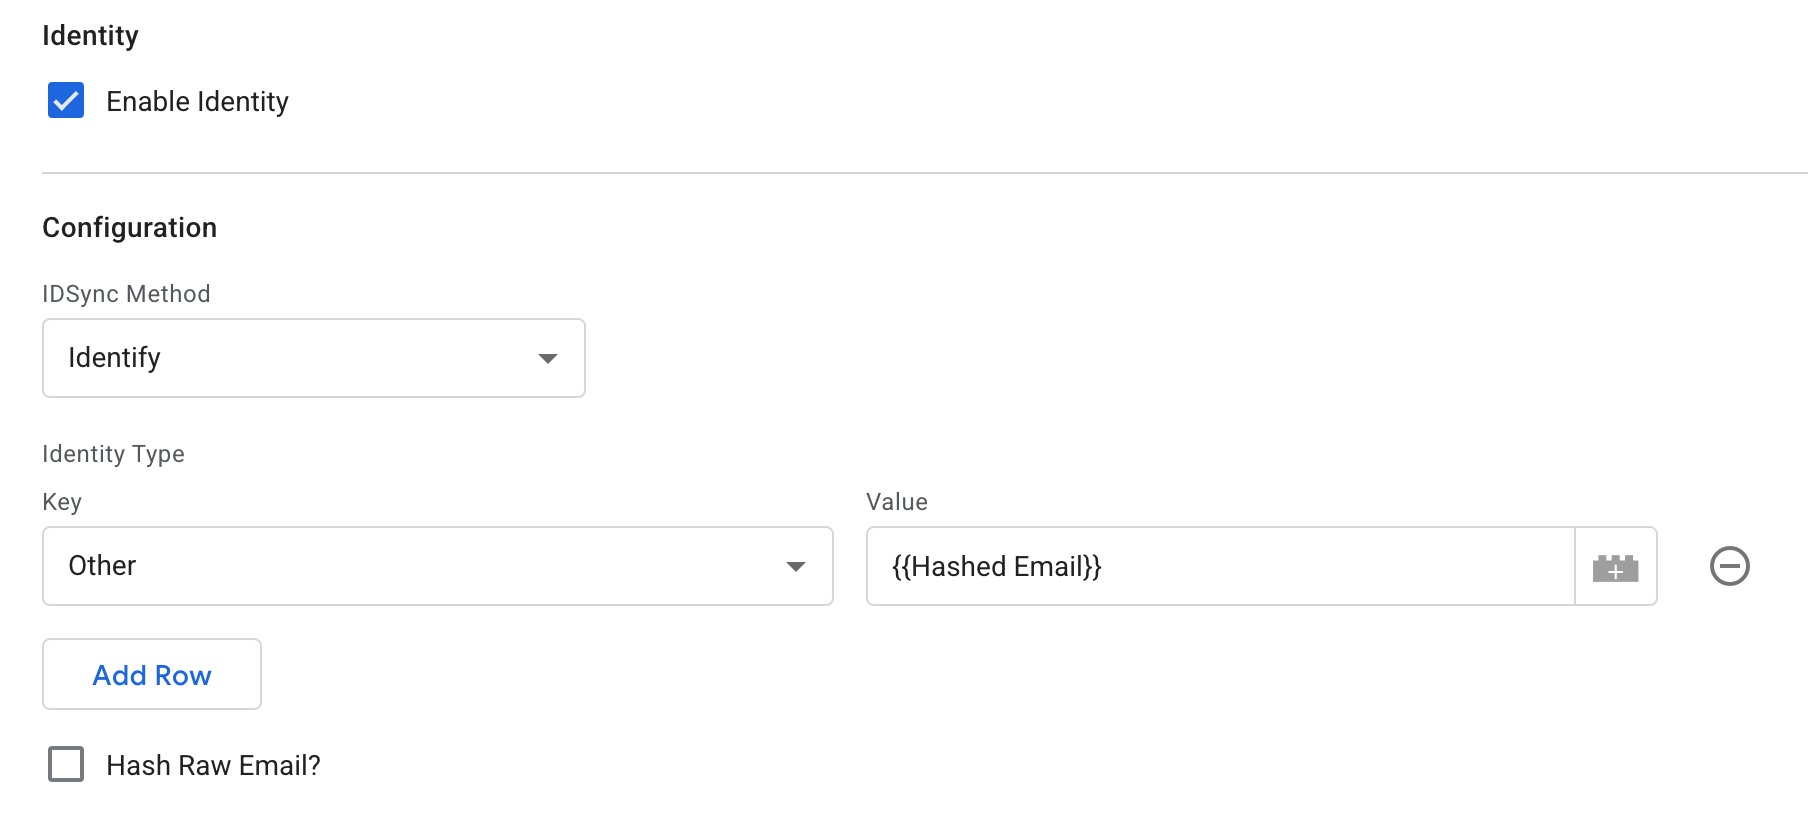
- If you are sending a raw email address, select
- (Optional) Select Hash Raw Email? if you want the tag to hash the raw email value before it is sent to Rokt.
- Configure Triggering so the tag fires only after initialization and only when the email value is available.
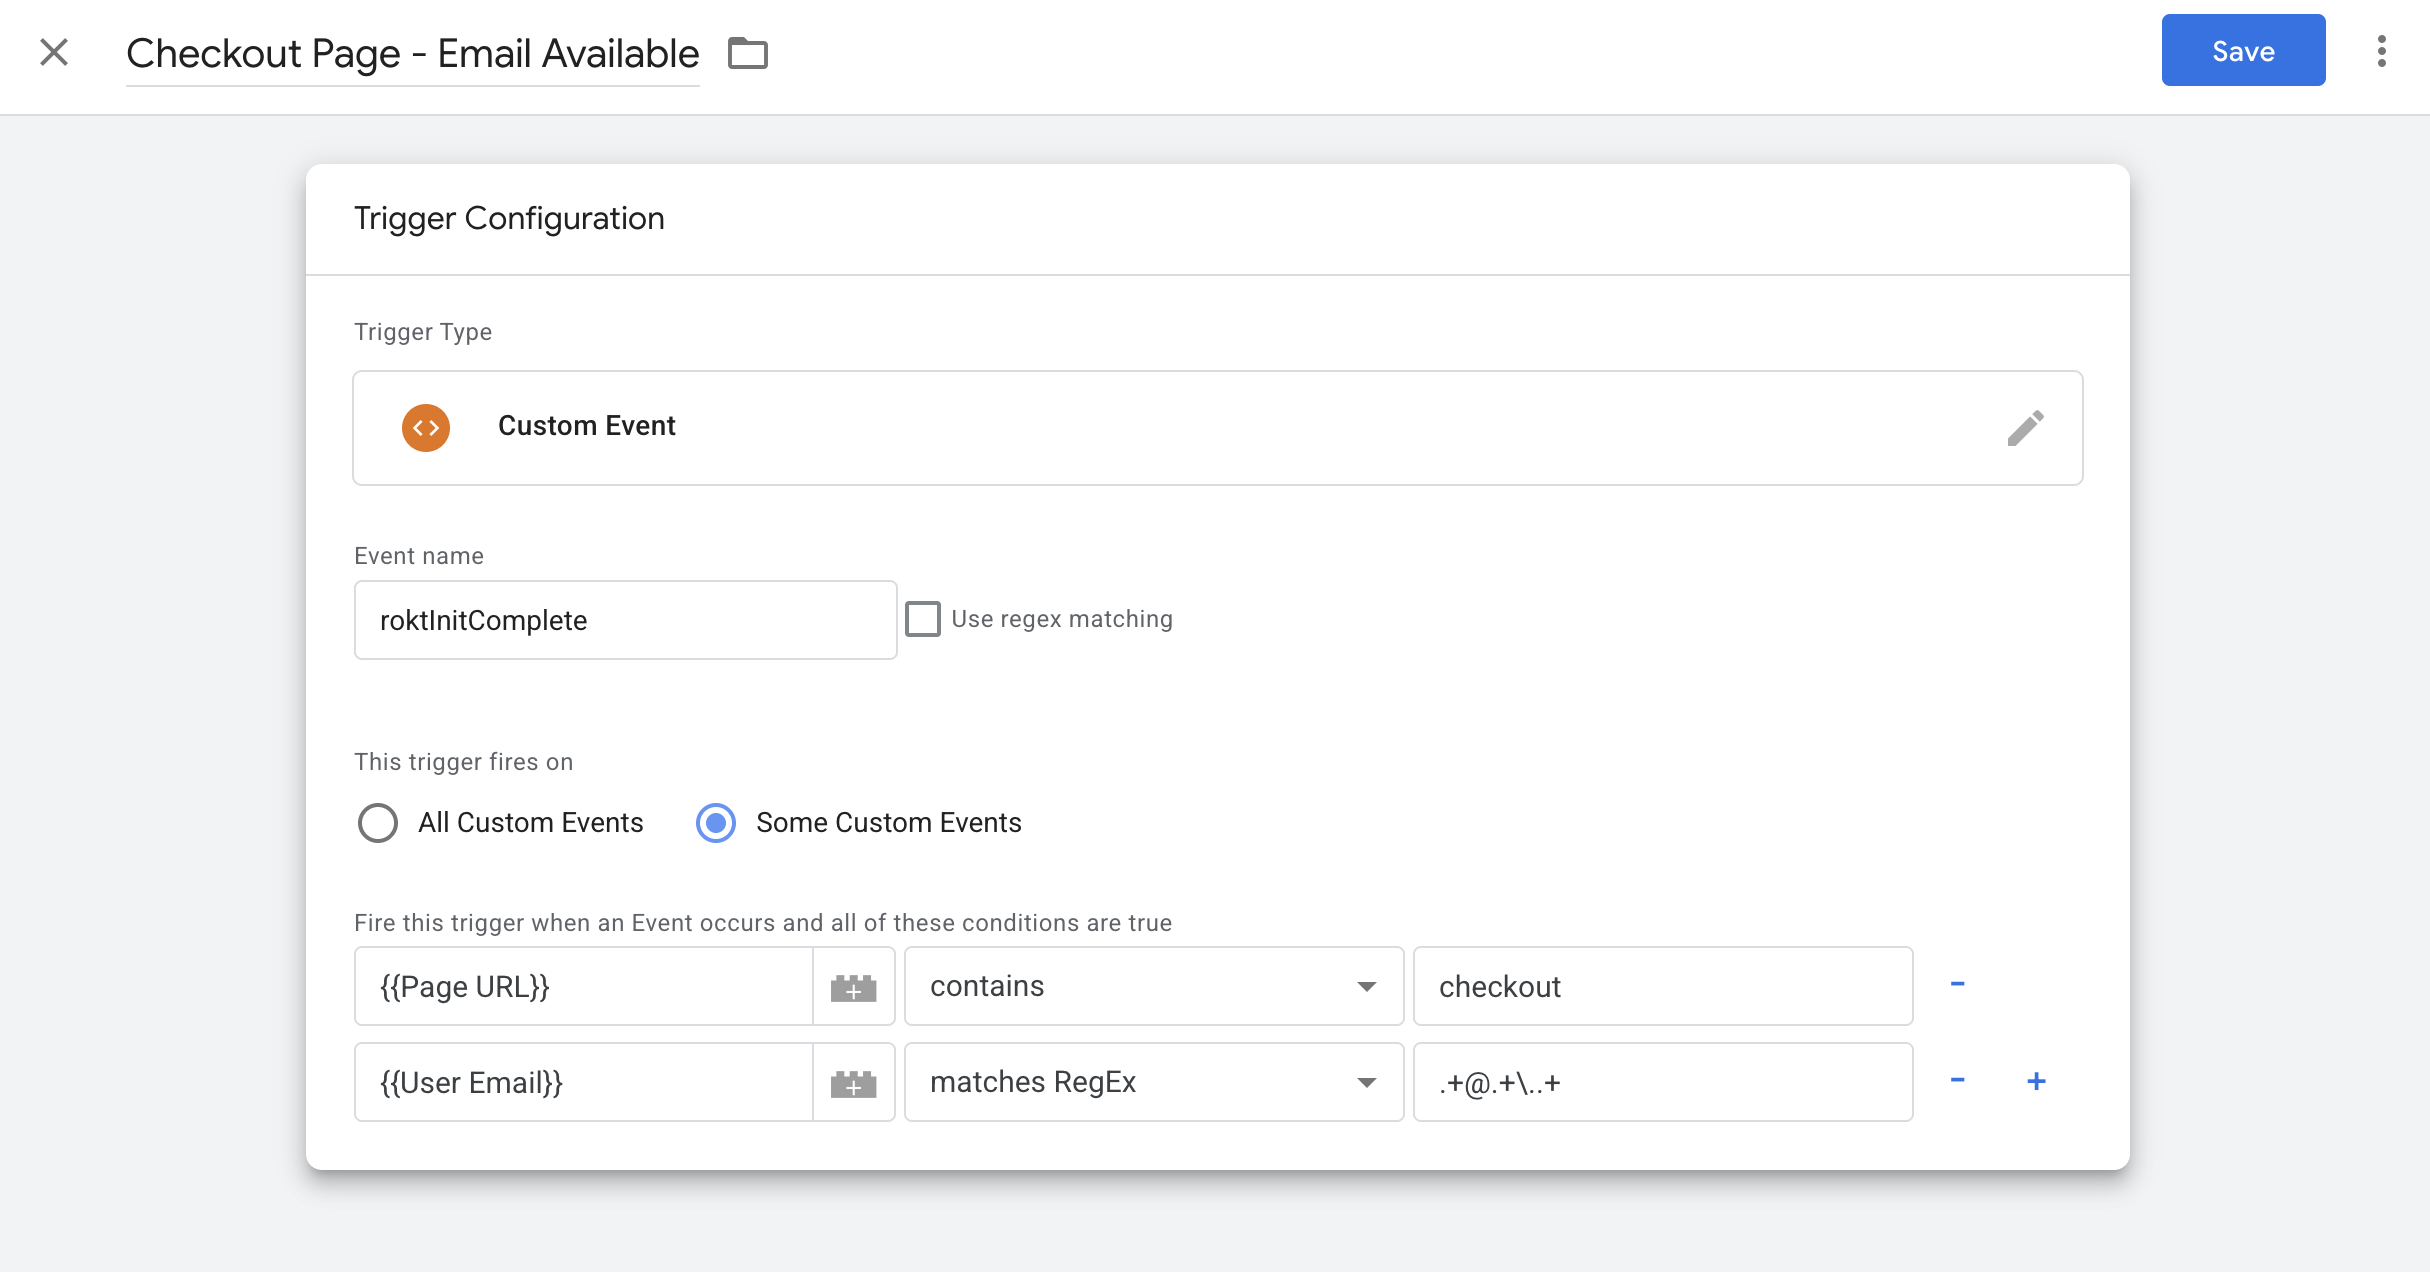
- Example (email is already present on a checkout page load):
- In Triggering, click + to create a new trigger.
- Under Trigger Configuration, select Custom Event.
- Set Event name to
roktInitComplete. - Set the trigger to fire on Some Custom Events.
- Add conditions that match your implementation, for example:
- Page URL contains
checkout {{User Email}}matches RegEx.+@.+\..+
- Page URL contains
- Click Save to save the trigger.
- Example (email is already present on a checkout page load):
 6. When you are done adding actions to this Events tag, click Save.
Insert a PlacementDirect link to Insert a Placement
The main value of the Rokt SDK is unlocked through the selectPlacements method, which serves a placement that is hyper-relevant to your customers based on the attributes you provide. Configure this tag to fire on the page where you want offers to appear (for example, a purchase confirmation or "thank you" page).
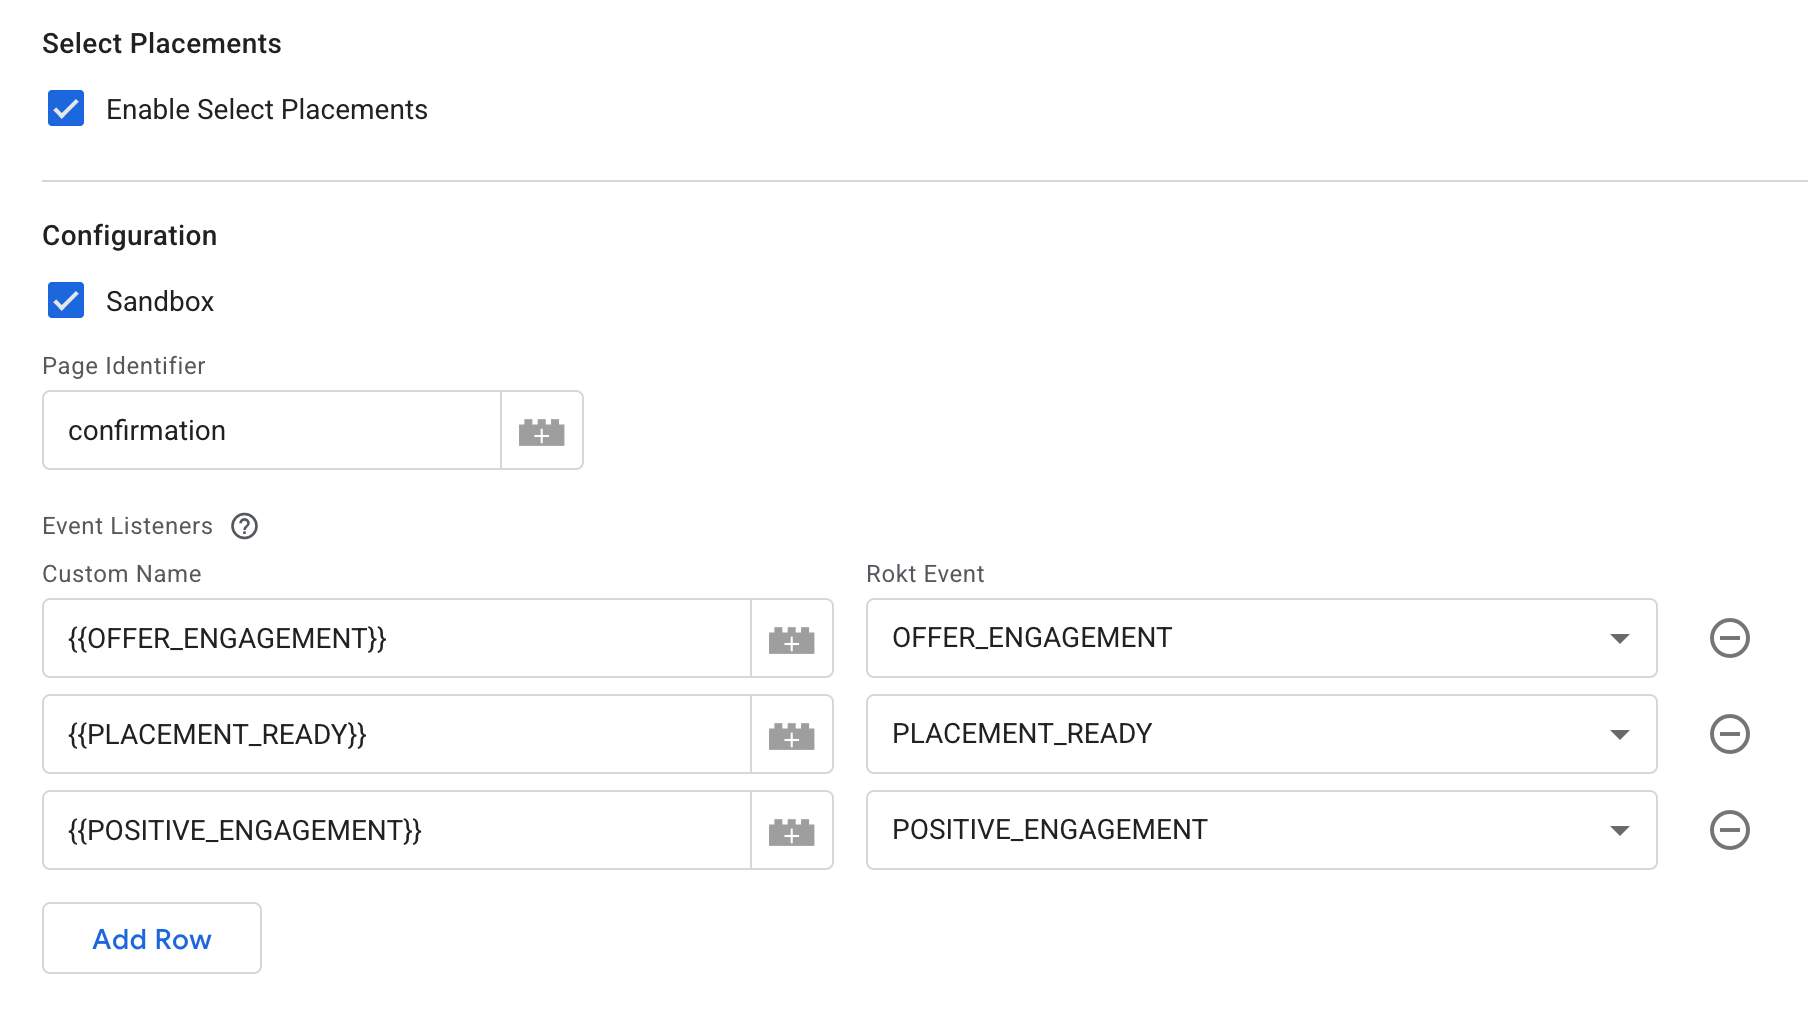
- In the mParticle by Rokt - Events tag, navigate to the Select Placements section and select Enable Select Placements.
- Under Configuration, configure the options you need:
- Enable Sandbox while testing the integration. Disable it when you are ready to go live.
- (Optional) Set a Page Identifier if you need to uniquely identify a page (useful for multi-step checkout flows that reuse the same URL). If you decide to integrate a Page Identifier, please disclose this to your Rokt account manager. Examples:
stg.rokt.conf- A confirmation page in a staging (testing) environmentprod.rokt.conf- A confirmation page in a production environmentstg.rokt.payments- A payments page in a staging (testing) environmentprod.rokt.payments- A payments page in a production environment
- (Optional) The Events tag also allows you to subscribe to placement events, so you can receive notifications for events, such as when a placement is interactive or when a customer engages with an offer. To subscribe:
- Create a new GTM variable for each Rokt event you want to track.
- Map that GTM variable to the corresponding Rokt Event.
- When the Rokt Event is triggered, a new data layer event is pushed with your mapped GTM variable name.
- For examples of different event types, see event-based tracking.
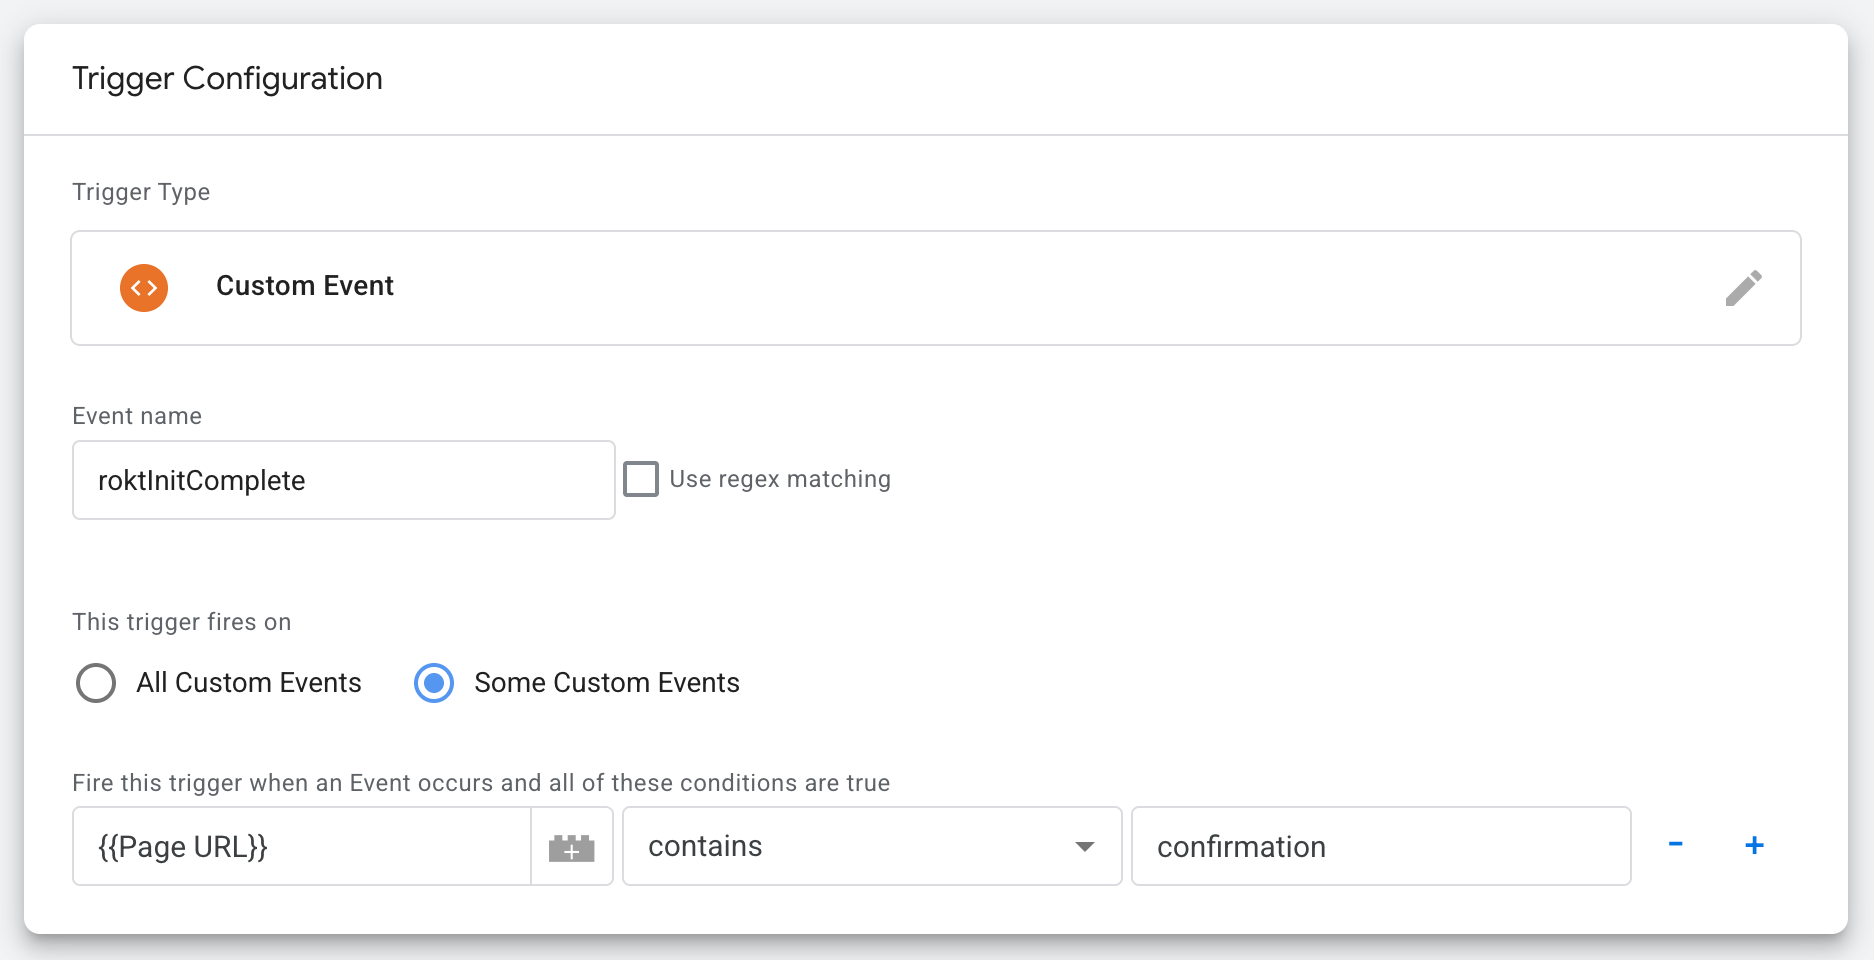
- Configure the trigger for this GTM tag. The next steps vary depending on whether your site is a multipage application (MPA) or a single page application (SPA):
- Trigger configuration for multipage applications
- Select Custom Event from the list.
- Enter
roktInitCompleteas the event name. - Change the trigger firing rules to Some Custom Events.
- Enter the URL parameter(s) that identify each unique page where the tag should fire. For example, if your confirmation page is
example.com/cart/payment/confirmation, the identifying parameter can be any ofcart,payment, orconfirmation.
- Trigger configuration for single page applications
- Select History Change from the list.
- Change the trigger firing rules to Some History Changes.
- Enter the URL parameter that identifies the page where the tag should fire. For example, if your confirmation page is
example.com/cart/payment/confirmation, the identifying parameter can be any ofcart,payment, orconfirmation.
- Click Save to save the trigger.
- When you are done adding actions to this Events tag, click Save.
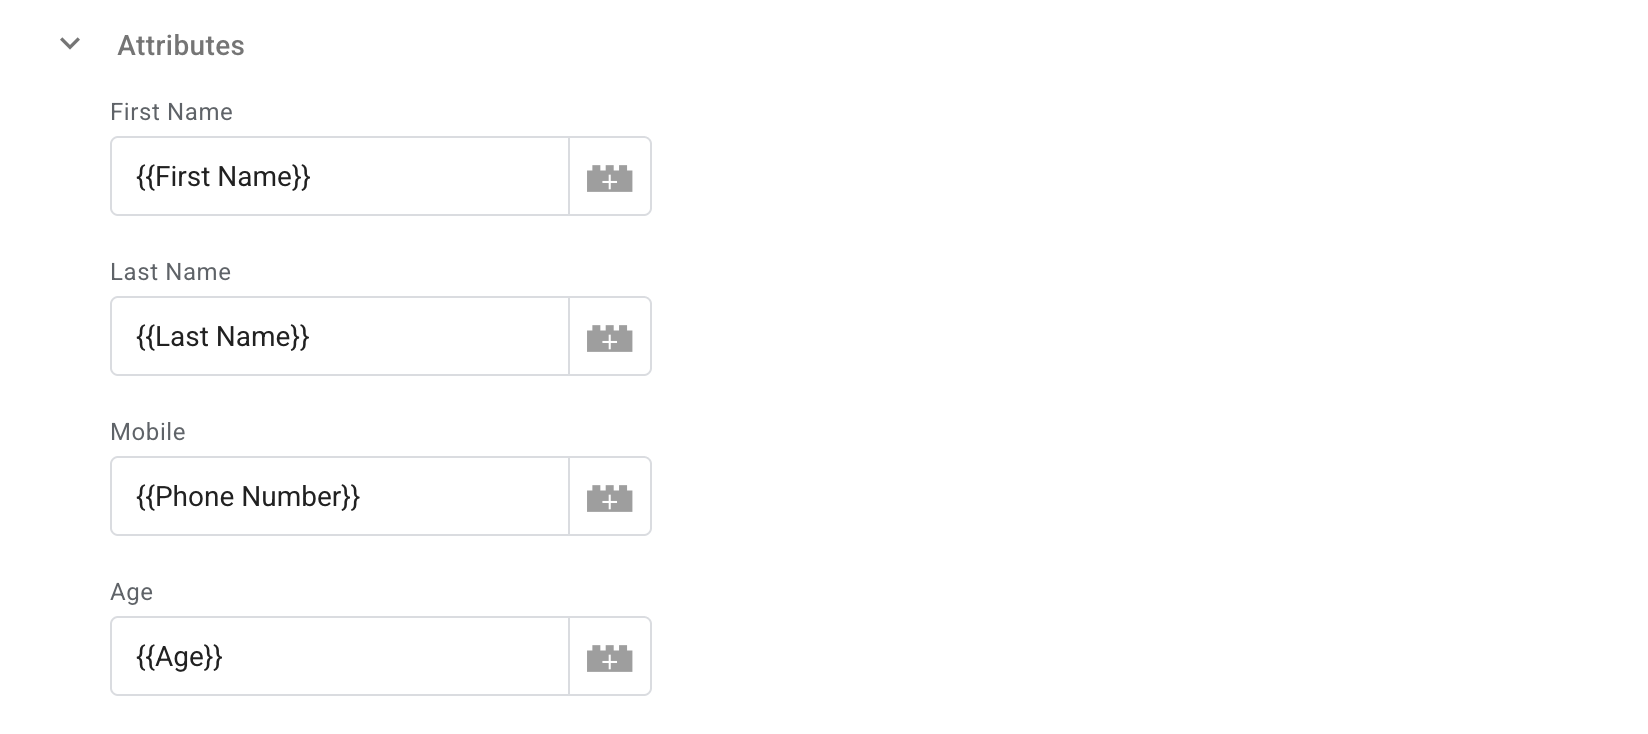
Adding AttributesDirect link to Adding Attributes
Along with identifying a user and rendering placements, Rokt recommends sending additional attributes to improve offer relevance for the user.
- In the mParticle by Rokt - Events tag, navigate to the Attributes section.
- Enter as many attributes as you have available that are related to the user or event. For predefined attributes, Rokt will automatically categorize them as a user attribute or an event attribute, as shown below.
Predefined AttributesDirect link to Predefined Attributes
| Attribute Key | Example Value | User Attribute | Notes |
|---|---|---|---|
| First Name | John | ✓ | The customer's first name. |
| Last Name | Doe | ✓ | The customer's last name. |
| Mobile | 3125551515 | ✓ | Phone numbers can be formatted either as 1112345678 or +1 (222) 345-6789. |
| Age | 33 | ✓ | The customer's age. |
| Date of Birth | 19900717 | ✓ | Date of birth. Formatted as yyyymmdd. |
| Gender | M | ✓ | The customer's gender. For example, M, Male, F, or Female. |
| Payment Type | Credit Card | Payment method used for the transaction. For example, Credit Card, PayPal, Apple Pay. | |
| Confirmation Reference/Transaction ID | ORD-123456 | Unique transaction or confirmation reference ID for the purchase. | |
| Amount | 52.25 | The total transaction amount. | |
| Conversion Type | Purchase | Type of conversion event. For example, Purchase, Signup, Lead. | |
| Passback Conversion Tracking ID | TRACK-789 | Rokt Click ID. | |
| Address Line 1 | 123 Main Street | ✓ | The customer's primary address line. |
| Address Line 2 | Apt 4B | ✓ | The customer's secondary address line (apartment, suite, etc.). |
| City | Brooklyn | ✓ | The customer's city. |
| State | NY | ✓ | The customer's state or province. |
| ZIP Code | 11201 | ✓ | The customer's ZIP or postal code. |
| Country | US | ✓ | The customer's country. |
| Title | Mr | ✓ | The customer's title. For example, Mr, Mrs, Ms, Dr. |
| Language | en | ✓ | Language associated with the customer or purchase. |
Please confirm the attributes with your Rokt account manager before you complete the integration.
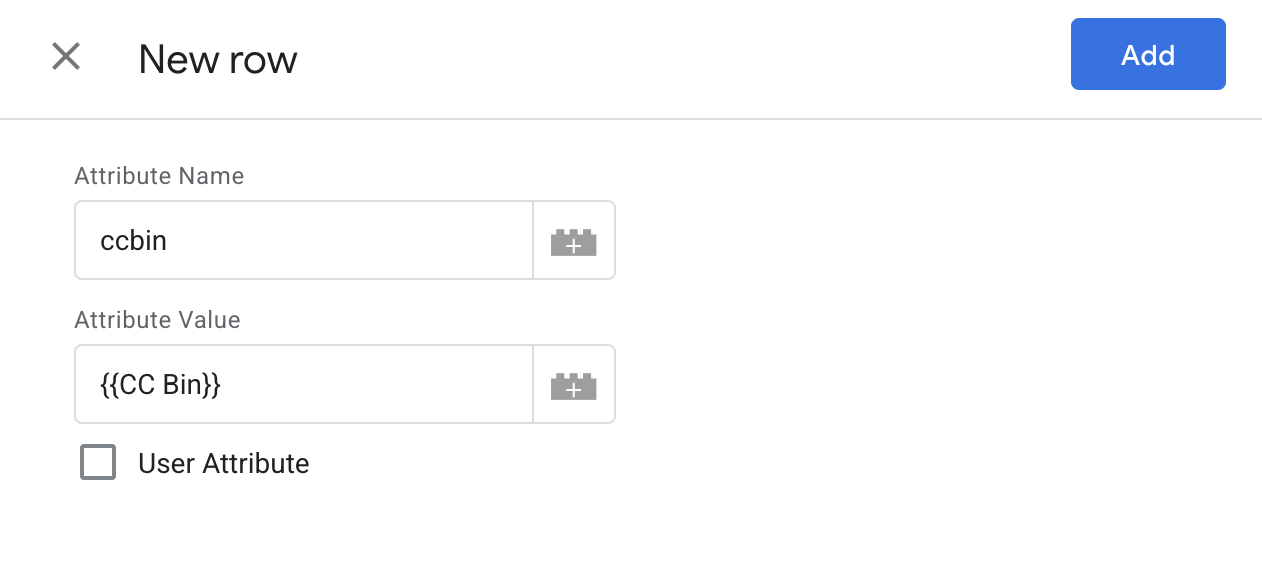
- If there are additional attributes you want to send that aren't already defined, click Add Row under Custom Attributes.
- Enter the attribute name and value under Attribute Name and Attribute Value.
- If the attribute is related to the user (not the Show Placement event), select User Attribute.
- When you are done adding actions to this Events tag, click Save.