Web SDK Integration Guide
This page explains how to implement the Web SDK for Rokt Ads to connect conversions with your campaigns. By linking conversions to ad engagement, you can achieve more accurate attribution, real-time optimization, and better campaign measurement.
Your dedicated Rokt account manager will assist in configuring your account for the Web SDK. They will provide the required API key and any additional resources needed.
The instructions below will require development resources to complete. If you need further assistance, please contact your Rokt account manager.
Work with your Rokt account manager to first implement the SDK in a development environment. This enables you to thoroughly test and troubleshoot your integration before deploying it in a production environment.
First-Party Domain ConfigurationDirect link to First-Party Domain Configuration
Browsers and ad-blocking tools sometimes block Rokt tags and event collection endpoints. To avoid this and maximize data collection, set up a first-party domain for event collection and use it instead of the default apps-rokt-api.com domain. To prevent this blocked HTTP traffic, create a custom subdomain and point its DNS record to Rokt. This makes it less likely to be blocked because the domain matches the same root domain seen in the address bar.
To learn how to configure a first-party domain for your SDK integration, see First Party Domain Integration.
1. Initialize the Rokt SDKDirect link to 1. Initialize the Rokt SDK
To initialize the SDK, copy and paste the SDK initialization script into your web application. The Rokt web SDK is lightweight (under 30KB)and distributed globally via a CDN.
Every web application is different, but Rokt recommends including the SDK script on every page to ensure users are tracked throughout the conversion funnel and can be re-targeted if they abandon the sign-up or cart.
- Single-page Applications (SPA): If your website is an SPA, insert the initialization script into the
<head>of the mainindex.htmlpage, or the primary location where the rest of your content is rendered. - Multi-page Applications (MPA): If your website is an MPA and you use a template-base rendering system (most common), place the initialization script in the primary shared layout file. If you don’t use a template-based rendering system, place the script in each HTML file of your website.
Note that although each page may include the script, due to browser caching, the SDK would load from cache by default rather than being loaded upon each page load of your website.
SDK Initialization and Page View EventDirect link to SDK Initialization and Page View Event
<script type="text/javascript">

// Enter your Rokt API key
const API_KEY = "YOUR_API_KEY";

// Enter your custom subdomain if you are using a first-party domain configuration (optional)
const ROKT_DOMAIN = "https://apps.rokt-api.com";

      window.mParticle = {
        config: {
          // Identify the current user:
          // Only include fields that have actual values (not placeholders or null)
          identifyRequest: {
            userIdentities: (function() {
              const identities = {};
              // Fetch user email from your persistence layer (e.g., localStorage, sessionStorage, cookies, or server-side session)
              // If you're using an un-hashed email address, set it in 'email'.
              const email = null; // e.g., localStorage.getItem('userEmail') or sessionStorage.getItem('email') or null
              // If you're using a hashed email address, set it in 'other' instead of `email`.
              // Fetch hashed email from your persistence layer where you store the SHA-256 hashed value; Prior to hashing, lowercase and trim all trailing spaces
              const hashedEmail = null; // e.g., localStorage.getItem('hashedEmail') or null

              if (email) {
                identities.email = email;
              }
              if (hashedEmail) {
                identities.other = hashedEmail;
              }

              // Always return an object (empty if no identities are set)
              return identities;
            })(),
          },
          identityCallback: function (result) {
            if (result.getUser()) {
              const user = result.getUser();
              // Fetch user attributes from your persistence layer (e.g., localStorage, sessionStorage, cookies, or server-side session)
              // Only set attributes when they have actual values (not null or undefined)
              const firstname = null; // e.g., localStorage.getItem('firstName') or sessionStorage.getItem('firstname') or null
              const lastname = null; // e.g., localStorage.getItem('lastName') or sessionStorage.getItem('lastname') or null

              if (firstname) {
                user.setUserAttribute('firstname', firstname);
              }
              if (lastname) {
                user.setUserAttribute('lastname', lastname);
              }
            }
          },
        },
      };


// Load the SDK
(function(e) { window.mParticle = window.mParticle || {}; window.mParticle.EventType = { Unknown: 0, Navigation: 1, Location: 2, Search: 3, Transaction: 4, UserContent: 5, UserPreference: 6, Social: 7, Other: 8, Media: 9 }; window.mParticle.eCommerce = { Cart: {} }; window.mParticle.Identity = {}; window.mParticle.Rokt = {}; window.mParticle.config = window.mParticle.config || {}; window.mParticle.config.rq = []; window.mParticle.config.snippetVersion = 2.8; window.mParticle.ready = function(e) { window.mParticle.config.rq.push(e); }; ["endSession", "logError", "logBaseEvent", "logEvent", "logForm", "logLink", "logPageView", "setSessionAttribute", "setAppName", "setAppVersion", "setOptOut", "setPosition", "startNewSession", "startTrackingLocation", "stopTrackingLocation"].forEach(function(e) { window.mParticle[e] = function() { var t = Array.prototype.slice.call(arguments); t.unshift(e); window.mParticle.config.rq.push(t); }; }); ["setCurrencyCode", "logCheckout"].forEach(function(e) { window.mParticle.eCommerce[e] = function() { var t = Array.prototype.slice.call(arguments); t.unshift("eCommerce." + e); window.mParticle.config.rq.push(t); }; }); ["identify", "login", "logout", "modify"].forEach(function(e) { window.mParticle.Identity[e] = function() { var t = Array.prototype.slice.call(arguments); t.unshift("Identity." + e); window.mParticle.config.rq.push(t); }; }); ["selectPlacements","hashAttributes","hashSha256","setExtensionData","use","getVersion","terminate"].forEach(function(e) { window.mParticle.Rokt[e] = function() { var t = Array.prototype.slice.call(arguments); t.unshift("Rokt." + e); window.mParticle.config.rq.push(t); }; }); var t = window.mParticle.config.isDevelopmentMode ? 1 : 0, n = "?env=" + t, a = window.mParticle.config.dataPlan; if (a) { var o = a.planId, r = a.planVersion; o && (r && (r < 1 || r > 1e3) && (r = null), n += "&plan_id=" + o + (r ? "&plan_version=" + r : "")); } var i = window.mParticle.config.versions, s = []; i && Object.keys(i).forEach(function(e) { s.push(e + "=" + i[e]); }); var c = document.createElement("script"); c.type = "text/javascript"; c.async = !0; window.ROKT_DOMAIN = ROKT_DOMAIN || 'https://apps.rokt-api.com'; mParticle.config.domain = ROKT_DOMAIN.split('//')[1]; c.src = ROKT_DOMAIN + "/js/v2/" + e + "/app.js" + n + "&" + s.join("&"); var l = document.getElementsByTagName("script")[0]; l.parentNode.insertBefore(c, l); })(API_KEY);

// Fire Page View Event once the SDK initializes.
window.mParticle.ready(function () {
        mParticle.logPageView(
          // Event name: "page view" identifies the type of event being logged
          "page view",
          {
            // Capture the last segment of the URL path as the screen name,
            // e.g., "/products/shoes" → "shoes". Defaults to "home" if the path is empty.
            screen_name:
              location.pathname.split("/").filter(Boolean).pop() || "home",

            // Record the full URL of the current page (including protocol, path, query, and hash)
            url: window.location.toString(),

            // Capture the URL of the page that referred the user to this one,
            // if available. This helps track user navigation between pages or sites.
            "referring-page": document.referrer,
          }
        );
      });

</script>
When adding the initialization script into your site, configure the following settings:
1.1 Enter your Rokt API KeyDirect link to 1.1 Enter your Rokt API Key
Set API_KEY to the Rokt API key provided by your dedicated Rokt account manager.
Your Rokt API Key is a unique credential provided by your Rokt account manager that securely enables your site to connect and interact with the Rokt SDK.
1.2 Enter your custom subdomain (optional)Direct link to 1.2 Enter your custom subdomain (optional)
If you want to route the SDK through your own domain, follow the instructions in First-Party Domain Configuration, and set ROKT_DOMAIN to the subdomain you created.
This step is optional. You can leave ROKT_DOMAIN set to https://apps.rokt-api.com, requests to the Rokt SDK will be routed through apps.rokt-api.com.
1.3 Configure your data environmentDirect link to 1.3 Configure your data environment
Rokt maintains two data environments: Development for labeling and storing data for testing purposes and Production for collecting actual customer activity.
If you are still testing the Rokt SDK, set isDevelopmentMode to true.
If you are done testing and want to begin collecting live customer activity, set isDevelopmentMode to false.
1.4 Identify the userDirect link to 1.4 Identify the user
When the SDK is initialized, it can identify the current user so that any collected data is correctly attributed to them and to ensure they are shown the most relevant ads based on their behavior.
The SDK initialization script includes an object called identifyRequest:
identifyRequest: {
  userIdentities: (function() {
    const identities = {};
    // Fetch user email from your persistence layer (e.g., localStorage, sessionStorage, cookies, or server-side session)
    // If you're using an un-hashed email address, set it in 'email'.
    const email = null; // e.g., localStorage.getItem('userEmail') or sessionStorage.getItem('email') or null
    // If you're using a hashed email address, set it in 'other' instead of `email`.
    // Fetch hashed email from your persistence layer where you store the SHA-256 hashed value ; Prior to hashing, lowercase and trim all trailing spaces
    const hashedEmail = null; // e.g., localStorage.getItem('hashedEmail') or null

    if (email) {
      identities.email = email;
    }
    if (hashedEmail) {
      identities.other = hashedEmail;
    }

    // Always return an object (empty if no identities are set)
    return identities;
  })(),
}
Within identifyRequest, fetch the user's email address from your persistence layer (e.g., localStorage, sessionStorage, cookies, or server-side session). If you're using an un-hashed email address, set it in the email variable. If you're using a hashed email address, set it in the hashedEmail variable, which will be assigned to other.
The code uses a function that conditionally sets identities only when values are available, ensuring that empty or null values are not passed to the SDK.
Always include identifyRequest in the initialization script, even if you don't have the user's email address at the time of initialization.
If you don't have the user's email address, leave the email and hashedEmail variables as null. The SDK will still initialize, and you can identify the user later by following the instructions in the next step.
1.5 Set additional user attributesDirect link to 1.5 Set additional user attributes
The initialization script includes a callback function that allows you to set additional user attributes for the user if they are successfully identified with their email address:
// The identityCallback determines if the identifyRequest was successful.
identityCallback: function(result) {
    if (result.getUser()) {
        // If the user was identified, set additional user attributes with setUserAttribute.
           result.getUser().setUserAttribute("attribute-key", "attribute-value");
    }
}
For a list of attributes Rokt recommends collecting for your users, see Recommended user attributes.
2. Identify the UserDirect link to 2. Identify the User
During initialization, The SDK submits an identifyRequest to Rokt with the user’s email or hashed address to identify the current user, if available.
In addition to identifying the user on initialization, whenever the user provides their email address after the SDK has initialized (for example, when they log in or make a purchase), you should call the identify method to pass their email to Rokt. This ensures that data is correctly attributed to the current user.
To identify the user, first create an identifyRequest object to contain the user's email address. Fetch the email from your persistence layer (e.g., localStorage, sessionStorage, cookies, or server-side session) or from a form submission.
const identifyRequest = {
  userIdentities: (function() {
    const identities = {};
    // Fetch user email from your persistence layer or form submission
    // If you're using an un-hashed email address, set it in 'email'.
    const email = null; // e.g., localStorage.getItem('userEmail') or document.getElementById('emailInput').value or null
    // If you're using a hashed email address, set it in 'other' instead of `email`.
    // Fetch hashed email from your persistence layer where you store the SHA-256 hashed value; Prior to hashing, lowercase and trim all trailing spaces
    const hashedEmail = null; // e.g., localStorage.getItem('hashedEmail') or null

    if (email) {
      identities.email = email;
    }
    if (hashedEmail) {
      identities.other = hashedEmail;
    }

    // Always return an object (empty if no identities are set)
    return identities;
  })(),
};
To hash email address or other attributes, see Hash user attributes.
Next, you have the option of setting additional user attributes when identifying a user by creating a callback function. If the identifyRequest succeeds, then the user attributes you set with setUserAttribute are assigned to the user.
const identityCallback = function (result) {
  if (result.getUser()) {
    result.getUser().setUserAttribute("attribute-key", "attribute-value");
  }
};
For a list of attributes Rokt recommends collecting for your users, see Recommended user attributes.
Finally, after creating your identifyRequest and your identityCallback, to set any additional attributes, call the identify method, passing in the identifyRequest and identityCallback objects you just created:
mParticle.Identity.identify(identifyRequest, identityCallback);
For example, to identify a user named Jane Smith with the email address j.smith@example.com (and you don't need to hash their email address) you would use:
const identifyRequest = {
  userIdentities: {
    email: "j.smith@example.com",
  },
};

const identityCallback = function (result) {
  if (result.getUser()) {
    result.getUser().setUserAttribute("firstname", "Jane");
    result.getUser().setUserAttribute("lastname", "Smith");
  }
};

mParticle.Identity.identify(identifyRequest, identityCallback);
2.1 Hash user attributesDirect link to 2.1 Hash user attributes
If you need to hash user attributes (such as email address) post SDK initialization using SHA-256, use the following methods. The hashing follows Rokt's hashing guidelines.
2.1.1 Hash multiple user attributesDirect link to 2.1.1 Hash multiple user attributes
Use hashAttributes to hash multiple attributes at once. The method returns both the original and hashed versions of each attribute.
mParticle.ready(async function() {
  const hashedAttributes = await mParticle.Rokt.hashAttributes({
    email: 'j.smith@example.com',
    mobile: '3125551515',
  });

  // `hashAttributes` returns:
  // {
  //   email: 'j.smith@example.com',
  //   mobile: '3125551515',
  //   emailsha256: '<sha256 hex>',
  //   mobilesha256: '<sha256 hex>'
  // }

  const identifyRequest = {
    userIdentities: {
      email: 'j.smith@example.com',
      other: hashedAttributes.emailsha256 // hashed copy emailsha256
    }
  };
});
2.1.2 Hash a single user attributeDirect link to 2.1.2 Hash a single user attribute
Use hashSha256 when you need to hash a single attribute. The method returns only the hashed value.
mParticle.ready(async function() {
  const emailSha256 = await mParticle.Rokt.hashSha256('j.smith@example.com');

  const identifyRequest = {
    userIdentities: {
      email: 'j.smith@example.com',
      other: emailSha256
    }
  };
});
3. Set User AttributesDirect link to 3. Set User Attributes
The examples above show how to set user attributes when the user is identified during SDK initialization and when the user is identified after providing their email address.However, after the user has been identified, you can set user attributes at any time.
To set user attributes, run the following:
// To retrieve the current user, call getCurrentUser.
const currentUser = mParticle.Identity.getCurrentUser();

// Once you have successfully set the current user to a const called `currentUser`, you can set user attributes with:
currentUser.setUserAttribute("user-attribute-key", "user-attribute-value");

// To set a list attribute, set the value of the attribute to an array of strings. For example:
currentUser.setUserAttribute("favorite-genres", [
  "documentary",
  "comedy",
  "romance",
  "drama",
]);

// To remove a user attribute, call removeUserAttribute and pass in the attribute name. All user attributes share the same key space.
currentUser.removeUserAttribute("attribute-to-remove");
Recommended user attributesDirect link to Recommended user attributes
Rokt recommends setting as many of the following user attributes as possible:
| User Attribute Key | Example Value | Notes |
|---|---|---|
| firstname | John | The customer's first name. |
| firstnamesha256 | fab1e2e699b3b927cbf875046a64f222 | SHA-256 hash of first name. Prior to hashing, lowercase and trim all trailing spaces. |
| lastname | Doe | The customer's last name. |
| lastnamesha256 | fab1e2e699b3b927cbf875046a64f222 | SHA-256 hash of last name. Prior to hashing, lowercase and trim all trailing spaces. |
| mobile | 3125551515 | Phone numbers can be formatted either as 1112345678 or +1 (222) 345-6789. |
| mobilesha256 | fab1e2e699b3b927cbf875046a64f222 | SHA-256 of mobile number. Note: Mobile number needs to be formatted to this specific format prior to hashing: 5551234567 (not containing dashes or spaces). |
| age | 33 | The customer's age. |
| dob | 19900717 | Date of birth. Formatted as yyyymmdd. |
| gender | M | The customer's gender. For example, M, Male, F, or Female. |
| city | Brooklyn | The customer's city. |
| state | NY | The customer's state. |
| zip | 11201 | The customer's zip code. |
| title | Mr | The customer's title. For example, Mr, Mrs, Ms. |
| language | en | Language associated with the purchase. |
| value | 52.25 | The value of the customer. |
| predictedltv | 136.23 | The total predicted lifetime value of the customer. |
All user attributes (including list attributes and tags) must have distinct names.
4. Track ConversionsDirect link to 4. Track Conversions
To track a conversion, run the following code snippet on the most appropriate page that's loaded after a customer converts, such as a purchase confirmation or "thank you" page.
When pasting the code snippet into your site, make sure to:
-
Replace the sample user attributes in the
.setUserAttributecalls the actual values for your user or customer. Rokt recommends setting at least the following user attributes:firstnamelastnamezipcodemobile
-
Replace the sample conversion event attributes with with actual values from your conversion event.
-
Required conversion attributes.
conversiontypeConversion type indicates what the name of this event is ie signup, purchase etc.confirmationrefConfirmation Reference serves as our deduplication key
When logging a conversion event, you should include as many user attributes and event attributes as possible to improve Rokt's ability to optimize your campaigns.
The conversiontype and confirmationref attributes allow Rokt to optimize your campaign effectively and deduplicate events and conversions appropraitely. These are required launch attributes.
When you initialize the Rokt SDK, it automatically captures the Rokt Click ID and Time on Site. These are included when you log a conversion event.
// Set user attributes before logging the conversion event
currentUser.setUserAttribute("firstname", "John");
currentUser.setUserAttribute("lastname", "Doe");
currentUser.setUserAttribute("zipcode", "98103");
currentUser.setUserAttribute("mobile", "3125551515");

// Log the conversion event
mParticle.logEvent(
  "conversion", // The name of the event
  mParticle.EventType.Transaction, // The event type
  {
    conversiontype: "signup", // Type of conversion
    confirmationref: "54321", // Transaction ID / Order ID
    amount: "300.5", // Transaction amount e.g. 300.5
    currency: "USD", // Transaction currency e.g. USD

    // You can track your own custom event attributes!
    CUSTOM_EVENT_ATTRIBUTE_NAME: "CUSTOM_EVENT_ATTRIBUTE_VALUE",
  }
);
5. Test Your IntegrationDirect link to 5. Test Your Integration
Rokt recommends testing your new integration to ensure the SDK initializes correctly, and that events are logged successfully.
After verifying the following steps to ensure the integration is set up correctly, perform a few test purchases or sign-ups emulating an end-user. Then, provide the email or hashed email you used to the Rokt Account Manager so they can verify that the data is ingested properly into Rokt
If you don't integrate an email or hashed email with Rokt, provide the mPID from your test session. You can get it by typing mParticle.Identity.getCurrentUser().getMPID() into your browser console.
Testing InitializationDirect link to Testing Initialization
-
Open a new browser window.
-
Access your browser's developer tools panel. For most browsers, do this by right-clicking on your screen and selecting Inspect.
-
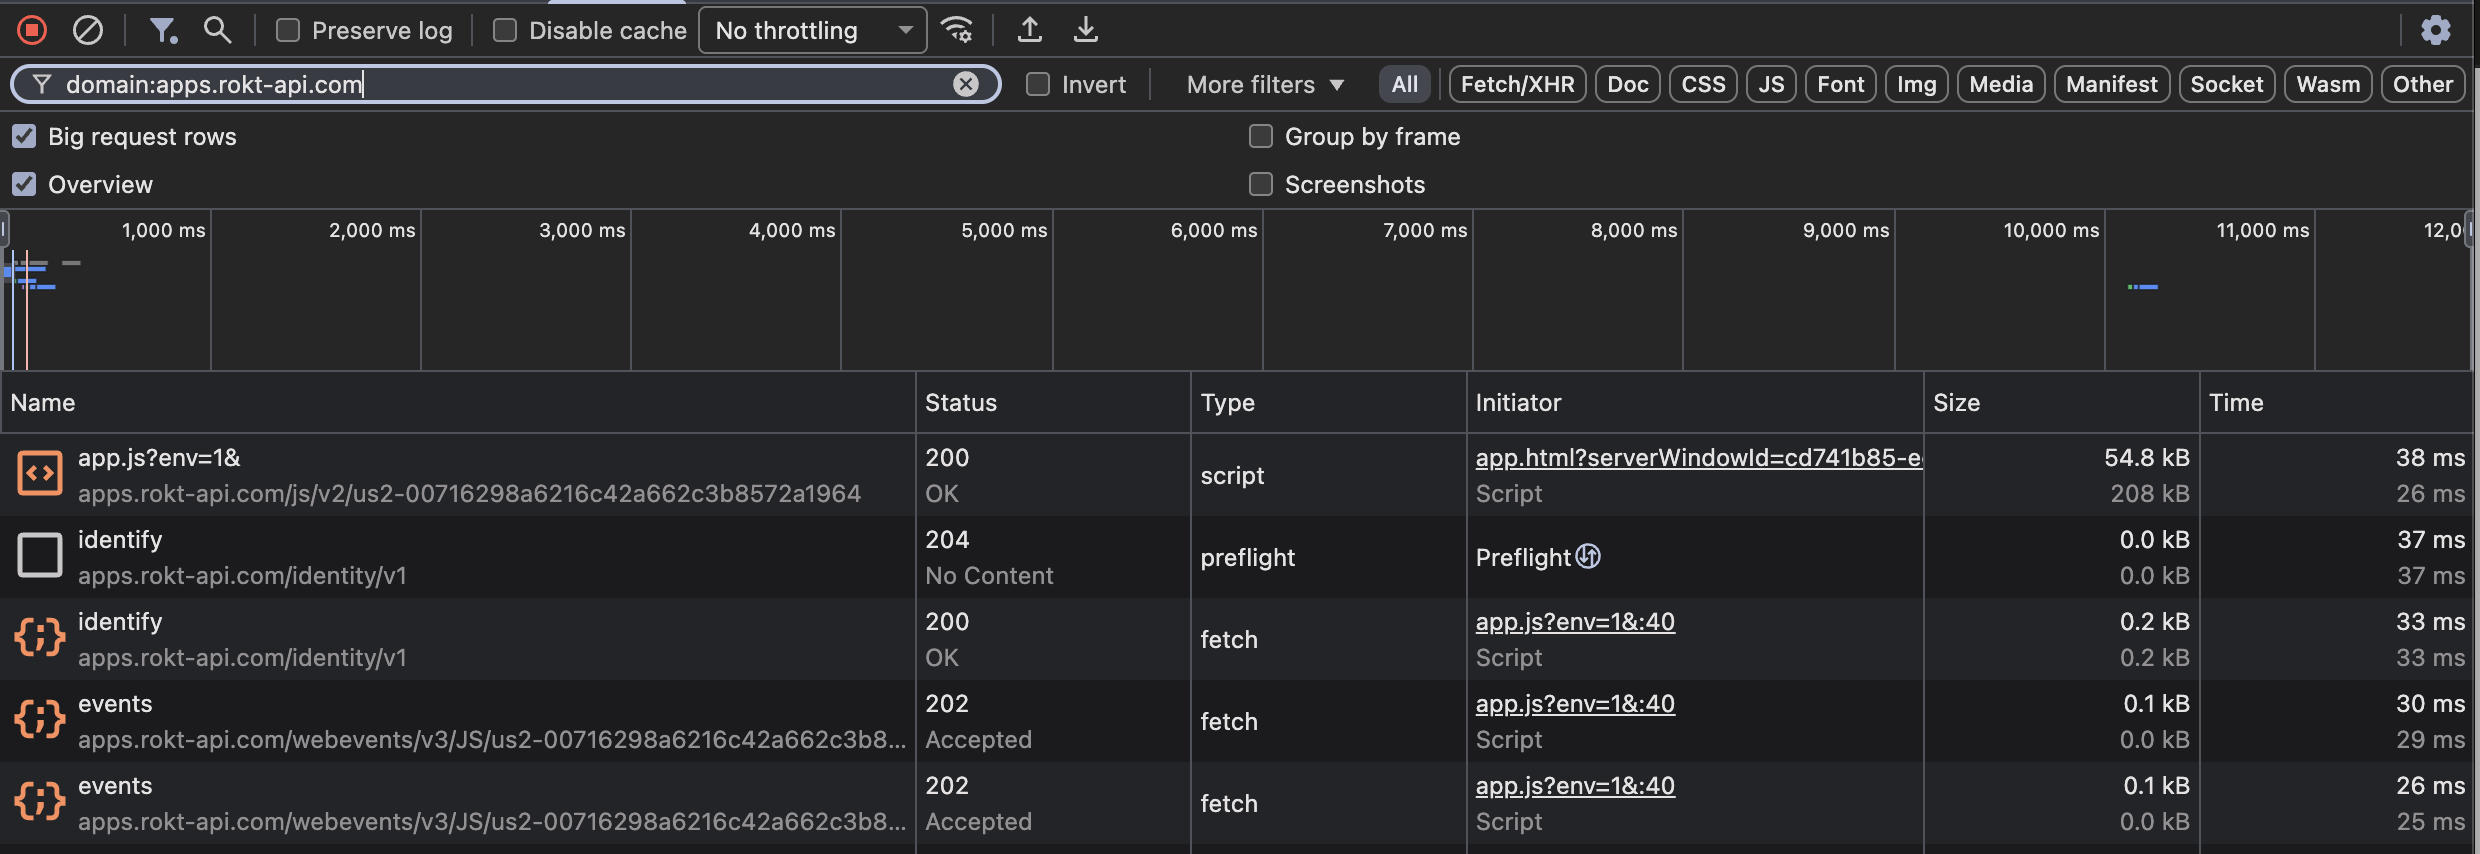
In the developer tools panel, navigate to the Network tab and enter
apps.rokt-api.cominto the filter bar. -
You should see the Rokt JS being loaded, along with API calls that record the initialization.
- Alternatively, you can also type
mParticle.config.appNameinto your browser console, which will echo back the name of your app currently running the SDK, confirming the SDK loaded successfully.
- Alternatively, you can also type
Testing Conversion TrackingDirect link to Testing Conversion Tracking
-
Open a new browser window.
-
Access your browser's developer tools panel. For most browsers, do this by right-clicking on your screen and selecting Inspect.
-
In the developer tools panel, navigate to the Network tab and enter
apps.rokt-api.cominto the filter bar. -
You should see the Rokt JS being loaded, along with API calls that record the initialization.
-
After the initization call, you should see a API call that is records the conversion.

Testing Email and User AttributesDirect link to Testing Email and User Attributes
-
Open a new browser window.
-
Access your browser's developer tools panel. For most browsers, do this by right-clicking on your screen and selecting Inspect.
-
In the developer tools panel, navigate to the Network tab and enter
apps.rokt-api.cominto the filter bar. -
You should see the Rokt JS being loaded, along with API calls that record the initialization.
-
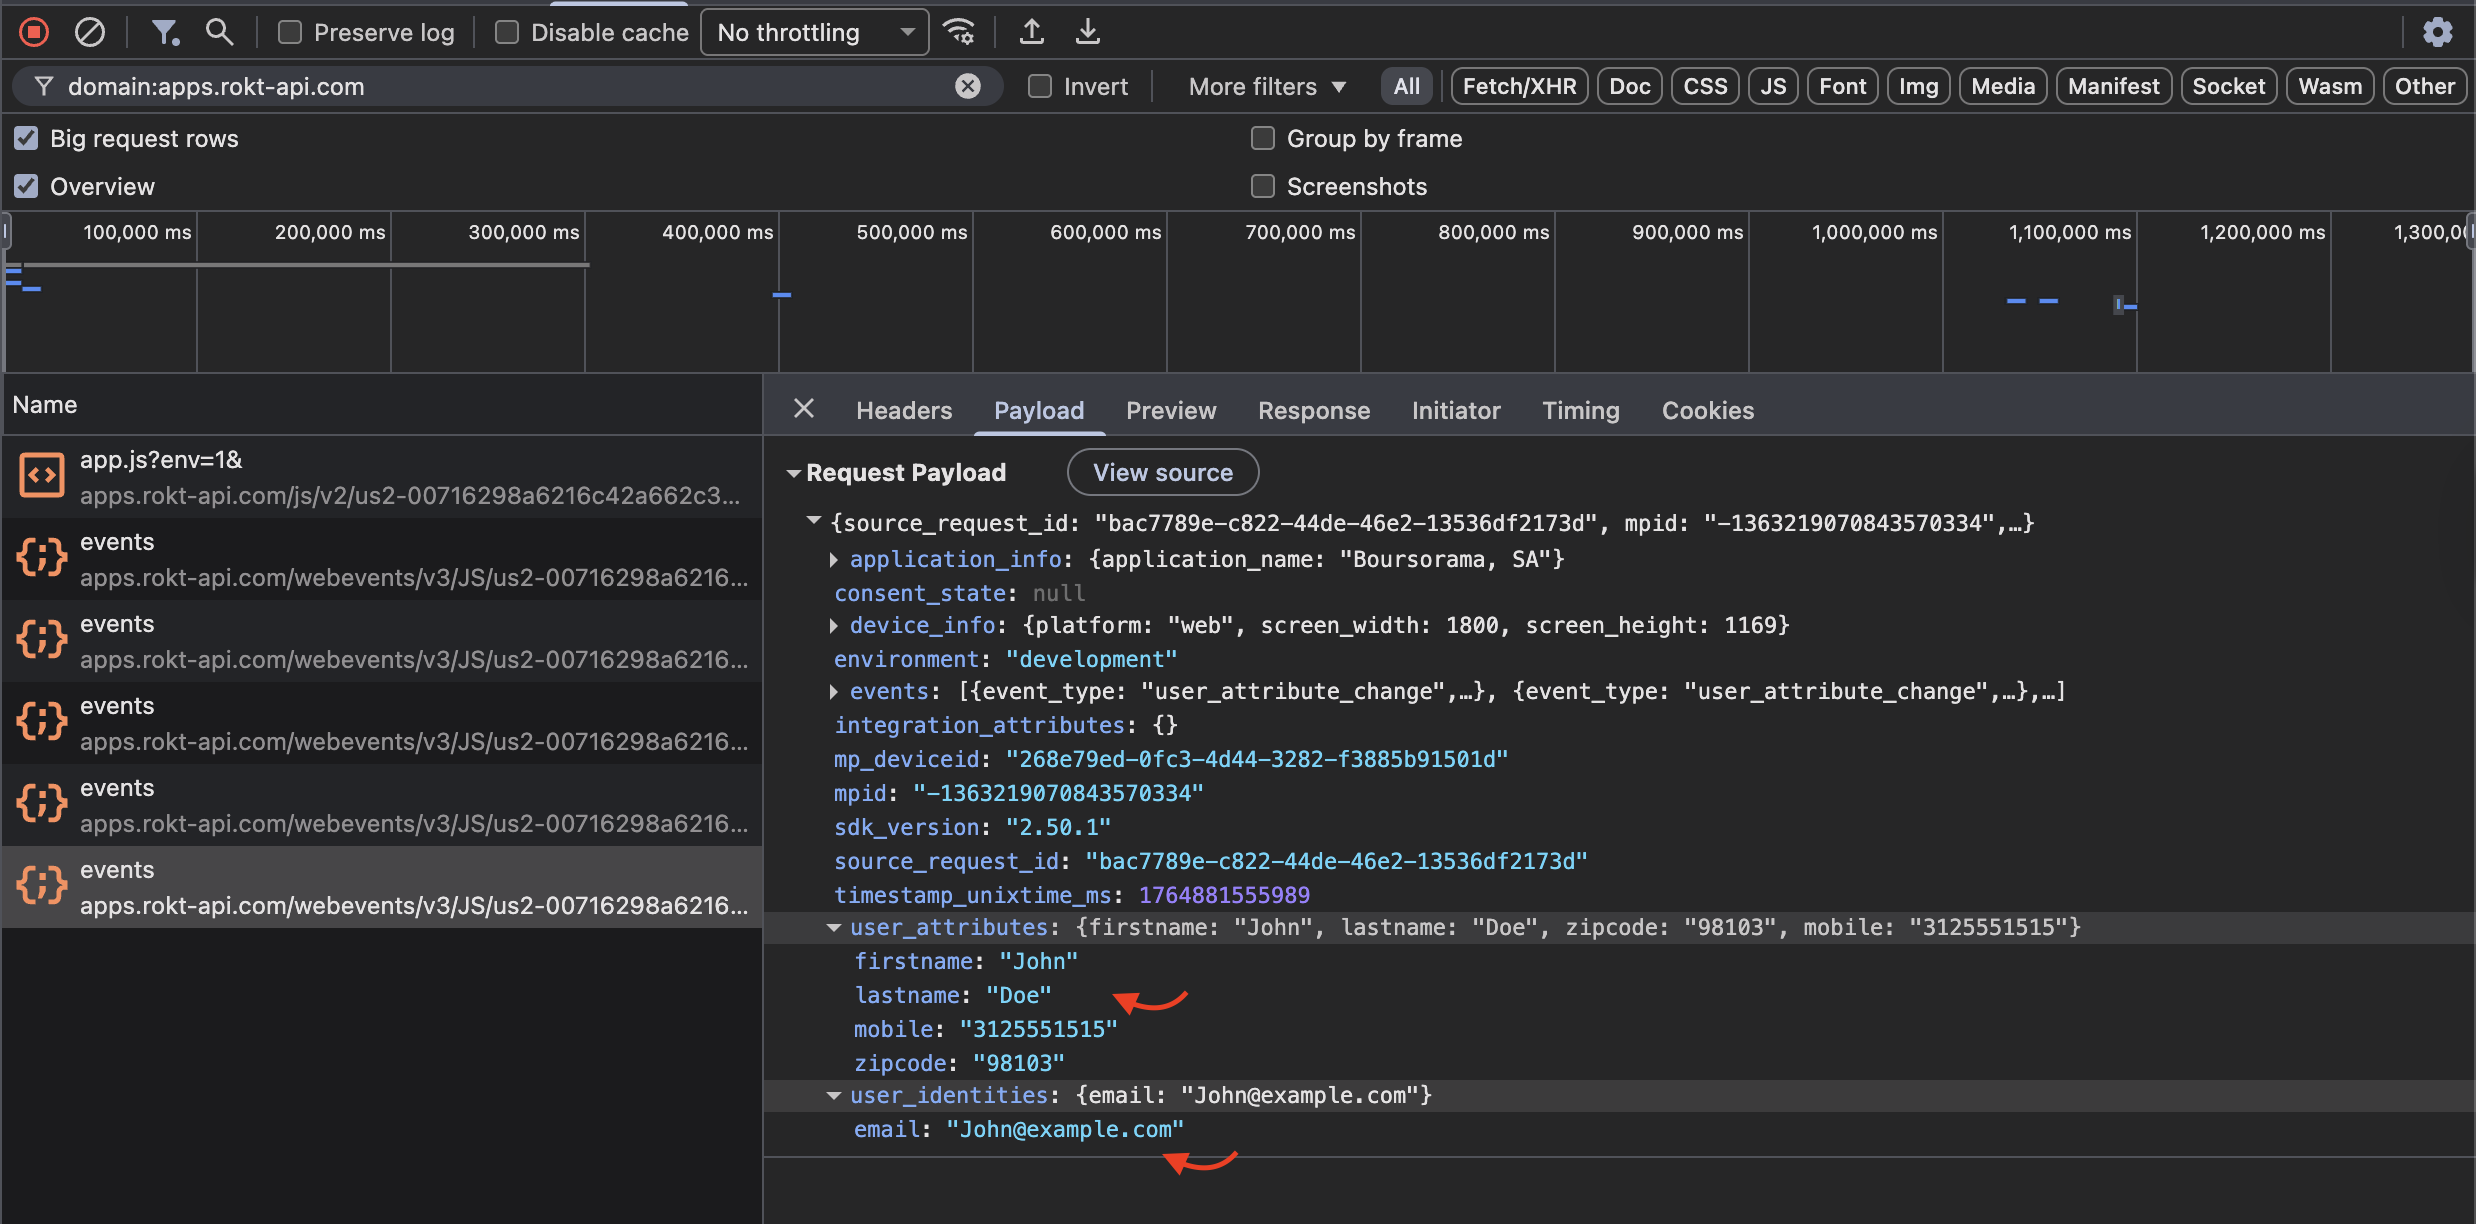
When you set a user email, hashed email in the identity call, or set a user first name, last name, or mobile number, you will see this information included in the API call made to the Rokt server. Alternatively to retrive:
- User Email: Type
mParticle.Identity.getCurrentUser().getUserIdentities()in your browser console, which will return an object with the current user's identity set in the session; no information recorded outside the current session is ever returned. - User Attributes: Type
mParticle.Identity.getCurrentUser().getAllUserAttributes()in your browser console, which will return an object with current users's attributes set in the session; no information recorded outside the current session is ever returned.
- User Email: Type
TroubleshootingDirect link to Troubleshooting
The Rokt Web SDK provides contextual error reporting. If you are having trouble validating your integration, the best way to debug the issue is by using the Console tab in your browser's developer tools panel.
While you may be encountering errors unrelated to the Rokt SDK, some common Rokt SDK errors to check for are:
Syntax errorsDirect link to Syntax errors
Make sure you are not missing any commas in your integration code.
To check for syntax errors:
-
Go to your browser's developer tools panel and select the Console tab.
-
If the file where you placed the Web SDK has an error, it should be logged in the console. Click the file to see the code and reported error.

-
Any error is indicated in the file. In particular, check that all attributes are separated by commas as shown below.
Incorrect:
email: ''
emailsha256: '',
Correct:
email: '',
emailsha256: '',
Initialization errorsDirect link to Initialization errors
- Make sure the SDK initialization script has been placed on the correct page.
- If you integrated using a tag manager, make sure you configured your tag triggers so that initialization loads on the right pages, and that your selectPlacements and conversion logging tags are firing after the SDK has initialized.
AppendixDirect link to Appendix
After implementing placements and page view tracking by following the instructions above, you may want to implement additional event tracking.
Track Custom EventsDirect link to Track Custom Events
You can define and track custom events by calling logEvent and passing in the event name, the event type, and a JSON object containing a list of any custom attributes for the event.
The supported custom event types are:
NavigationLocationSearchTransactionUserContentUserPreferenceSocialOther
The event type is optional; if you omit event type, the event is simply categorized as unknown.
mParticle.logEvent(
  // The event name
  "event-name",
  // The event type
  mParticle.EventType.Other,
  // Include custom event attributes to further describe the event
  {
    "custom-attribute-name": "custom-attribute-value",
  }
);
In addition to tracking custom events and conversion events, following are some examples of commerce events you may want to track. Speak with your account manager for help identifying the best events to track, and how to implement them in your site:
purchase- when a user makes a purchase or transaction.sign_up- when a user signs up or registers for an event or service.first_time_deposit- when a user provides a deposit.subscription_started- when a user starts a subscription.app_install- when a user installs an app.add_payment_info- when a user adds payment details.add_to_cart- when a user adds an item to their cart.add_to_wishlist- when a user adds an item to their wishlist.