Adobe Experience Platform
![]()
Adobe Experience Platform (AEP) is the centralized and connected data foundation that powers customer experience management across Adobe Real-Time CDP, Adobe Customer Journey Analytics, and Adobe Journey Optimizer. Adobe Experience Platform houses a large variety of of products and services that offer clients the ability to manage their performance marketing streams, customer journeys, data collection, tags and analytical workflows.
This guide explains how to set up the Rokt event and audience integrations within AEP so you can send event data and audiences from AEP to Rokt.
- The event integration allows you to send comprehensive conversion data to Rokt, so you can connect marketing activity (like referrals) to valuable outcomes like customer conversions (for example, purchases, subscriptions, or application downloads).
- The audiences integration allows you to send audiences in AEP directly to Rokt to improve your campaign performance through smarter targeting, suppression, and personalization. This helps ensure that your marketing efforts reach the right customers at the right time, all while reducing wasted spend.
Event Integration SetupDirect link to Event Integration Setup
AuthenticationDirect link to Authentication
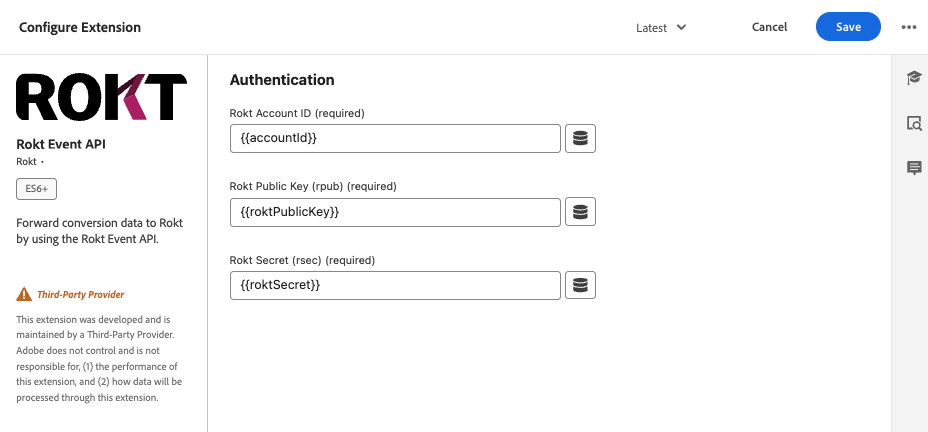
Authenticating with the Rokt Event API Forwarding Extension requires an Rokt Public Key, Rokt Secret and Account ID. Reach out to your Account Manager to get these credentials.
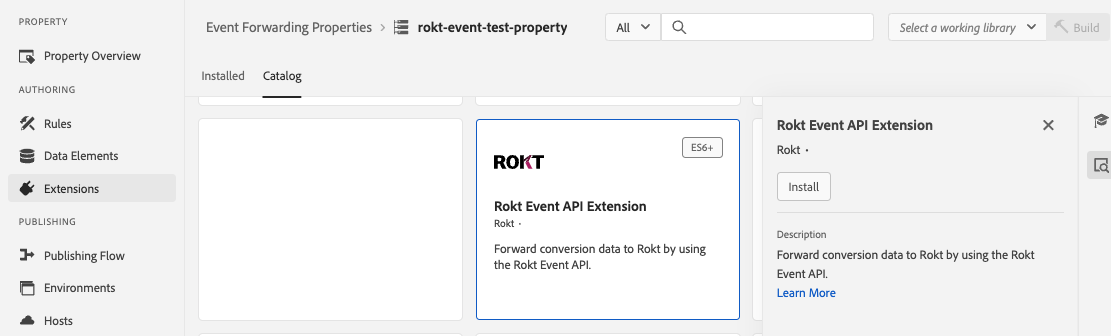
Extension ConfigurationDirect link to Extension Configuration
Extensions provide data element types and rules for you to work with. To install the Rokt Event API - Server-side extension, you must first create an event-forwarding property. To learn more, please refer to the Create an event-forwarding property documentation.
Go to the Event Forwarding tab within Data Collection at https://experience.adobe.com. Search for the Rokt Event API Extension in the extension catalog and click install.
Upon clicking Install, you will be prompted to enter your Rokt Account ID, Rokt Public Key and Rokt Secret. It is recommended that you store these as Secrets and reference them as Data Elements.
Configure your Data ElementsDirect link to Configure your Data Elements
Data elements are an easy way to reference any data that exists elsewhere. They create shortcuts that can be used within rules and extension configurations. When the location of the underlying data changes, they can be updated to point to the new location without having to update individual rules or extensions. Read more about Data Elements
Data Elements can be any of the following:
- Custom Code
- Path to attribute in your arc (Adobe Request Context)
- Secret
- IP
Configure your RuleDirect link to Configure your Rule
Rules are a collection of rule components (events, conditions, and actions) that control the behavior of the deployed server-side event forwarding property. Learn more about Rules.
- Create a new Rule, give it a unique name and add a condition that will trigger your Action.
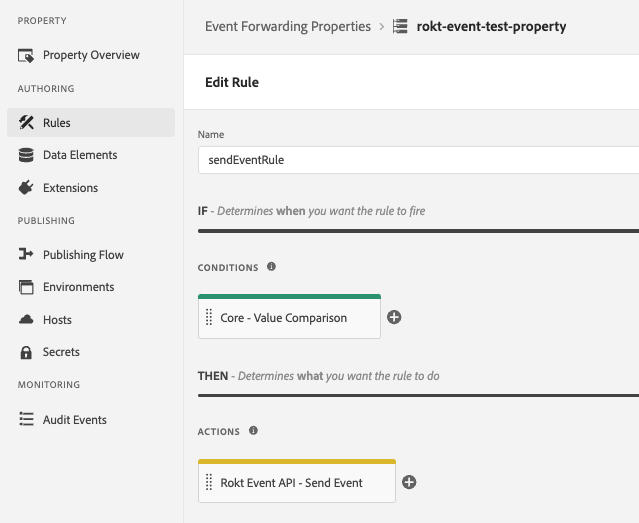
- Configure your action by selecting the Rokt Event API Extension and selecting the Send Event action.
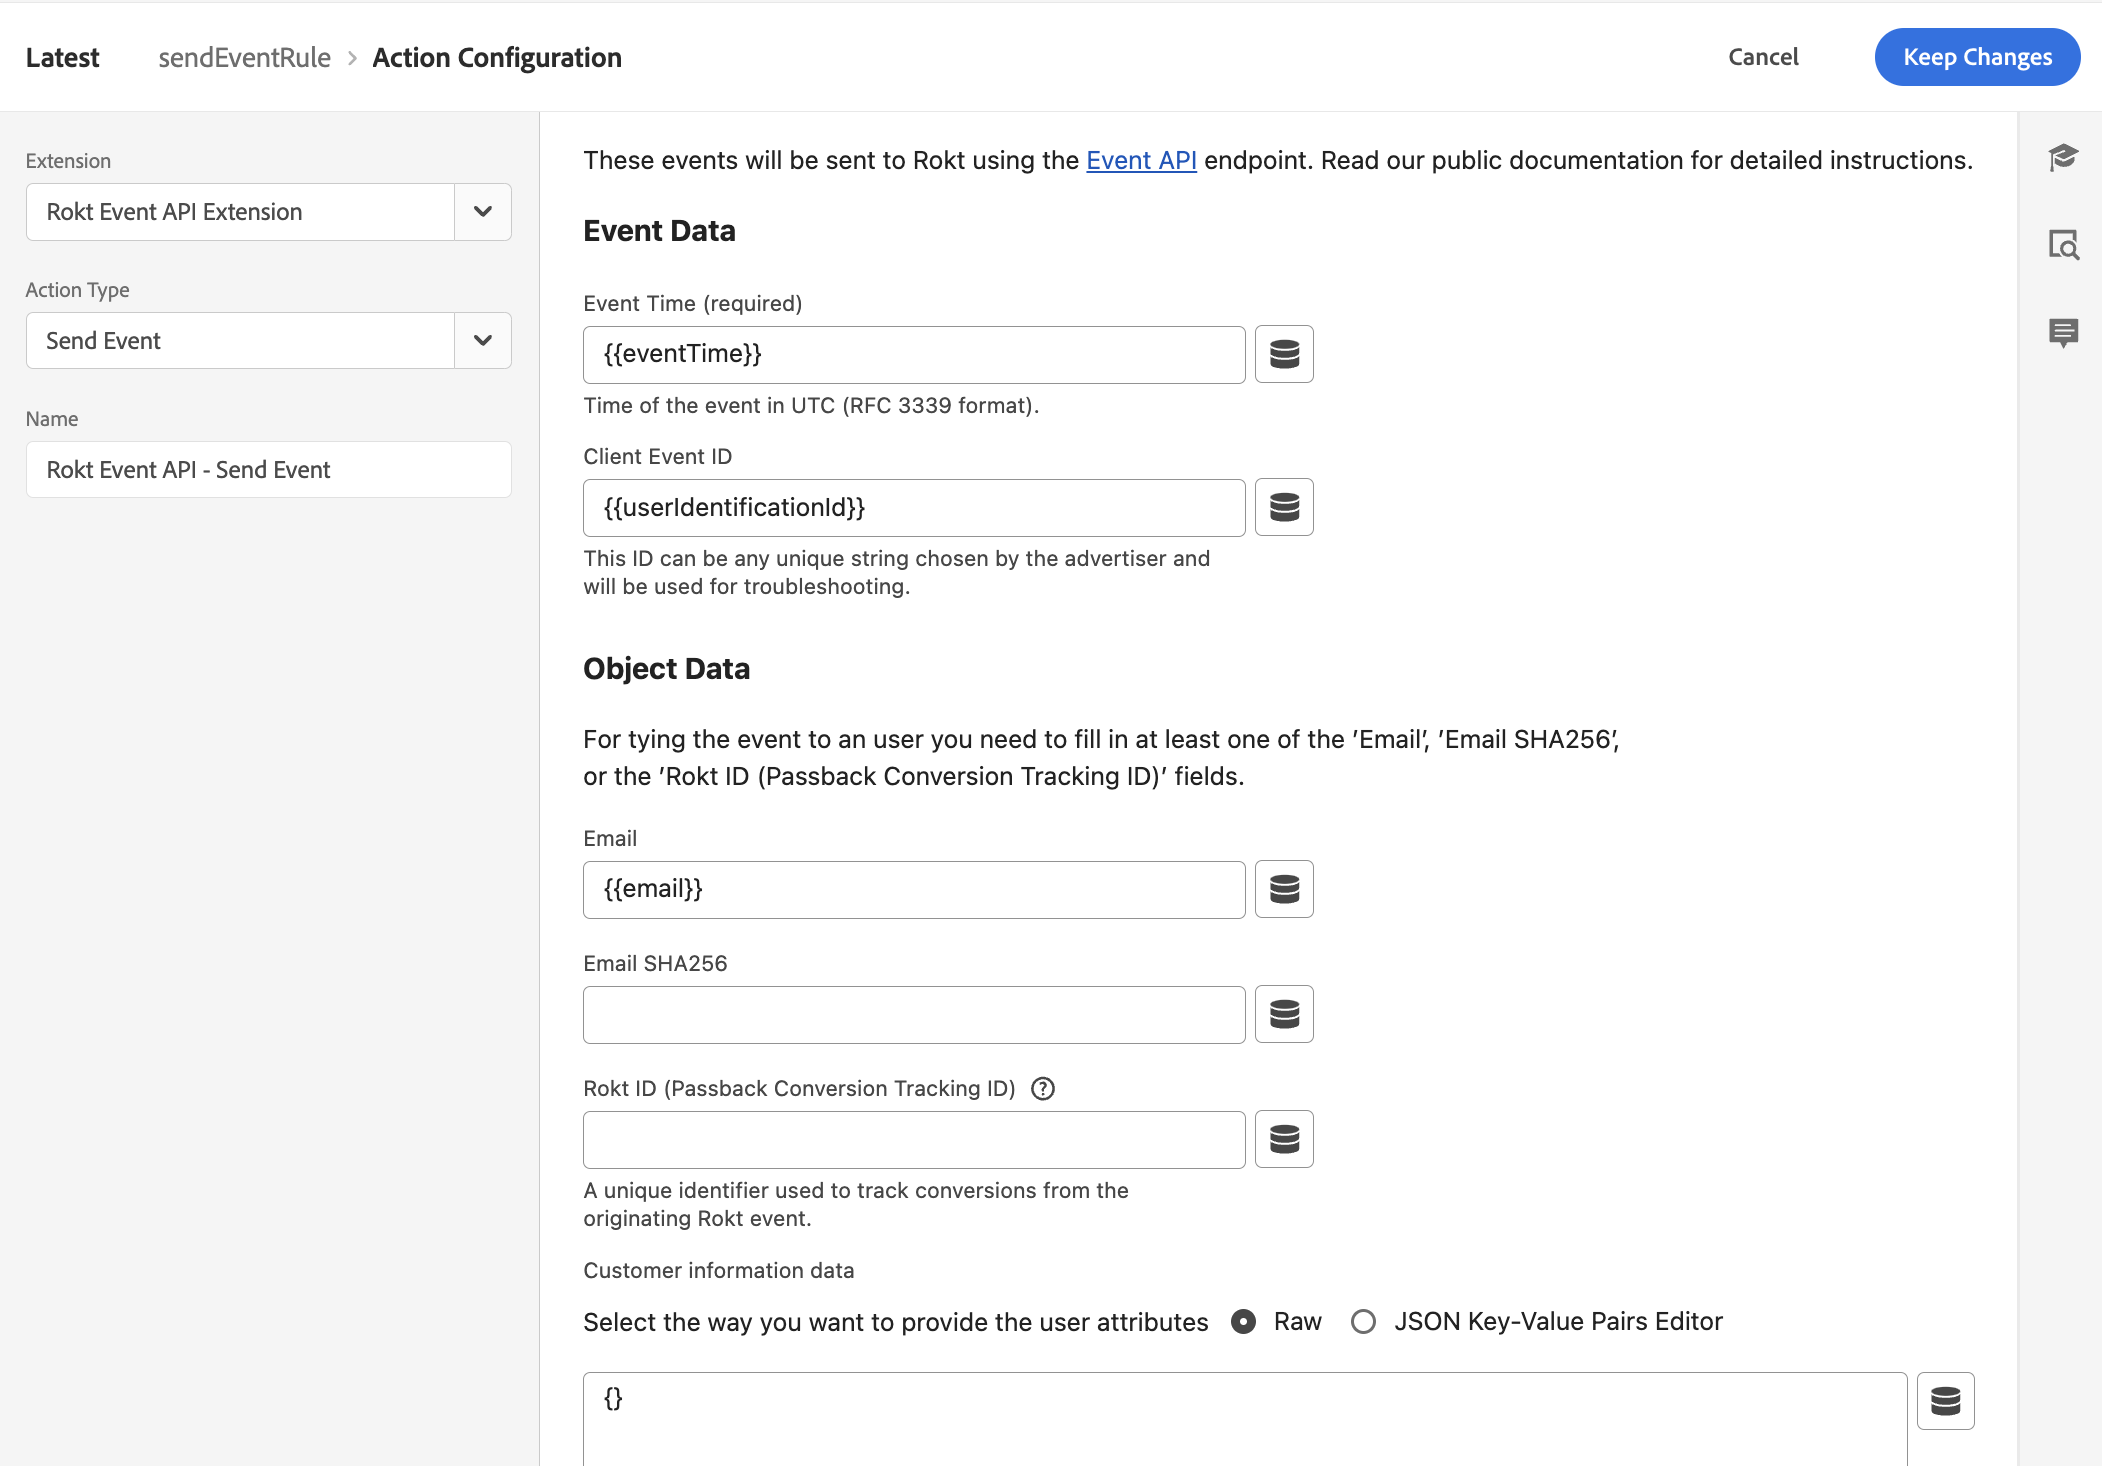
Use your data elements defined above to populate fields for your Event API response.
- Event Data should contain data about the
Conversionevent such as an event time (the time the conversion occurred) and unique identifier (Client Event ID) for the request. - Object Data should contain user identification properties about the conversion event (atleast one of email, emailsha256 & passbackconversiontrackingid).
- The Customer Information data section should have other attributes you can send via the Event API extension (use
{}for raw JSON if you are only sending at least one of the 3 required user identification properties).
Please forward only event types that Rokt can use to optimize your ad campaign.
- Add Rokt Field Mappings
To ensure conversions and associated metadata is sent to Rokt in the correct format, the following elements must be captured and ultimately received by Rokt (refer to our public documentation for a full list):
| Parameter | Description | Required / Recommeneded |
|---|---|---|
| Event ID | An identifier used to uniquely identify an event | Required |
| Event Time | Time of the event in UTC | Required |
| Email passed as plain text, lowercase and without trailing spaces | One of the following is necessary: email, emailsha256, passbackconversiontrackingid. | |
| EmailSHA256 | SHA-256 hash of email address, already hashed | See Above |
| Passback Conversion Tracking ID | A Rokt-generated ID used to match conversion events to the originating click | See Above |
| Mobile | Mobile phone number of converting customer | Recommended |
| First Name | Customer's first name | Recommended |
| Last Name | Customer's last name | Recommended |
| Confirmation Ref | Confirmation reference ID | Recommended |
| Conversion Type | Used to differentiate between different conversion events | Recommended |
The full list of accepted features can be found in the Customer information data section within the dropdown.
- Click Save.
You are now finished configuring your Extension Configuration & Rule Action. Events from your client-side tag extensions and your XDM (Experience Data Model) schema datastreams can be configured to forward conversion data to Rokt when certain conditions are met.
Audience Integration SetupDirect link to Audience Integration Setup
Connecting AEP audiences to Rokt allows you to activate your first-party segments for targeting and suppression directly within Rokt campaigns. Before you begin, contact your Rokt Account Manager to obtain your API key and API secret — these credentials are required to authenticate the destination connection.
Supported audience types include:
- Audiences genereated through the AEP Segmentation Service
- Audiences imported from CSV files through AEP Workflows
Step 1 — Find the Rokt DestinationDirect link to Step 1 — Find the Rokt Destination
- Log in to Adobe Experience Platform at https://experience.adobe.com.
- In the left sidebar, navigate to Connections > Destinations.
- Click the Catalog tab.
- Search for
Rokt— the Rokt Destination card will appear under the Advertising category. - Click Activate audiences on the Rokt Destination card.
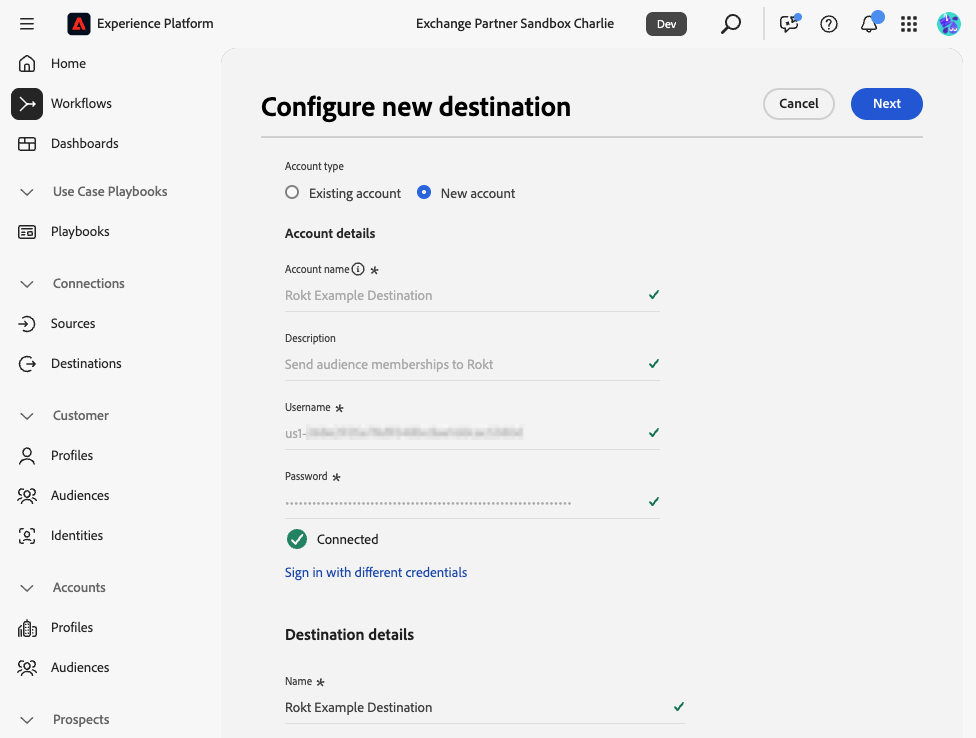
Step 2 — Configure the AccountDirect link to Step 2 — Configure the Account
- On the Configure new destination screen, select New account.
- Enter a descriptive Account name for your destination (e.g., "My Brand – Rokt AEP Connection").
- In the Username field, paste the API Key provided by your Rokt Account Manager.
- In the Password field, paste the API Secret provided by your Rokt Account Manager.
- Click Connect to destination. A green checkmark will appear next to each credential field once the connection is validated.
- Under Destination details, add a descriptive Name and click Next.
- Optionally, review the Governance policy & enforcement actions screen and apply any applicable data labels for your organization, then click Create.
Step 3 — Select AudiencesDirect link to Step 3 — Select Audiences
- In the Activate destination workflow, select your newly created destination and click Next.
- In the Select audiences tab, search for and select the AEP audience(s) you want to send to Rokt.
- Click Next.
Step 4 — Map IdentitiesDirect link to Step 4 — Map Identities
- On the Mapping tab, click Add new mapping to map identity fields from your AEP profile schema to Rokt's identity namespace. The supported mappings are shown in the table below. At least one identity is required.
Rokt strongly recommends an email-based identity, either raw or hashed, to maximize match rates.
| Source field | Target field | Notes |
|---|---|---|
IdentityMap: Email | Identity: email | Recommended |
IdentityMap: Email_LC_SHA256 | Identity: emailSha256 | Recommended |
IdentityMap: Phone | Identity: phone | Optional |
IdentityMap: Phone_SHA256 | Identity: phoneSha256 | Optional |
IdentityMap: GAID | Identity: gaid | Optional |
IdentityMap: IDFA | Identity: idfa | Optional |
xdm: _id | Identity: aepProfileId | Optional |
Here is an example identity mapping:
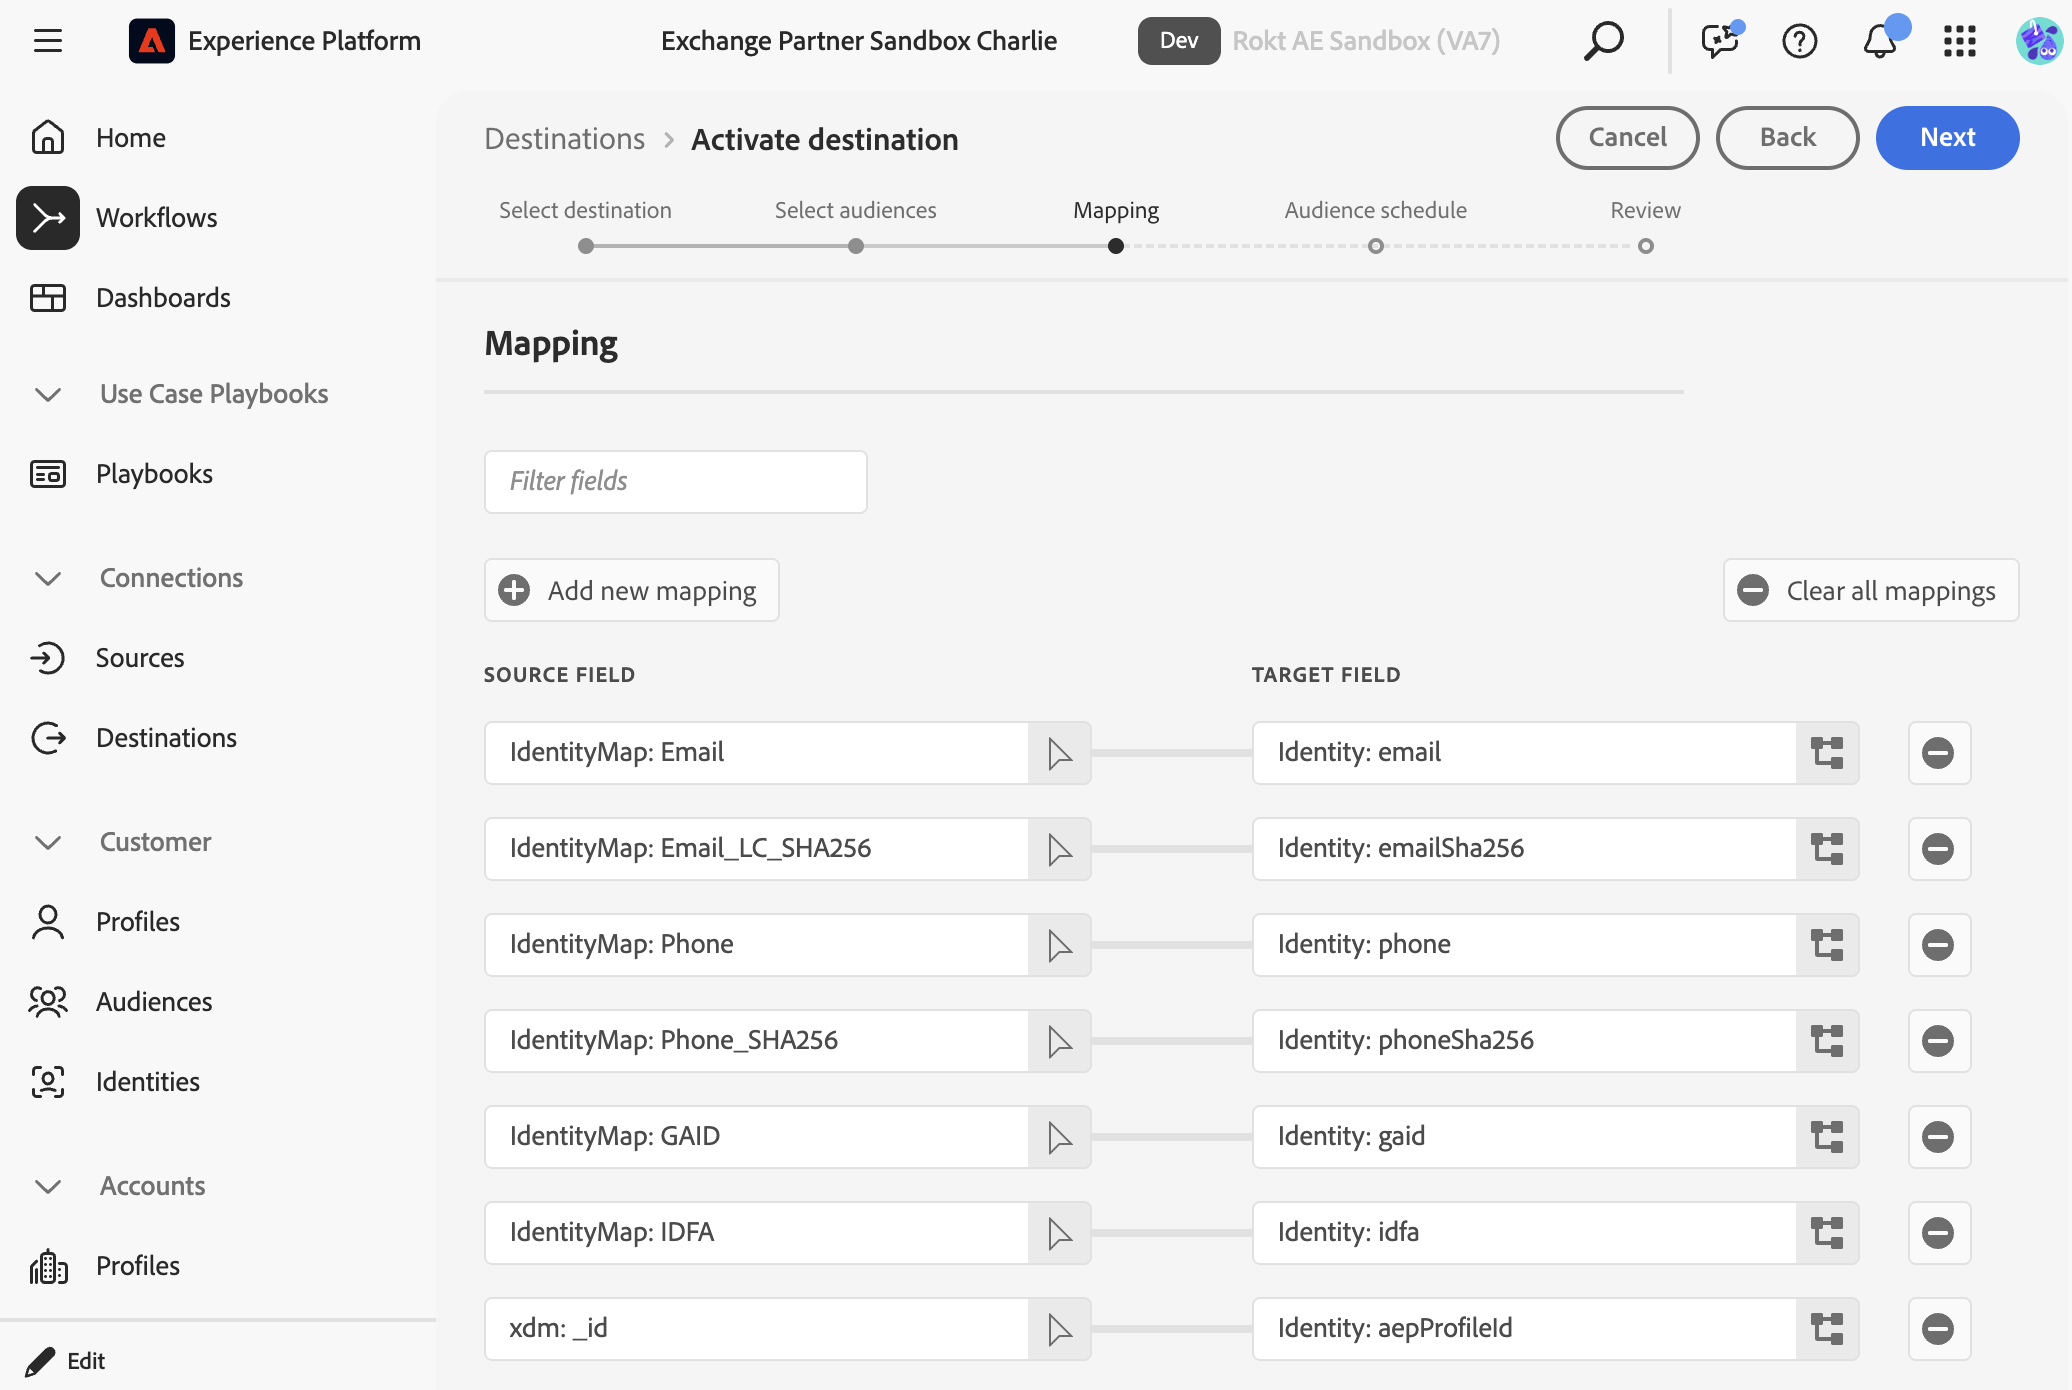
- Click Next.
Step 5 — Set Audience ScheduleDirect link to Step 5 — Set Audience Schedule
- On the Audience schedule tab, a settings panel will appear on the right for each selected audience. Set a Start date for when the audience should begin syncing, and enter a Mapping ID — a label used to identify this audience segment within Rokt. You can use the AEP audience name or any descriptive string agreed upon with your Rokt Account Manager.
- Click Next.
Step 6 — Review and FinishDirect link to Step 6 — Review and Finish
- On the Review tab, confirm that the connection shows Connected and your audience is listed with the correct start date and mapping ID.
- Click Finish. The destination will show status Enabled in AEP and your audience will begin syncing to Rokt.