Add a placement (legacy)
Before you beginDirect link to Before you begin
Ensure that the Rokt iOS SDK has already been integrated into your application following the steps listed here.
Overlay placementsDirect link to Overlay placements
Call selectPlacements on the Rokt iOS SDK in your desired ViewController and add all appropriate customer attributes. The example code below uses ViewDidLoad to display a Rokt overlay placement.
The SDK provides events through a unified onEvent callback.
- Swift
- Objective-C
- SwiftUI
import Rokt_Widget

class OrderConfirmationViewController: UIViewController {

    // call this function when the placement needs to be shown
    func showWidget() {
        let attributes = ["email": "j.smith@example.com",
                "firstname": "Jenny",
                "lastname": "Smith",
                "mobile": "(555)867-5309",
                "postcode": "90210",
                "country": "US"]

        Rokt.selectPlacements(identifier: "RoktExperience", attributes: attributes, onEvent: { roktEvent in
        })
    }
}
#import <Rokt_Widget/Rokt_Widget-Swift.h>

// call this function when placement needs to be shown
- (void)showWidget {
    NSDictionary *attributes = @{
        @"email" : @"j.smith@example.com",
        @"firstname": @"Jenny",
        @"lastname": @"Smith",
        @"mobile": @"(555)867-5309",
        @"postcode": @"90210",
        @"country": @"US"
    };
    [Rokt selectPlacementsWithIdentifier:@"RoktExperience"
                   attributes:attributes
                   placements:nil
                   onEvent:^(id<RoktEventProtocol> roktEvent) {
    }];
}
import SwiftUI
import Rokt_Widget
class OrderConfirmationViewController: View {

    func showPlacement() {
       let attributes = ["email": "j.smith@example.com",
               "firstname": "Jenny",
               "lastname": "Smith",
               "mobile": "(555)867-5309",
               "postcode": "90210",
               "country": "US"]

       Rokt.selectPlacements(identifier: "RoktExperience",
                    attributes: attributes,
                    onEvent: { roktEvent in
                    })
   }
}
Optional functionsDirect link to Optional functions
| Function | Purpose |
|---|---|
Rokt.close() | Used to auto-close overlay placements. |
Embedded placementsDirect link to Embedded placements
Modify your StoryboardDirect link to Modify your Storyboard
If you are using SwiftUI, please see the instructions in the SwiftUI table below. If you are not using SwiftUI, please use the following instructions.
In your Storyboard, add a view and put it in your ViewController:
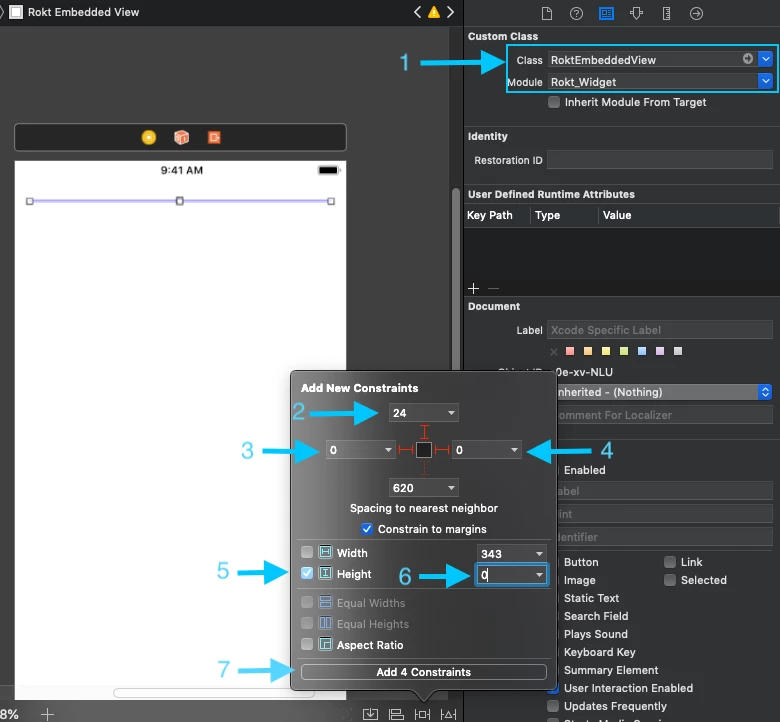
On the custom class, set RoktEmbeddedView as the view's class. Then define top, leading, and trailing constraints to match the place that the embedded placement will be shown. For height, we recommend adding a height constraint of zero.
RoktEmbeddedView can only modify the its own height according to the content of the placement. There is a callback in the selectPlacements method to notify when the height has changed and return the new height.
The image below illustrates the easiest way to define RoktEmbeddedView using auto layout.
-
Place RoktEmbeddedView as the Class of view and Rokt_Widget as Module.
-
Define the top constraints.
-
Define the leading constraints.
-
Define the trailing constraints.
-
Choose height and width constraints.
-
Set the height constraint.
-
Add constraints to view.
The RoktEmbeddedView can also be created in code and included in the layout dynamically.
Select placements with the Rokt SDKDirect link to Select placements with the Rokt SDK
Call selectPlacements on the Rokt SDK for iOS in your desired ViewController and add all appropriate customer attributes. The example code below uses ViewDidLoad to launch the placement.
The SDK provides events through a unified onEvent callback.
- Swift
- Objective-C
- SwiftUI
import Rokt_Widget
class OrderConfirmationViewController: UIViewController {

   // linked to RoktEmbeddedView created in step 5 or it could be created programmatically
    @IBOutlet weak var roktEmbeddedView: RoktEmbeddedView!

    ...

    // call this function when placement needs to be shown
    func showWidget() {
        let attributes = ["email": "j.smith@example.com",
                "firstname": "Jenny",
                "lastname": "Smith",
                "mobile": "(555)867-5309",
                "postcode": "90210",
                "country": "US"]

       let placements: [String : RoktEmbeddedView] = ["RoktEmbedded1": roktEmbeddedView]

        Rokt.selectPlacements(identifier: "RoktEmbeddedExperience", attributes: attributes, placements: placements, onEvent: { roktEvent in
        })
    }
}
#import <Rokt_Widget/Rokt_Widget-Swift.h>

// call this function when the placement needs to be shown
- (void)showWidget {
    NSDictionary *attributes = @{
        @"email" : @"j.smith@example.com",
        @"firstname": @"Jenny",
        @"lastname": @"Smith",
        @"mobile": @"(555)867-5309",
        @"postcode": @"90210",
        @"country": @"US"
    };

    // roktEmbeddedView is @property (weak, nonatomic) IBOutlet RoktEmbeddedView *roktEmbeddedView;  in .h which points to roktEmbeddedView defines in step 5 or it could be created programmatically
    NSDictionary<NSString *, RoktEmbeddedView *> *placements= [NSDictionary dictionaryWithObject:self.roktEmbeddedView forKey:@"RoktEmbedded1"];

    [Rokt selectPlacementsWithIdentifier:@"RoktExperience"
                   attributes:attributes
                   placements:placements
                   onEvent:^(id<RoktEventProtocol> roktEvent) {
    }];
}
import Rokt_Widget
import SwiftUI

// creating UIViewRepresentable to connect UIKit with SwiftUI
struct RoktEmbeddedSwiftUIView: UIViewRepresentable {
   typealias UIViewType = RoktEmbeddedView
   var embedded: RoktEmbeddedView

   init() {
       embedded = RoktEmbeddedView()
   }

   func makeUIView(context: Context) -> RoktEmbeddedView {
       return embedded
   }

   func updateUIView(_ uiView: RoktEmbeddedView, context: Context) {

   }
}

struct OrderConfirmationViewController: View {

   // Create Rokt embedded view
   let roktEmbedded1 = RoktEmbeddedSwiftUIView()
   @State private var embeddedSize: CGFloat = 0
   @State private var placementDisplayed = false

   var body: some View {
       ScrollView {
           VStack(spacing: 0){
               // place rokt embedded view where you want
               roktEmbedded1
                   .frame(height: self.embeddedSize, alignment: .center)
           }
       }.onAppear {
           if !placementDisplayed {
        // show placement when view appears
               showPlacement()
           }
       }
   }

   private func showPlacement() {

       var placements = [String: RoktEmbeddedView]()
       placements["RoktEmbedded1"] = roktEmbedded1.embedded

       let attributes = ["email": "j.smith@example.com",
                         "firstname": "Jenny",
                         "lastname": "Smith",
                         "mobile": "(555)867-5309",
                         "postcode": "90210",
                         "country": "US"]

       Rokt.selectPlacements(identifier: "RoktEmbeddedExperience",
                    attributes: attributes,
                    placements: placements,
                    onEvent: { roktEvent in
       })
   }
}
To update the view name RoktExperience or placement name RoktEmbedded1 with a different value, contact your Rokt account manager to ensure Rokt placements are configured consistently.
SwiftUI ComponentDirect link to SwiftUI Component
Starting from major version 4 of the Rokt iOS SDK, you can add a Rokt layout by utilizing the RoktLayout component. This removes the need to call Rokt.selectPlacements directly and supports a more modern declarative integration using SwiftUI.
Adding the componentDirect link to Adding the component
import SwiftUI
import Rokt_Widget

struct OrderConfirmationSwiftUI: View {
    let attributes: [String: String]
    let pageIdentifier: String
    let location: String
    @State var sdkTriggered = true

    var body: some View {
        VStack(alignment: .leading) {

            RoktLayout(sdkTriggered: $sdkTriggered,
                       identifier: pageIdentifier,
                       location: location, // If using an embedded layout
                       attributes: attributes,
                       onEvent: { roktEvent in
            })

        }.frame(maxWidth: .infinity, maxHeight: .infinity, alignment: .topLeading)
    }
}
You can use the RoktLayout component for both embedded and overlay layouts.
EventsDirect link to Events
The SDK provides the events on each page through Rokt.events API.
Rokt.events(identifier: "identifier") { roktEvent in
    print("Rokt event received \(roktEvent)")
}
Event objectsDirect link to Event objects
| Event | Description | Params |
|---|---|---|
| ShowLoadingIndicator | Triggered before the SDK calls the Rokt backend | |
| HideLoadingIndicator | Triggered when the SDK receives a success or failure from the Rokt backend | |
| OfferEngagement | Triggered when the user engages with the offer | placementId: String |
| PositiveEngagement | Triggered when the user positively engages with the offer | placementId: String |
| FirstPositiveEngagement | Triggered when the user positively engages with the offer for the first time | placementId: String, setFulfillmentAttributes: func (attributes: [String: String]) |
| PlacementInteractive | Triggered when a placement has been rendered and is interactable | placementId: String |
| PlacementReady | Triggered when a placement is ready to display but has not rendered content yet | placementId: String |
| PlacementClosed | Triggered when a placement is closed by the user | placementId: String |
| PlacementCompleted | Triggered when the offer progression reaches the end and no more offers are available to display. Also triggered when cache is hit but the retrieved placement will not be displayed as it has previously been dismissed | placementId: String |
| PlacementFailure | Triggered when a placement could not be displayed due to some failure or when no placements are available to show | placementId: String (optional) |
| OpenUrl | Triggered when the user presses a URL that is configured to be sent to the partner app | placementId: String, url: String |
Event-based callbacksDirect link to Event-based callbacks
The Rokt iOS SDK uses a unified onEvent callback pattern. All events are delivered through a single onEvent closure that receives RoktEvent objects. See the Events section above for the full list of event types.