Rokt 広告のための Web SDK 統合ガイド
このページでは、Rokt 広告のための Web SDK を実装して、コンバージョンをキャンペーンに接続する方法を説明します。広告のエンゲージメントにコンバージョンをリンクすることで、より正確なアトリビューション、リアルタイムの最適化、より良いキャンペーンの測定が可能になります。
専任の Rokt アカウントマネージャーが、Web SDK のためのアカウント設定をサポートします。彼らは必要な API キー と他の追加リソースを提供します。
以下の指示を完了するには開発リソースが必要です。さらにサポートが必要な場合は、Rokt アカウントマネージャーにお問い合わせください。
最初に開発環境で SDK を実装するために、Rokt アカウントマネージャーと協力してください。これにより、統合を本番環境に展開する前に徹底的にテストし、トラブルシューティングを行うことができます。
ファーストパーティドメインの設定ファーストパーティドメインの設定 への直接リンク
ブラウザや広告ブロッキングツールは、Rokt タグやイベント収集エンドポイントをブロックすることがあります。これを避けてデータ収集を最大化するために、イベント収集のためのファーストパーティドメインを設定し、デフォルトの apps-rokt-api.com ドメインの代わりに使用してください。このブロックされた HTTP トラフィックを防ぐために、カスタムサブドメインを作成し、その DNS レコードを Rokt に向けます。これにより、アドレスバーに表示されるルートドメインと一致するため、ブロックされる可能性が低くなります。
SDK 統合のためのファーストパーティドメインの設定方法については、First Party Domain Integration を参照してください。
1. Rokt SDK を初期化する1. Rokt SDK を初期化する への直接リンク
SDK を初期化するには、SDK 初期化スクリプトをウェブアプリケーションにコピーして貼り付けます。Rokt の Web SDK は軽量(30KB 未満)で、CDN を通じてグローバルに配信されています。
各ウェブアプリケーションは異なりますが、Rokt はコンバージョンファネル全体でユーザーが追跡され、サインアップやカートを放棄した場合に再ターゲットできるように、すべてのページに SDK スクリプトを含めることを推奨しています。
- シングルページアプリケーション (SPA): ウェブサイトが SPA の場合、初期化スクリプトをメインの
<head>のindex.htmlページ、または他のコンテンツがレンダリングされる主要な場所に挿入します。 - マルチページアプリケーション (MPA): ウェブサイトが MPA でテンプレートベースのレンダリングシステムを使用している場合(一般的です)、初期化スクリプトを主要な共有レイアウトファイルに配置します。テンプレートベースのレンダリングシステムを使用していない場合は、ウェブサイトの各 HTML ファイルにスクリプトを配置します。
各ページにスクリプトが含まれている場合でも、ブラウザのキャッシュにより、SDK はデフォルトでキャッシュからロードされ、ウェブサイトの各ページロード時に再度ロードされることはありません。
SDKの初期化とページビューイベントSDKの初期化とページビューイベント への直接リンク
<script type="text/javascript">

// Enter your Rokt API key
const API_KEY = "YOUR_API_KEY";

// Enter your custom subdomain if you are using a first-party domain configuration (optional)
const ROKT_DOMAIN = "https://apps.rokt-api.com";

    window.mParticle = {
      config: {
        // Identify the current user:
        // Only include fields that have actual values (not placeholders or null)
        identifyRequest: {
          userIdentities: (function() {
            const identities = {};
            // Fetch user email from your persistence layer (e.g., localStorage, sessionStorage, cookies, or server-side session)
            // If you're using an un-hashed email address, set it in 'email'.
            const email = null; // e.g., localStorage.getItem('userEmail') or sessionStorage.getItem('email') or null
            // If you're using a hashed email address, set it in 'other' instead of 'email'.
            // Fetch hashed email from your persistence layer where you store the SHA-256 hashed value; Prior to hashing, lowercase and trim all trailing spaces
            const hashedEmail = null; // e.g., localStorage.getItem('hashedEmail') or null

            if (email) {
              identities.email = email;
            }
            if (hashedEmail) {
              identities.other = hashedEmail;
            }

            // Always return an object (empty if no identities are set)
            return identities;
          })(),
        },
        identityCallback: function (result) {
          if (result.getUser()) {
            const user = result.getUser();
            // Fetch user attributes from your persistence layer (e.g., localStorage, sessionStorage, cookies, or server-side session)
            // Only set attributes when they have actual values (not null or undefined)
            const firstname = null; // e.g., localStorage.getItem('firstName') or sessionStorage.getItem('firstname') or null
            const lastname = null; // e.g., localStorage.getItem('lastName') or sessionStorage.getItem('lastname') or null

            if (firstname) {
              user.setUserAttribute('firstname', firstname);
            }
            if (lastname) {
              user.setUserAttribute('lastname', lastname);
            }
          }
        },
      },
    };


// Load the SDK
(function(i){window.mParticle=window.mParticle||{};window.mParticle.EventType={Unknown:0,Navigation:1,Location:2,Search:3,Transaction:4,UserContent:5,UserPreference:6,Social:7,Other:8,Media:9};window.mParticle.eCommerce={Cart:{}};window.mParticle.Identity={};window.mParticle.Rokt={};window.mParticle.config=window.mParticle.config||{};window.mParticle.config.rq=[];window.mParticle.config.snippetVersion=3;window.mParticle.ready=function(e){window.mParticle.config.rq.push(e)};var e=["endSession","logError","logBaseEvent","logEvent","logForm","logLink","logPageView","setSessionAttribute","setAppName","setAppVersion","setOptOut","setPosition","startNewSession","startTrackingLocation","stopTrackingLocation"];var t=["setCurrencyCode"];var n=["identify","login","logout","modify","search"];var o=["selectPlacements","hashAttributes","hashSha256","setExtensionData","use","getVersion","terminate","onShoppableAdsReady"];e.forEach(function(e){window.mParticle[e]=r(e)});t.forEach(function(e){window.mParticle.eCommerce[e]=r(e,"eCommerce")});n.forEach(function(e){window.mParticle.Identity[e]=r(e,"Identity")});o.forEach(function(e){window.mParticle.Rokt[e]=r(e,"Rokt")});function r(t,n){return function(){if(n){t=n+"."+t}var e=Array.prototype.slice.call(arguments);e.unshift(t);window.mParticle.config.rq.push(e)}}var a=window.mParticle.config,c=a.isDevelopmentMode?1:0,s="?env="+c,w=a.dataPlan;if(w){var l=w.planId,m=w.planVersion;if(l){if(m&&(m<1||m>1e3)){m=null}s+="&plan_id="+l+(m?"&plan_version="+m:"")}}var d=a.versions;var p=[];if(d){Object.keys(d).forEach(function(e){p.push(e+"="+d[e])})}var f=document.createElement("script");f.type="text/javascript";f.async=true;window.ROKT_DOMAIN=ROKT_DOMAIN||"https://apps.rokt-api.com";window.mParticle.config.domain=window.ROKT_DOMAIN.split("//")[1];f.src=window.ROKT_DOMAIN+"/js/v3/"+i+"/app.js"+s+"&"+p.join("&");f.onerror=function(){var e=["https://apps.","rokt","ecommerce",".com"].join("");window.ROKT_DOMAIN=e;window.mParticle.config.domain=e.split("//")[1];var t=document.createElement("script");t.type="text/javascript";t.async=true;t.src=e+"/js/v3/"+i+"/app.js"+s+"&"+p.join("&");var n=document.getElementsByTagName("script")[0];n.parentNode.insertBefore(t,n)};var u=document.getElementsByTagName("script")[0];u.parentNode.insertBefore(f,u)})(API_KEY);

// Fire Page View Event once the SDK initializes.
window.mParticle.ready(function () {
      mParticle.logPageView(
        // Event name: "page view" identifies the type of event being logged
        "page view",
        {
          // Capture the last segment of the URL path as the screen name,
          // e.g., "/products/shoes" → "shoes". Defaults to "home" if the path is empty.
          screen_name:
            location.pathname.split("/").filter(Boolean).pop() || "home",

          // Record the full URL of the current page (including protocol, path, query, and hash)
          url: window.location.toString(),

          // Capture the URL of the page that referred the user to this one,
          // if available. This helps track user navigation between pages or sites.
          "referring-page": document.referrer,
        }
      );
    });

</script>
初期化スクリプトをサイトに追加する際は、次の設定を構成してください:
1.1 Rokt APIキーを入力1.1 Rokt APIキーを入力 への直接リンク
API_KEYを、専任のRoktアカウントマネージャーから提供されたRokt APIキーに設定します。
Rokt APIキーは、Roktアカウントマネージャーから提供される一意の認証情報で、サイトがRokt SDKと安全に接続し、相互作用することを可能にします。
1.2 カスタムサブドメインを入力(オプション)1.2 カスタムサブドメインを入力(オプション) への直接リンク
SDKを独自のドメインを通じてルーティングしたい場合は、First-Party Domain Configurationの指示に従い、ROKT_DOMAINを作成したサブドメインに設定します。
このステップはオプションです。ROKT_DOMAINをhttps://apps.rokt-api.comに設定したままにしておくこともできます。この場合、Rokt SDKへのリクエストはapps.rokt-api.comを通じてルーティングされます。
1.3 データ環境を構成1.3 データ環境を構成 への直接リンク
Roktは2つのデータ環境を維持しています: テスト目的でデータをラベル付けし保存するための開発環境と、実際の顧客活動を収集するための本番環境です。
まだRokt SDKをテスト中の場合、isDevelopmentModeをtrueに設定します。
テストが完了し、実際の顧客活動の収集を開始したい場合は、isDevelopmentModeをfalseに設定します。
1.4 ユーザーを識別1.4 ユーザーを識別 への直接リンク
SDKが初期化されると、現在のユーザーを識別し、収集されたデータが正しくユーザーに帰属し、ユーザーの行動に基づいて最も関連性の高い広告が表示されるようにすることができます。
SDKの初期化スクリプトには、identifyRequestというオブジェクトが含まれています:
identifyRequest: {
  userIdentities: (function() {
    const identities = {};
    // Fetch user email from your persistence layer (e.g., localStorage, sessionStorage, cookies, or server-side session)
    // If you're using an un-hashed email address, set it in 'email'.
    const email = null; // e.g., localStorage.getItem('userEmail') or sessionStorage.getItem('email') or null
    // If you're using a hashed email address, set it in 'other' instead of `email`.
    // Fetch hashed email from your persistence layer where you store the SHA-256 hashed value ; Prior to hashing, lowercase and trim all trailing spaces
    const hashedEmail = null; // e.g., localStorage.getItem('hashedEmail') or null

    if (email) {
      identities.email = email;
    }
    if (hashedEmail) {
      identities.other = hashedEmail;
    }

    // Always return an object (empty if no identities are set)
    return identities;
  })(),
}
identifyRequest内で、ユーザーのメールアドレスを永続化レイヤー(例: localStorage, sessionStorage, cookies, またはサーバーサイドセッション)から取得します。ハッシュされていないメールアドレスを使用している場合は、email変数に設定します。ハッシュされたメールアドレスを使用している場合は、hashedEmail変数に設定し、それをotherに割り当てます。
コードは、値が利用可能な場合にのみ識別情報を条件付きで設定する関数を使用しており、空またはnullの値がSDKに渡されないようにしています。
初期化スクリプトには、ユーザーのメールアドレスが初期化時にない場合でも、必ずidentifyRequestを含めてください。
ユーザーのメールアドレスがない場合は、emailおよびhashedEmail変数をnullのままにしておいてください。SDKは初期化され、次のステップの指示に従って後でユーザーを識別することができます。
1.5 追加のユーザー属性を設定する1.5 追加のユーザー属性を設定する への直接リンク
初期化スクリプトには、ユーザーがメールアドレスで正常に識別された場合に、追加のユーザー属性を設定できるコールバック関数が含まれています。
// The identityCallback determines if the identifyRequest was successful.
identityCallback: function(result) {
    if (result.getUser()) {
        // If the user was identified, set additional user attributes with setUserAttribute.
           result.getUser().setUserAttribute("attribute-key", "attribute-value");
    }
}
ユーザーに対して収集することをRoktが推奨する属性のリストについては、推奨されるユーザー属性を参照してください。
2. ユーザーを識別する2. ユーザーを識別する への直接リンク
初期化中に、SDKはユーザーのメールまたはハッシュ化されたアドレスを使用して、現在のユーザーを識別するためにRoktにidentifyRequestを送信します。
初期化時にユーザーを識別することに加えて、SDKが初期化された後にユーザーがメールアドレスを提供するたびに(例:ログイン時や購入時)、identifyメソッドを呼び出してそのメールをRoktに渡す必要があります。これにより、データが現在のユーザーに正しく帰属されることが保証されます。
ユーザーを識別するには、まずユーザーのメールアドレスを含むidentifyRequestオブジェクトを作成します。メールは、永続化レイヤー(例:localStorage、sessionStorage、クッキー、またはサーバーサイドセッション)から、またはフォーム送信から取得します。
const identifyRequest = {
  userIdentities: (function() {
    const identities = {};
    // Fetch user email from your persistence layer or form submission
    // If you're using an un-hashed email address, set it in 'email'.
    const email = null; // e.g., localStorage.getItem('userEmail') or document.getElementById('emailInput').value or null
    // If you're using a hashed email address, set it in 'other' instead of `email`.
    // Fetch hashed email from your persistence layer where you store the SHA-256 hashed value; Prior to hashing, lowercase and trim all trailing spaces
    const hashedEmail = null; // e.g., localStorage.getItem('hashedEmail') or null

    if (email) {
      identities.email = email;
    }
    if (hashedEmail) {
      identities.other = hashedEmail;
    }

    // Always return an object (empty if no identities are set)
    return identities;
  })(),
};
メールアドレスやその他の属性をハッシュ化するには、ユーザー属性のハッシュ化を参照してください。
次に、ユーザーを識別する際に追加のユーザー属性を設定するオプションとして、コールバック関数を作成します。identifyRequestが成功した場合、setUserAttributeで設定したユーザー属性がユーザーに割り当てられます。
const identityCallback = function (result) {
  if (result.getUser()) {
    result.getUser().setUserAttribute("attribute-key", "attribute-value");
  }
};
ユーザーに対して収集することをRoktが推奨する属性のリストについては、推奨されるユーザー属性を参照してください。
最後に、identifyRequestとidentityCallbackを作成した後、追加の属性を設定するために、作成したidentifyRequestとidentityCallbackオブジェクトを渡してidentifyメソッドを呼び出します。
mParticle.Identity.identify(identifyRequest, identityCallback);
例えば、Jane Smithという名前のユーザーをメールアドレスj.smith@example.comで識別する場合(メールアドレスをハッシュ化する必要がない場合)、次のように使用します。
const identifyRequest = {
  userIdentities: {
    email: "j.smith@example.com",
  },
};

const identityCallback = function (result) {
  if (result.getUser()) {
    result.getUser().setUserAttribute("firstname", "Jane");
    result.getUser().setUserAttribute("lastname", "Smith");
  }
};

mParticle.Identity.identify(identifyRequest, identityCallback);
2.1 ユーザー属性のハッシュ化2.1 ユーザー属性のハッシュ化 への直接リンク
SDKの初期化後にユーザー属性(例えばメールアドレス)をSHA-256でハッシュ化する必要がある場合は、以下の方法を使用します。ハッシュ化はRoktのハッシュ化ガイドラインに従います。
2.1.1 複数のユーザー属性をハッシュする2.1.1 複数のユーザー属性をハッシュする への直接リンク
hashAttributes を使用して、複数の属性を一度にハッシュします。このメソッドは、各属性の元のバージョンとハッシュされたバージョンの両方を返します。
mParticle.ready(async function() {
  const hashedAttributes = await mParticle.Rokt.hashAttributes({
    email: 'j.smith@example.com',
    mobile: '3125551515',
  });

  // `hashAttributes` returns:
  // {
  //   email: 'j.smith@example.com',
  //   mobile: '3125551515',
  //   emailsha256: '<sha256 hex>',
  //   mobilesha256: '<sha256 hex>'
  // }

  const identifyRequest = {
    userIdentities: {
      email: 'j.smith@example.com',
      other: hashedAttributes.emailsha256 // hashed copy emailsha256
    }
  };
});
2.1.2 単一のユーザー属性をハッシュする2.1.2 単一のユーザー属性をハッシュする への直接リンク
単一の属性をハッシュする必要がある場合は、hashSha256 を使用します。このメソッドはハッシュされた値のみを返します。
mParticle.ready(async function() {
  const emailSha256 = await mParticle.Rokt.hashSha256('j.smith@example.com');

  const identifyRequest = {
    userIdentities: {
      email: 'j.smith@example.com',
      other: emailSha256
    }
  };
});
3. ユーザー属性を設定する3. ユーザー属性を設定する への直接リンク
上記の例は、SDK の初期化時にユーザーが識別された場合と、ユーザーがメールアドレスを提供した後に識別された場合にユーザー属性を設定する方法を示しています。しかし、ユーザーが識別された後は、いつでもユーザー属性を設定することができます。
ユーザー属性を設定するには、以下を実行します:
// To retrieve the current user, call getCurrentUser.
const currentUser = mParticle.Identity.getCurrentUser();

// Once you have successfully set the current user to a const called `currentUser`, you can set user attributes with:
currentUser.setUserAttribute("user-attribute-key", "user-attribute-value");

// To set a list attribute, set the value of the attribute to an array of strings. For example:
currentUser.setUserAttribute("favorite-genres", [
  "documentary",
  "comedy",
  "romance",
  "drama",
]);

// To remove a user attribute, call removeUserAttribute and pass in the attribute name. All user attributes share the same key space.
currentUser.removeUserAttribute("attribute-to-remove");
推奨されるユーザー属性推奨されるユーザー属性 への直接リンク
Rokt は、可能な限り多くの以下のユーザー属性を設定することを推奨します:
| ユーザー属性キー | 例の値 | 備考 |
|---|---|---|
| firstname | John | 顧客の名。 |
| firstnamesha256 | fab1e2e699b3b927cbf875046a64f222 | 名の SHA-256 ハッシュ。ハッシュ化する前に、小文字に変換し、末尾のスペースをすべて削除します。 |
| lastname | Doe | 顧客の姓。 |
| lastnamesha256 | fab1e2e699b3b927cbf875046a64f222 | 姓の SHA-256 ハッシュ。ハッシュ化する前に、小文字に変換し、末尾のスペースをすべて削除します。 |
| mobile | 3125551515 | 電話番号は 1112345678 または +1 (222) 345-6789 のいずれかの形式でフォーマットできます。 |
| mobilesha256 | fab1e2e699b3b927cbf875046a64f222 | モバイル番号の SHA-256。注意: モバイル番号はハッシュ化する前にこの特定の形式にフォーマットする必要があります: 5551234567(ダッシュやスペースを含まない)。 |
| age | 33 | 顧客の年齢。 |
| dob | 19900717 | 生年月日。 yyyymmdd の形式でフォーマットされます。 |
| gender | M | 顧客の性別。例えば、M、Male、F、または Female。 |
| city | Brooklyn | 顧客の市。 |
| state | NY | 顧客の州。 |
| zip | 11201 | 顧客の郵便番号。 |
| title | Mr | 顧客の敬称。例えば、Mr、Mrs、Ms。 |
| language | en | 購入に関連する言語。 |
| value | 52.25 | 顧客の価値。 |
| predictedltv | 136.23 | 顧客の予測生涯価値の合計。 |
すべてのユーザー属性(リスト属性やタグを含む)は、異なる名前を持たなければなりません。
4. コンバージョンの追跡4. コンバージョンの追跡 への直接リンク
コンバージョンを追跡するには、顧客がコンバートした後に読み込まれる最も適切なページ(購入確認ページや「ありがとう」ページなど)で、次のコードスニペットを実行します。
コードスニペットをサイトに貼り付ける際は、以下の点に注意してください:
-
.setUserAttribute呼び出しのサンプルユーザー属性を、ユーザーまたは顧客の実際の値に置き換えます。Roktは、少なくとも以下のユーザー属性を設定することを推奨します:firstnamelastnamezipcodemobile
-
サンプルのコンバージョンイベント属性を、実際のコンバージョンイベントの値に置き換えます。
-
必須のコンバージョン属性。
conversiontypeコンバージョンタイプは、このイベントの名前(例:サインアップ、購入など)を示します。confirmationref確認参照は、重複排除キーとして機能します。
コンバージョンイベントをログに記録する際、できるだけ多くのユーザー属性とイベント属性を含めることで、Roktがキャンペーンを最適化する能力を向上させます。
conversiontype と confirmationref 属性は、Roktがキャンペーンを効果的に最適化し、イベントやコンバージョンを適切に重複排除するために必要です。これらは必須の起動属性です。
Rokt SDKを初期化すると、Rokt Click ID と サイト滞在時間 が自動的にキャプチャされます。これらはコンバージョンイベントをログに記録する際に含まれます。
// Set user attributes before logging the conversion event
currentUser.setUserAttribute("firstname", "John");
currentUser.setUserAttribute("lastname", "Doe");
currentUser.setUserAttribute("zipcode", "98103");
currentUser.setUserAttribute("mobile", "3125551515");

// Log the conversion event
mParticle.logEvent(
  "conversion", // The name of the event
  mParticle.EventType.Transaction, // The event type
  {
    conversiontype: "signup", // Type of conversion
    confirmationref: "54321", // Transaction ID / Order ID
    amount: "300.5", // Transaction amount e.g. 300.5
    currency: "USD", // Transaction currency e.g. USD

    // You can track your own custom event attributes!
    CUSTOM_EVENT_ATTRIBUTE_NAME: "CUSTOM_EVENT_ATTRIBUTE_VALUE",
  }
);
5. 統合のテスト5. 統合のテスト への直接リンク
Roktは、新しい統合をテストして、SDKが正しく初期化され、イベントが正常にログに記録されることを確認することを推奨します。
以下のステップを確認して統合が正しく設定されていることを確認した後、エンドユーザーを模倣していくつかのテスト購入またはサインアップを行います。その後、使用したメールまたはハッシュ化されたメールをRoktアカウントマネージャーに提供し、データが正しくRoktに取り込まれていることを確認してもらいます。
Roktとメールまたはハッシュ化されたメールを統合しない場合は、テストセッションからmPIDを提供してください。ブラウザコンソールに mParticle.Identity.getCurrentUser().getMPID() と入力することで取得できます。
テストの初期化テストの初期化 への直接リンク
-
新しいブラウザウィンドウを開きます。
-
ブラウザの開発者ツールパネルにアクセスします。ほとんどのブラウザでは、画面を右クリックしてInspectを選択することで行います。
-
開発者ツールパネルで、Networkタブに移動し、フィルターバーに
apps.rokt-api.comを入力します。 -
Rokt JSが読み込まれ、初期化を記録するAPIコールが表示されるはずです。
- または、ブラウザコンソールに
mParticle.config.appNameを入力すると、現在SDKが実行されているアプリの名前がエコーバックされ、SDKが正常に読み込まれたことが確認できます。
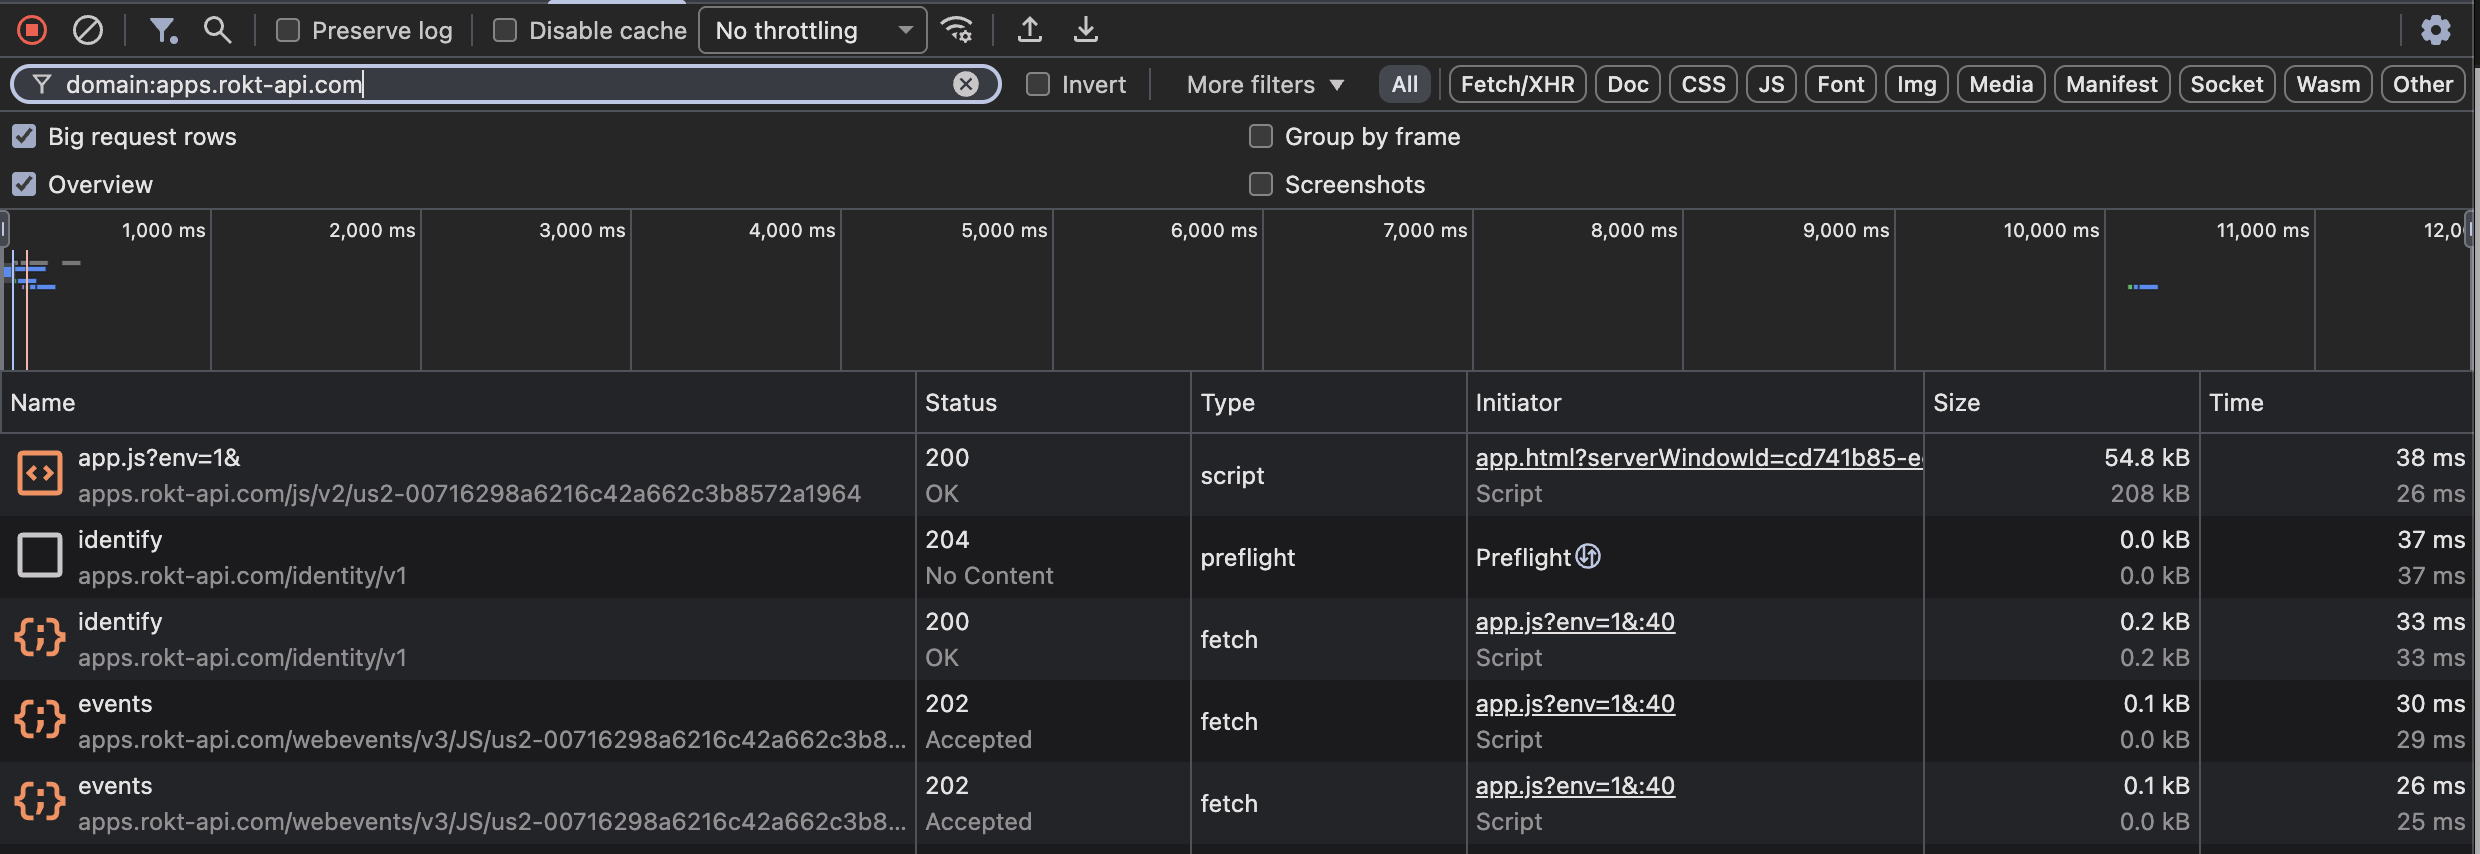
- または、ブラウザコンソールに
コンバージョントラッキングのテストコンバージョントラッキングのテスト への直接リンク
-
新しいブラウザウィンドウを開きます。
-
ブラウザの開発者ツールパネルにアクセスします。ほとんどのブラウザでは、画面を右クリックしてInspectを選択することで行います。
-
開発者ツールパネルで、Networkタブに移動し、フィルターバーに
apps.rokt-api.comを入力します。 -
Rokt JSが読み込まれ、初期化を記録するAPIコールが表示されるはずです。
-
初期化コールの後に、コンバージョンを記録するAPIコールが表示されるはずです。
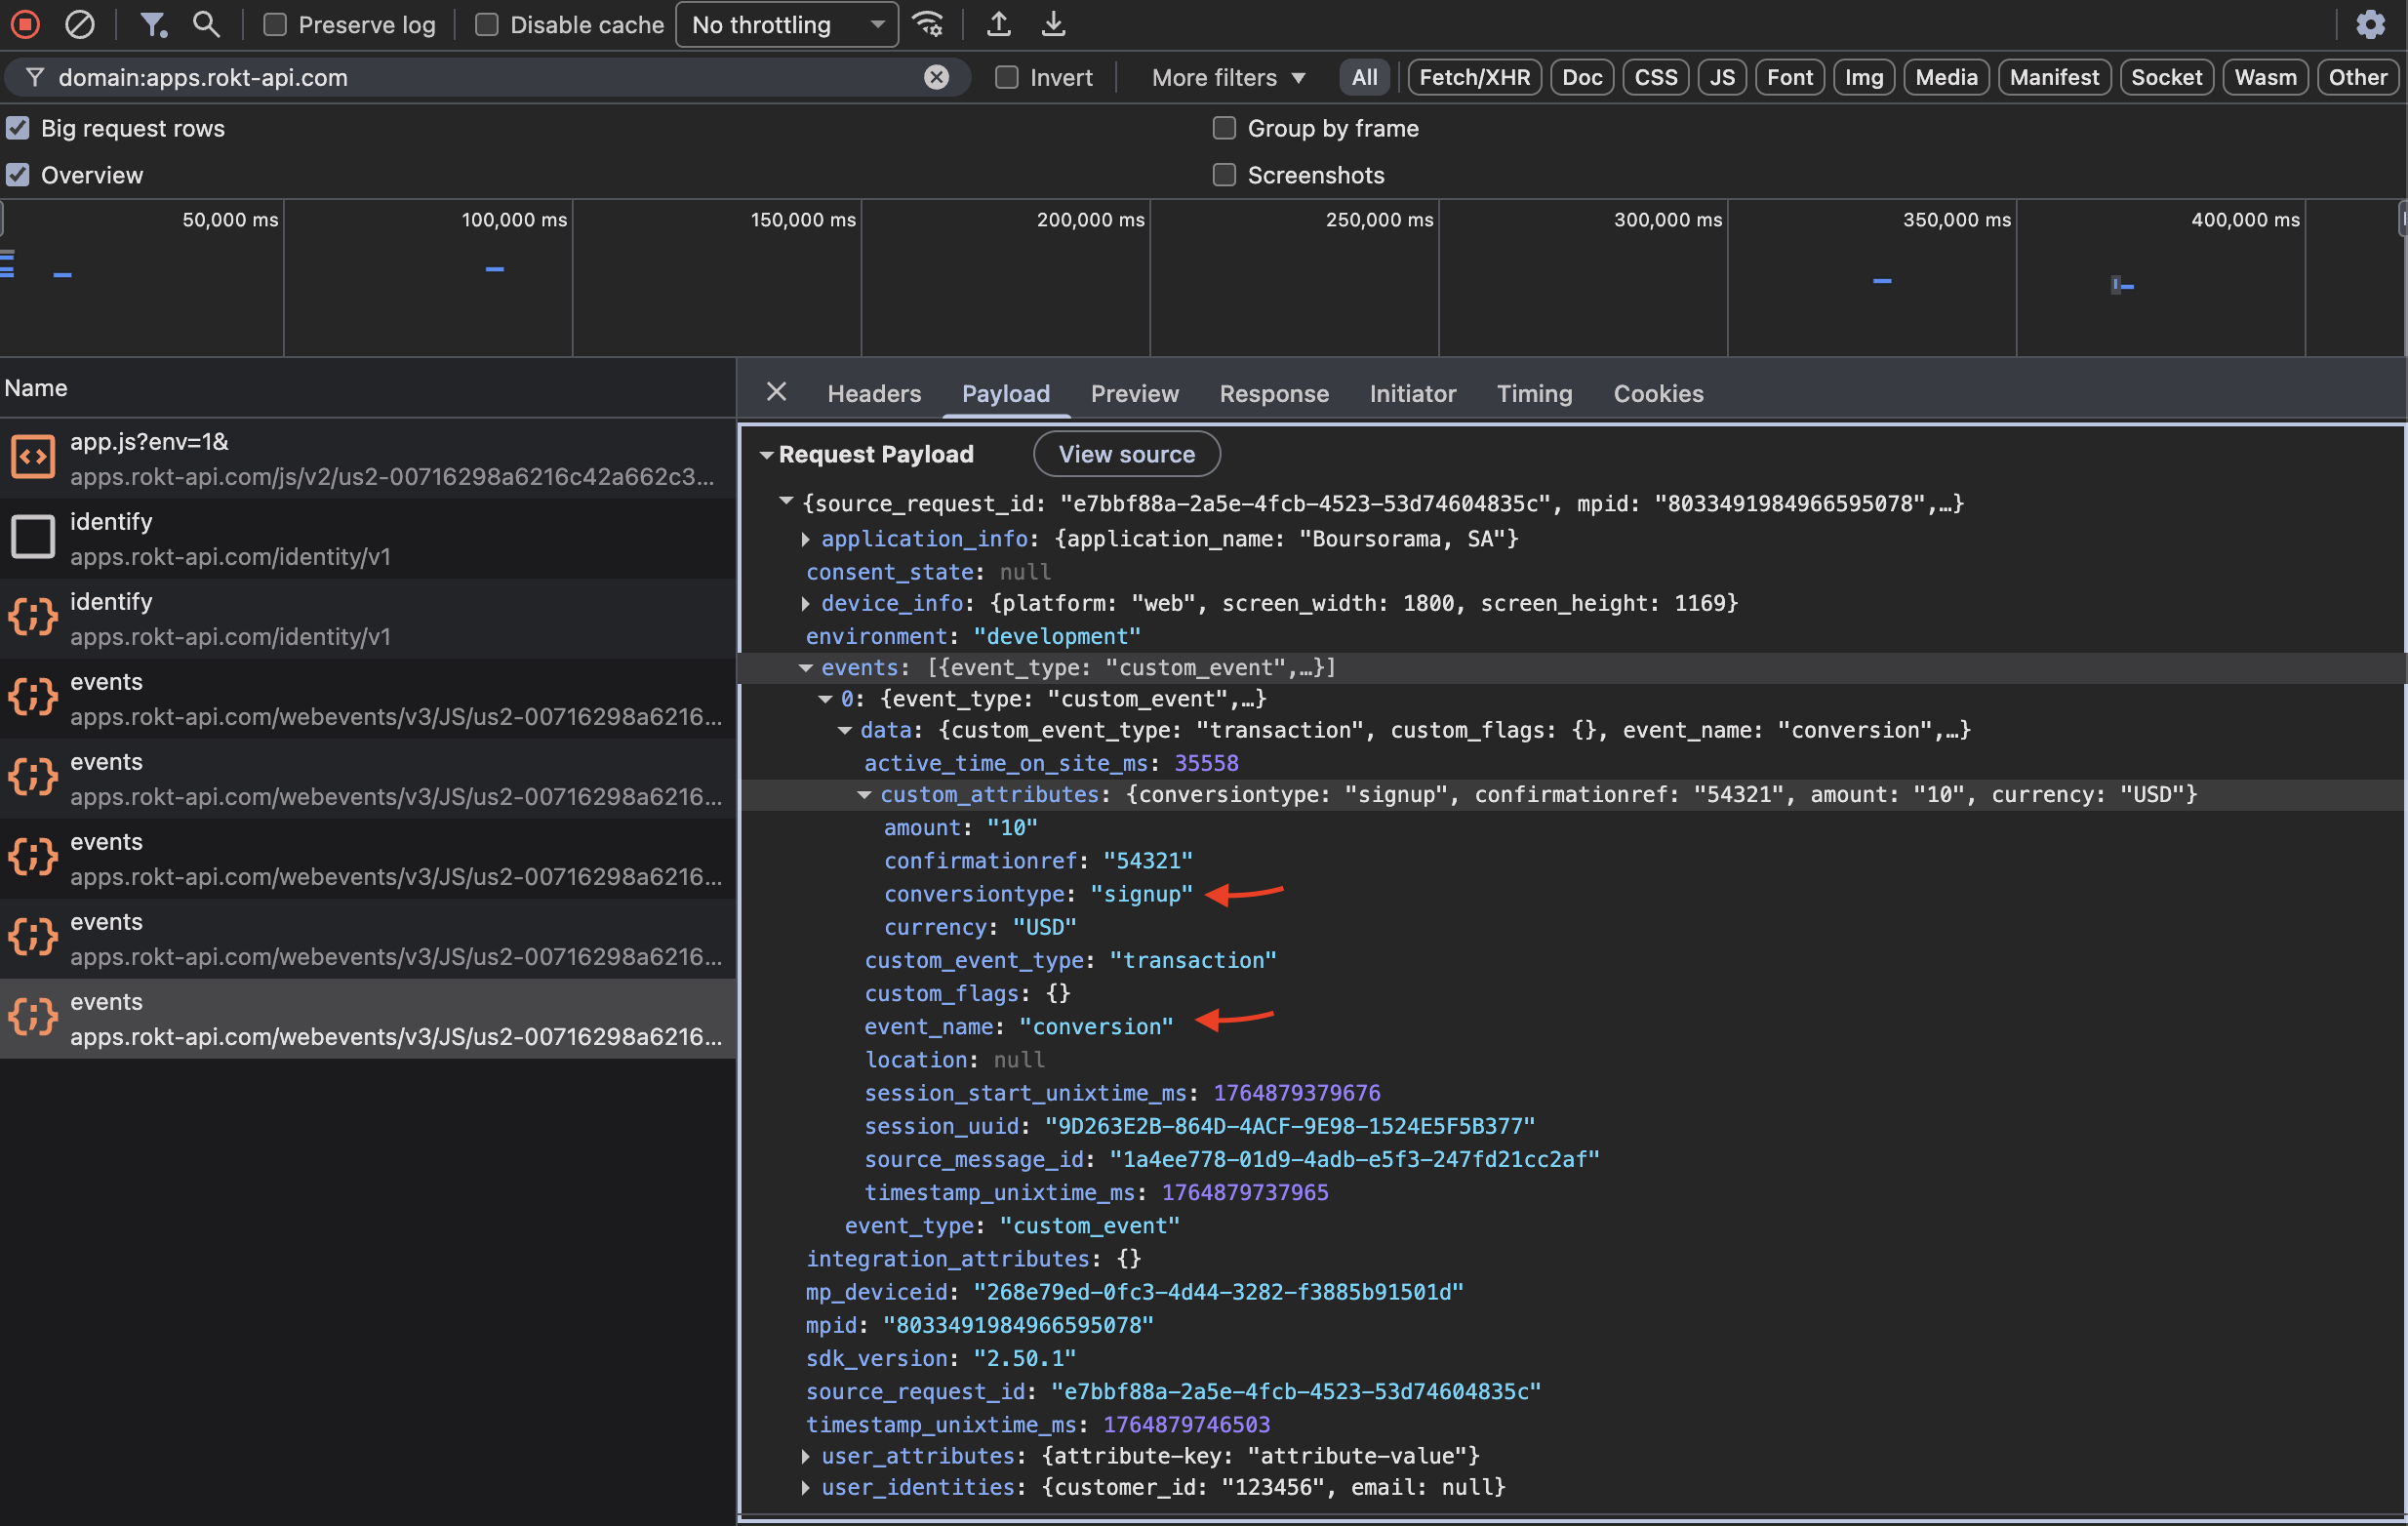
メールとユーザー属性のテストメールとユーザー属性のテスト への直接リンク
-
新しいブラウザウィンドウを開きます。
-
ブラウザの開発者ツールパネルにアクセスします。ほとんどのブラウザでは、画面を右クリックしてInspectを選択することで行います。
-
開発者ツールパネルで、Networkタブに移動し、フィルターバーに
apps.rokt-api.comを入力します。 -
Rokt JSが読み込まれ、初期化を記録するAPIコールが表示されるはずです。
-
ユーザーのメール、ハッシュ化されたメールをアイデンティティコールで設定したり、ユーザーの名前、姓、または携帯番号を設定したりすると、この情報がRoktサーバーに送信されるAPIコールに含まれることが確認できます。 取得するための代替方法:
- ユーザーメール: ブラウザコンソールに
mParticle.Identity.getCurrentUser().getUserIdentities()を入力すると、セッション内で設定された現在のユーザーのアイデンティティを持つオブジェクトが返されます。セッション外で記録された情報は一切返されません。 - ユーザー属性: ブラウザコンソールに
mParticle.Identity.getCurrentUser().getAllUserAttributes()を入力すると、セッション内で設定された現在のユーザーの属性を持つオブジェクトが返されます。セッション外で記録された情報は一切返されません。
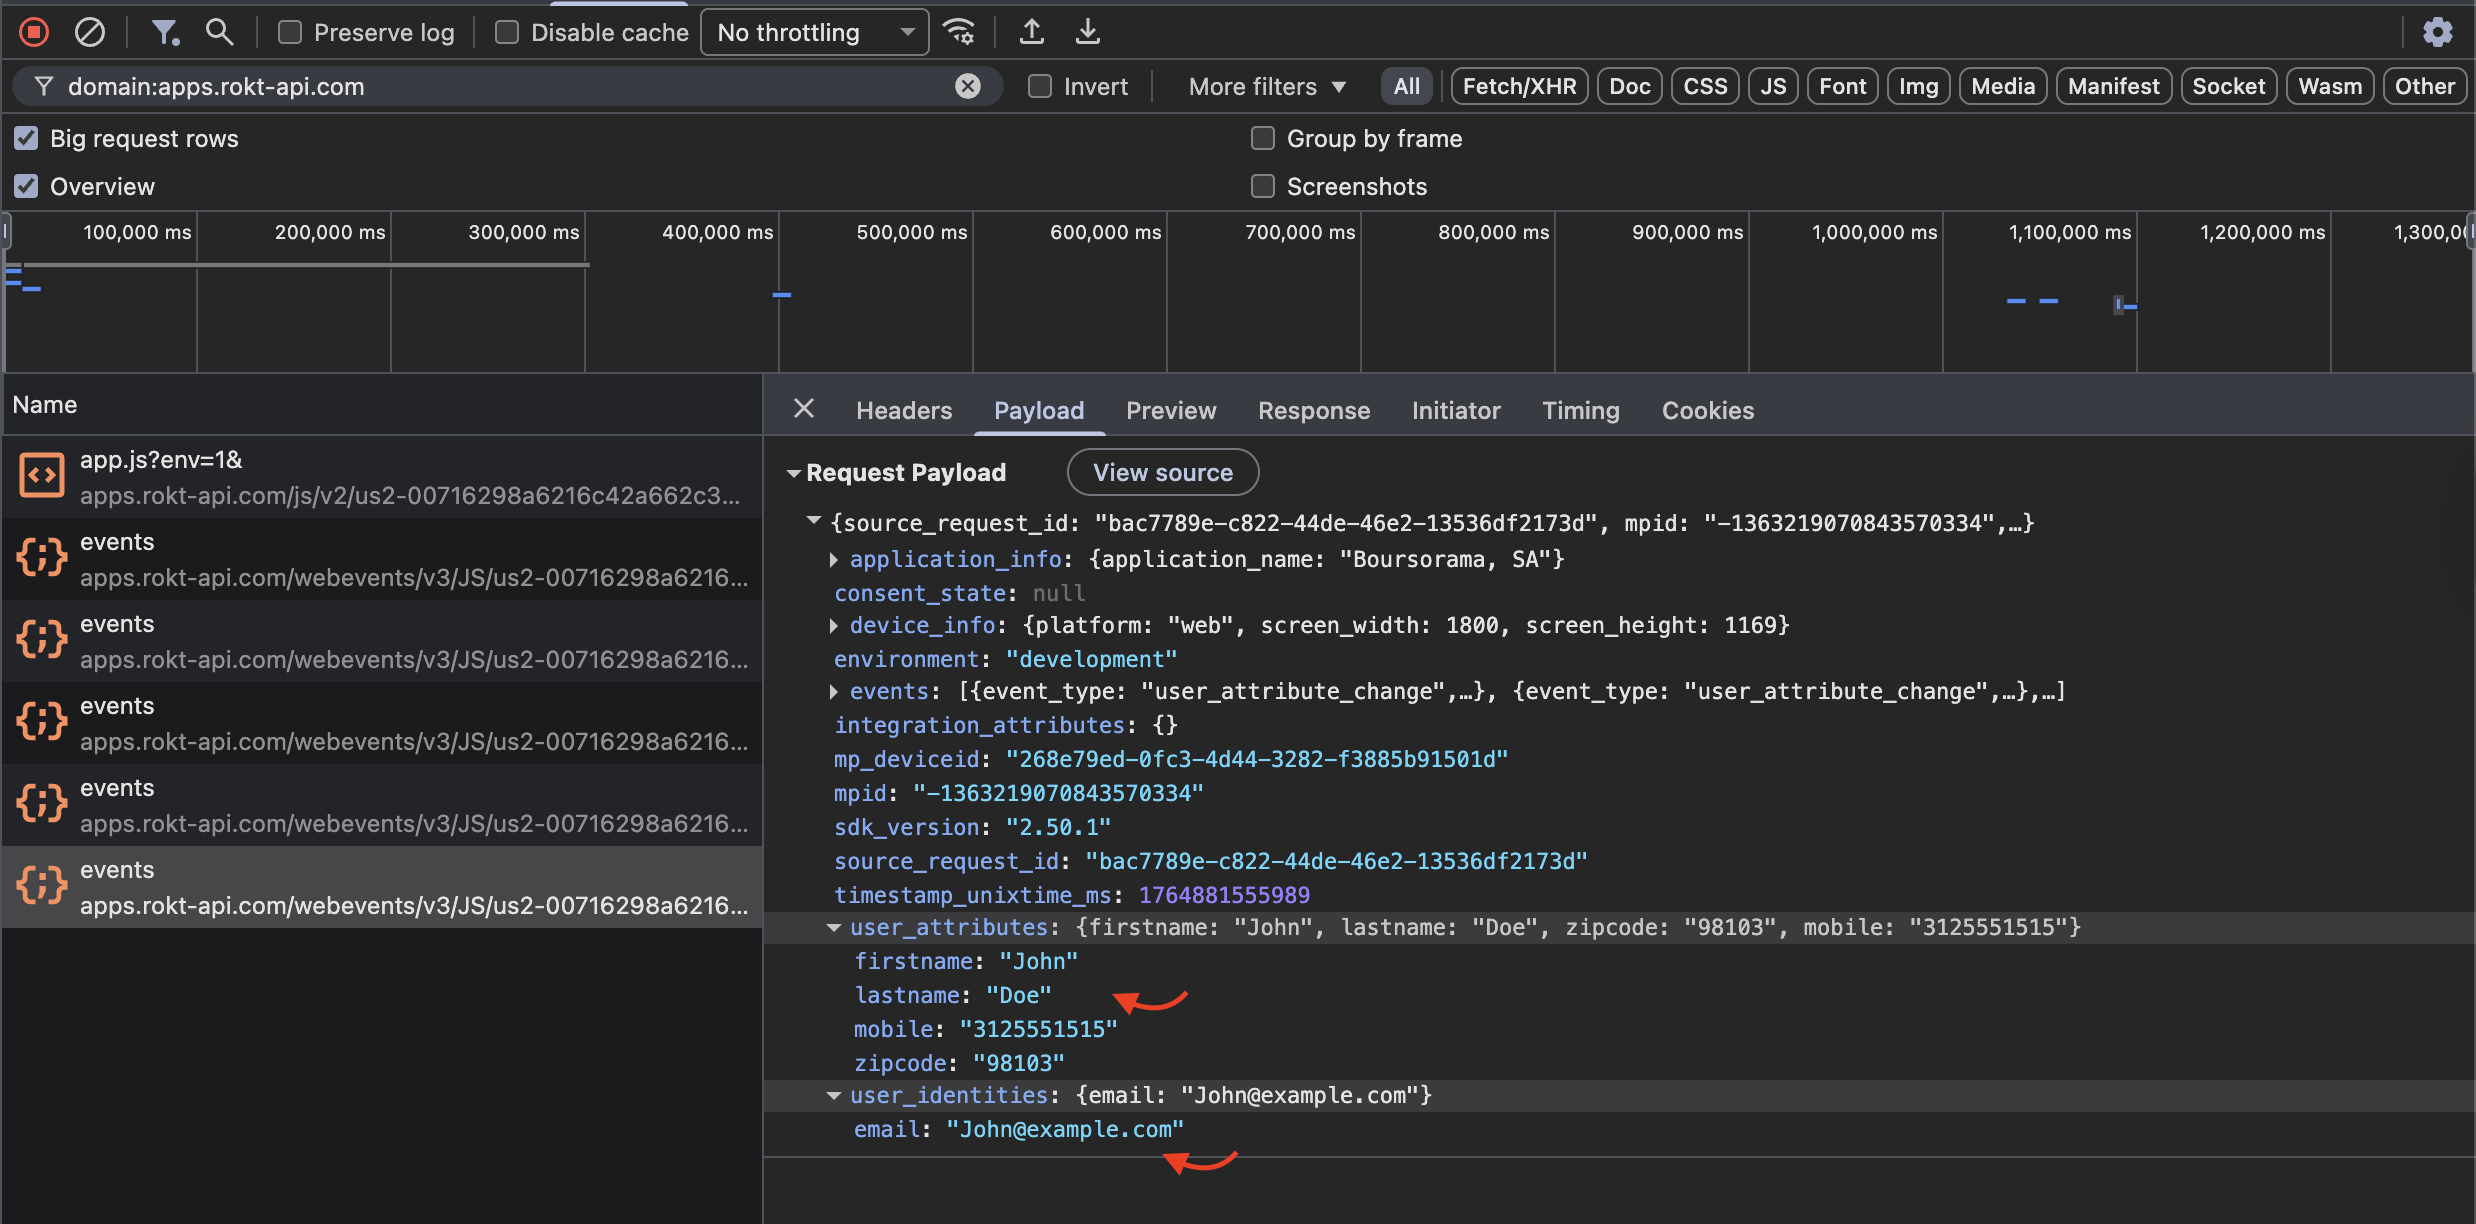
- ユーザーメール: ブラウザコンソールに
トラブルシューティングトラブルシューティング への直接リンク
Rokt Web SDK はコンテキストに基づいたエラーレポートを提供します。統合の検証に問題がある場合、問題をデバッグする最良の方法は、ブラウザの開発者ツールパネルの Console タブを使用することです。
Rokt SDK に関連しないエラーが発生している可能性もありますが、確認すべき一般的な Rokt SDK のエラーには以下のものがあります:
構文エラー構文エラー への直接リンク
統合コードにカンマが欠けていないことを確認してください。
構文エラーを確認するには:
-
ブラウザの開発者ツールパネルに移動し、Console タブを選択します。
-
Web SDK を配置したファイルにエラーがある場合、それはコンソールに記録されます。ファイルをクリックしてコードと報告されたエラーを確認します。

-
エラーはファイル内に示されます。特に、すべての属性が以下のようにカンマで区切られていることを確認してください。
不正:
email: ''
emailsha256: '',
正しい:
email: '',
emailsha256: '',
初期化エラー初期化エラー への直接リンク
- SDK の初期化スクリプトが正しいページに配置されていることを確認してください。
- タグマネージャーを使用して統合した場合、タグトリガーを設定して初期化が正しいページで読み込まれるようにし、SDK が初期化された後に selectPlacements とコンバージョンログのタグが発火するようにしてください。
付録付録 への直接リンク
上記の手順に従って配置とページビューのトラッキングを実装した後、追加のイベントトラッキングを実装したい場合があります。
カスタムイベントのトラッキングカスタムイベントのトラッキング への直接リンク
logEvent を呼び出し、イベント名、イベントタイプ、およびイベントのカスタム属性のリストを含む JSON オブジェクトを渡すことで、カスタムイベントを定義してトラッキングできます。
サポートされているカスタムイベントタイプは以下の通りです:
NavigationLocationSearchTransactionUserContentUserPreferenceSocialOther
イベントタイプはオプションです。イベントタイプを省略した場合、イベントは単に unknown として分類されます。
mParticle.logEvent(
  // The event name
  "event-name",
  // The event type
  mParticle.EventType.Other,
  // Include custom event attributes to further describe the event
  {
    "custom-attribute-name": "custom-attribute-value",
  }
);
カスタムイベントとコンバージョンイベントのトラッキングに加えて、以下はトラッキングしたい コマースイベント の例です。トラッキングする最適なイベントを特定し、それらをサイトに実装する方法については、アカウントマネージャーに相談してください:
purchase- ユーザーが購入または取引を行ったとき。sign_up- ユーザーがイベントまたはサービスに登録したとき。first_time_deposit- ユーザーが初めてデポジットを提供したとき。subscription_started- ユーザーがサブスクリプションを開始したとき。app_install- ユーザーがアプリをインストールしたとき。add_payment_info- ユーザーが支払い情報を追加したとき。add_to_cart- ユーザーがアイテムをカートに追加したとき。add_to_wishlist- ユーザーがアイテムをウィッシュリストに追加したとき。
コンテンツセキュリティポリシーコンテンツセキュリティポリシー への直接リンク
サイトがコンテンツセキュリティポリシーを強制している場合、SDKスクリプトの読み込みやSDKからRoktのドメインへの呼び出しがブロックされる可能性があります。また、キャンペーンがパートナーサイトのRokt配置内でページを表示する場合(埋め込み体験)、CSPはRoktがページをフレームに入れることを許可するかどうかも制御します。これらは通常、ウェブサーバーやCDNを所有するチームによって設定され、このページのSDK統合とは別に管理されます。
手順については、コンテンツセキュリティポリシーの設定を参照してください。