広告主向けAdobe Experience Platform統合
このページでは、Rokt AdsをAdobe Experience Platformを使用して実装し、コンバージョンをキャンペーンにリンクしてループを閉じる方法を説明します。コンバージョンをAdsのエンゲージメントにリンクすることで、より正確なアトリビューション、リアルタイムの最適化、およびキャンペーンの測定が可能になります。
データレイヤーに基づいてAdobeでデータ要素を作成する方法と、Rokt SDKを初期化してコンバージョンをログに記録するためのルールを作成する方法を学びます。
ルールの作成ルールの作成 への直接リンク
Rokt SDKの初期化Rokt SDKの初期化 への直接リンク
- Adobe Experience Platformにサインインします。
- プロパティの概要ページから、ルールタブを開き、ルールを追加を選択します。
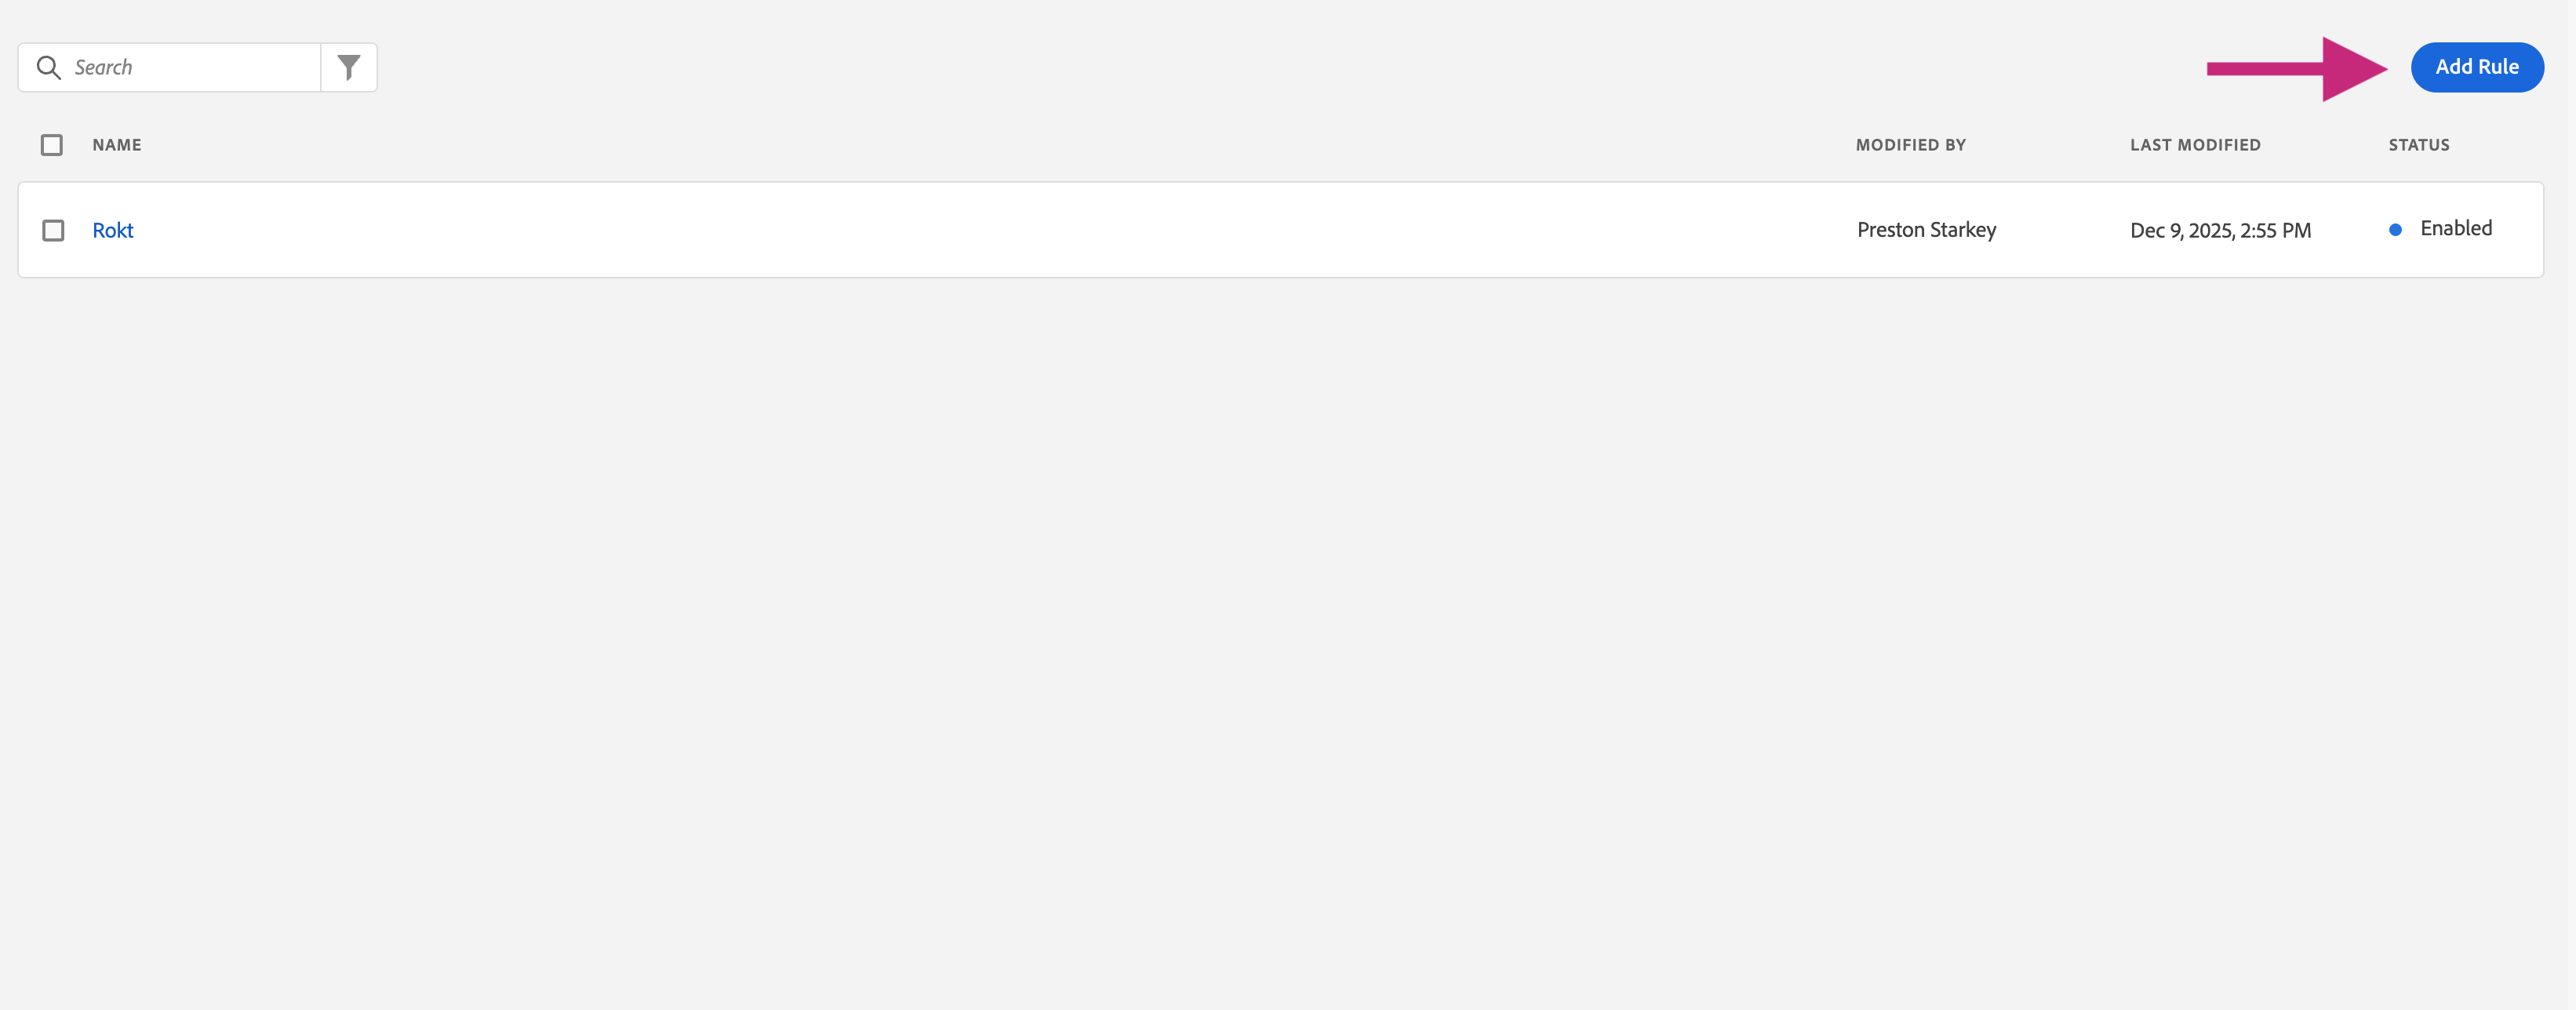
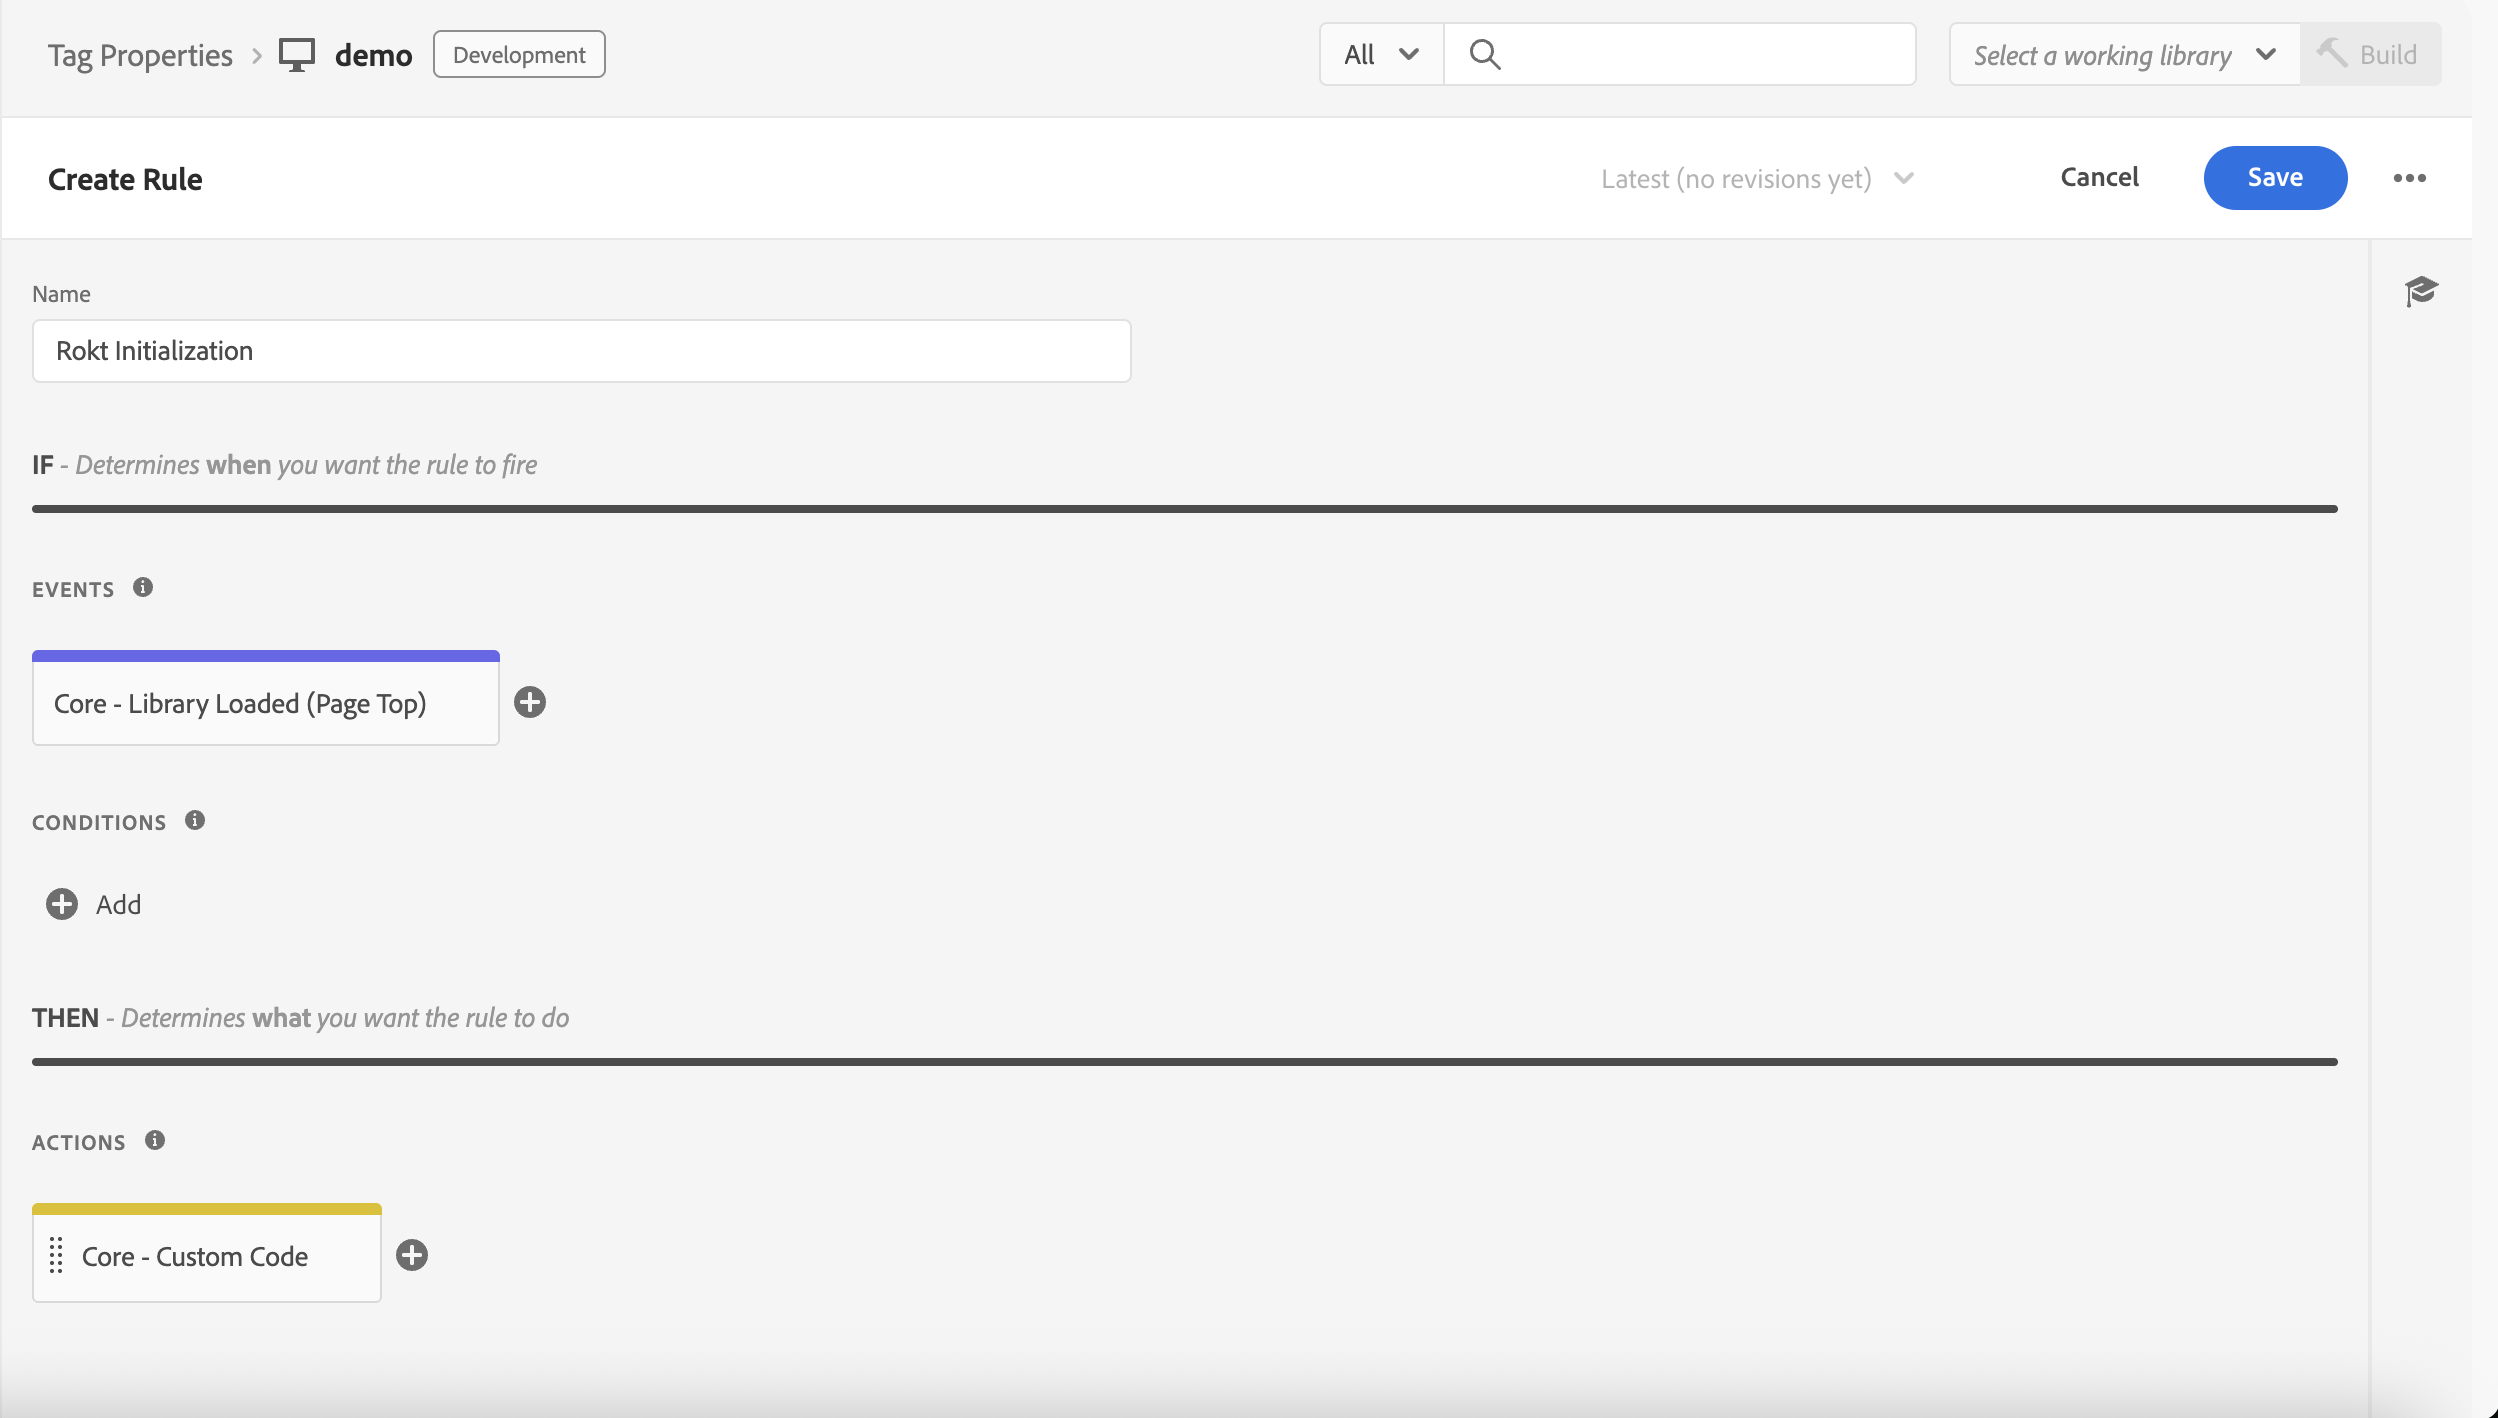
- ルールに_Rokt Initialization_のような説明的な名前を付け、ルールを発火させるイベントを作成します。
- サイトごとに異なりますが、RoktはすべてのページにSDKスクリプトを含めることを推奨しています。これにより、オファー配信の遅延が最小限に抑えられ、ユーザー識別の精度が最大化されます。
- サイトごとに異なりますが、RoktはすべてのページにSDKスクリプトを含めることを推奨しています。これにより、オファー配信の遅延が最小限に抑えられ、ユーザー識別の精度が最大化されます。
- アクションを作成し、拡張機能としてCoreを選択し、アクションタイプとしてカスタムコードを選択します。
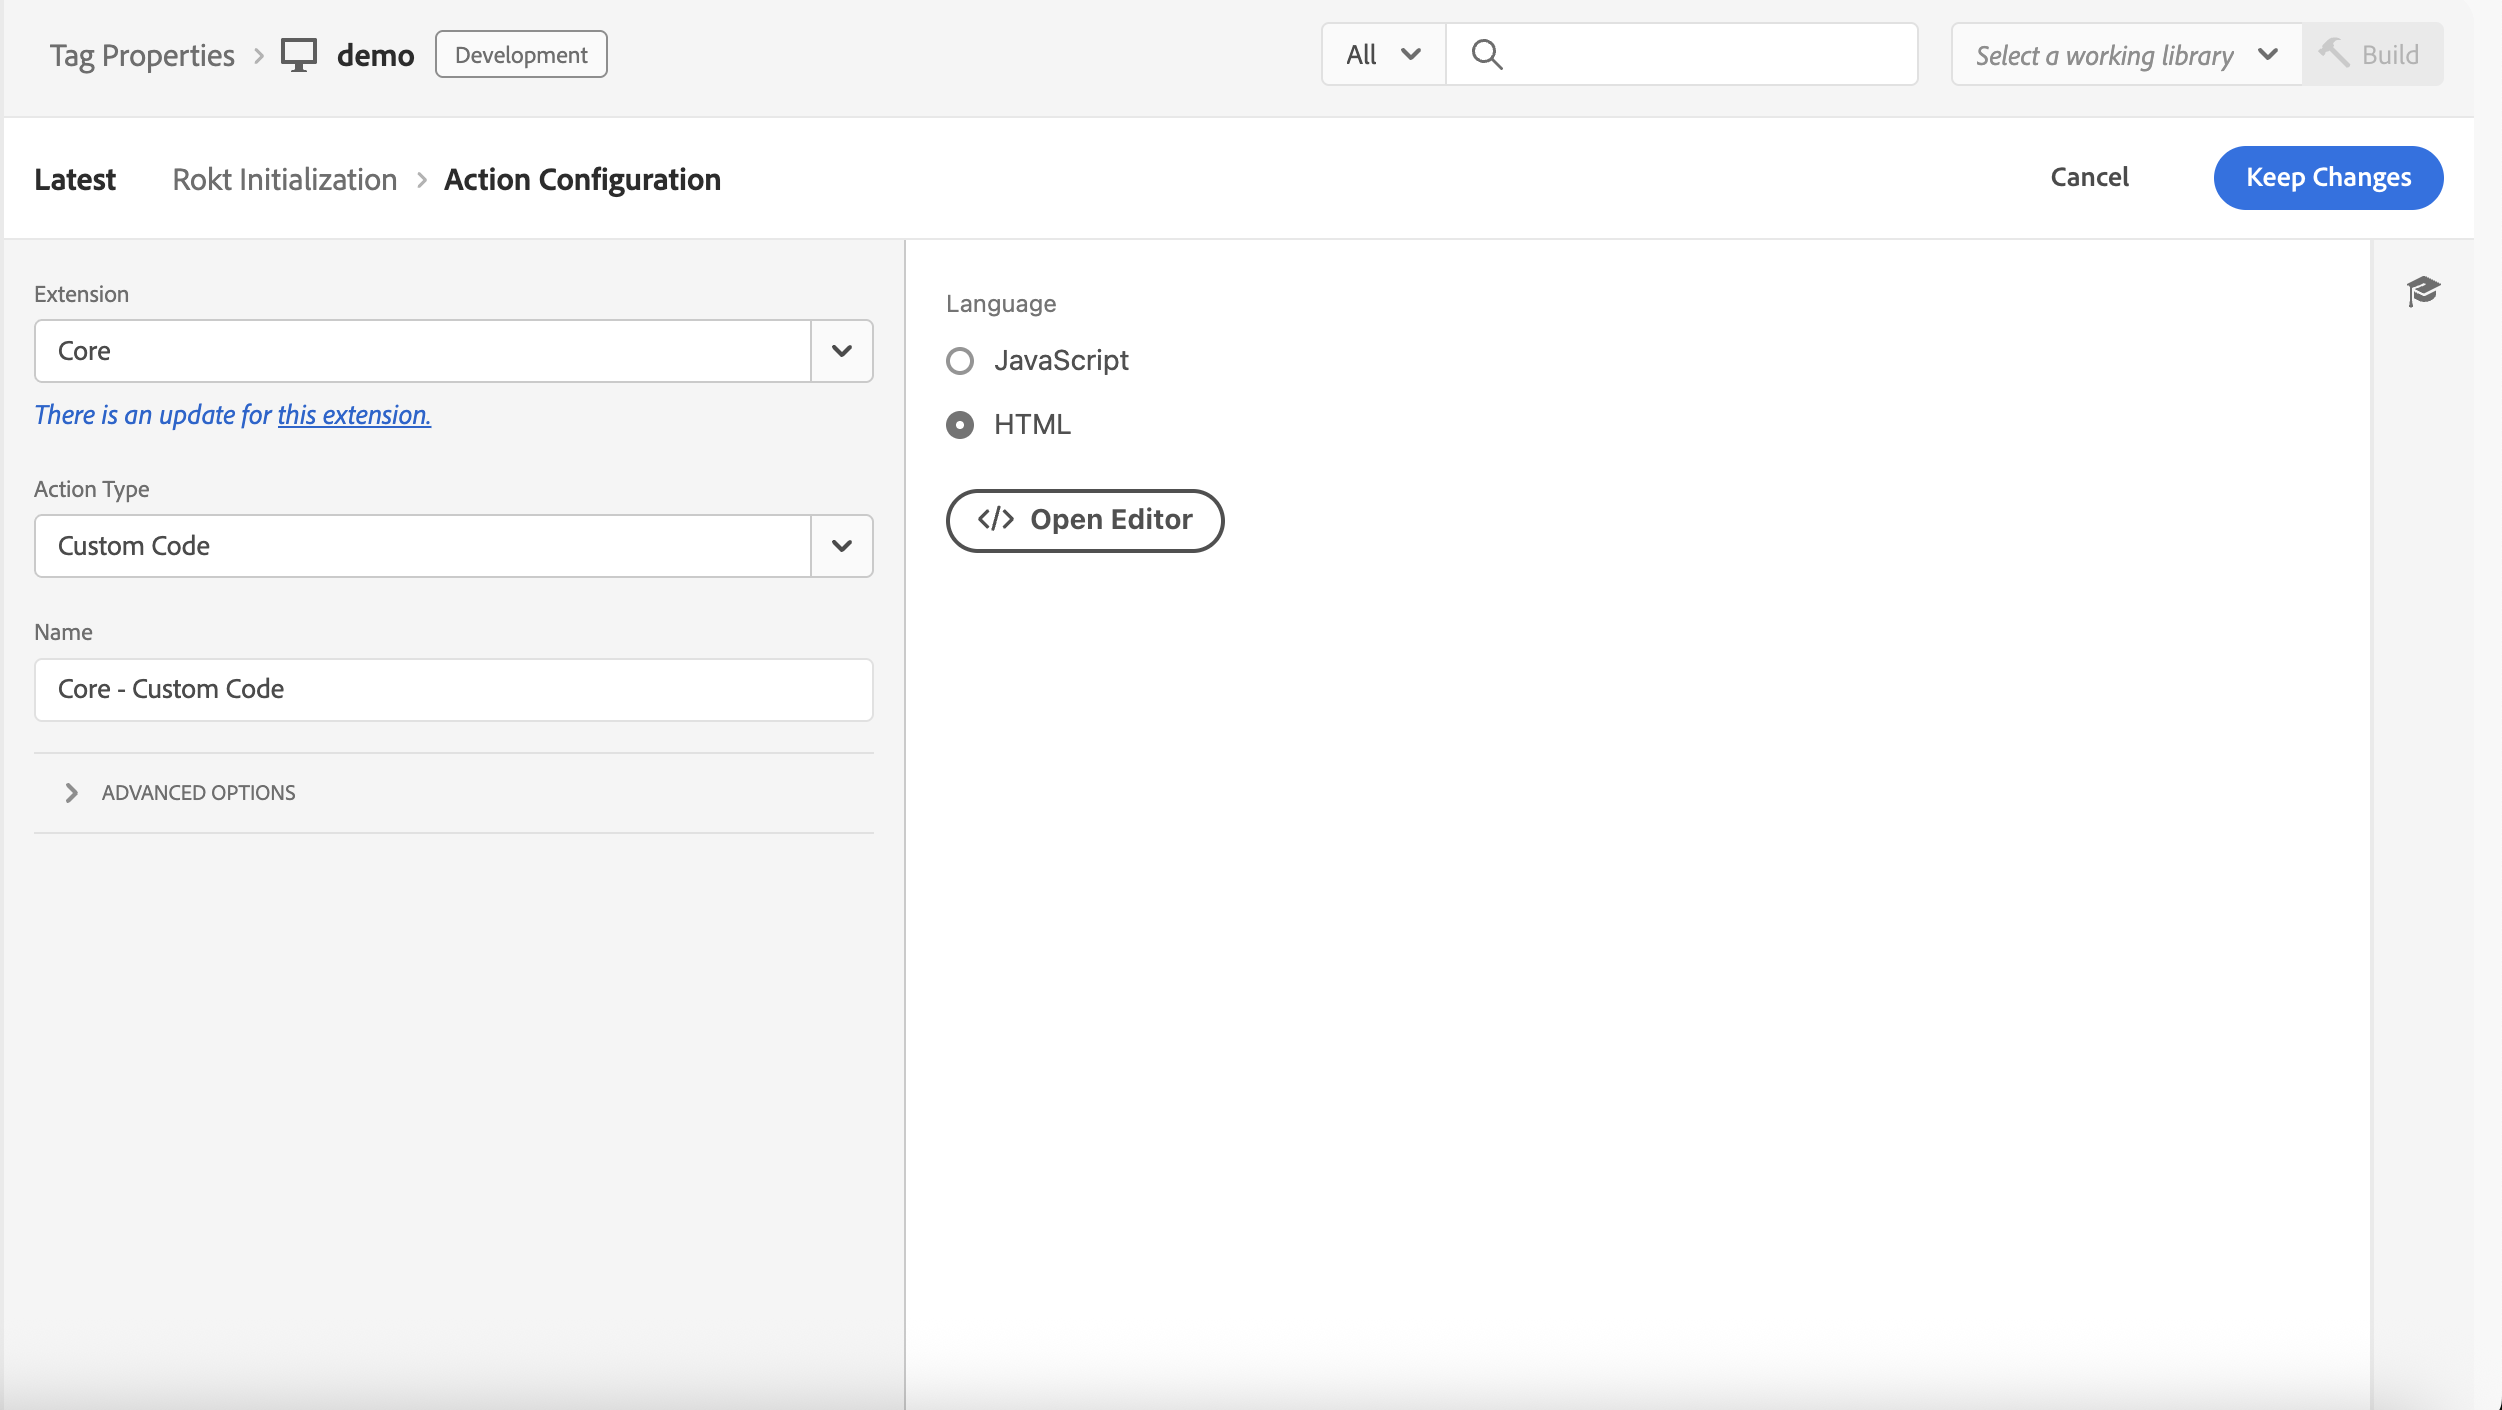
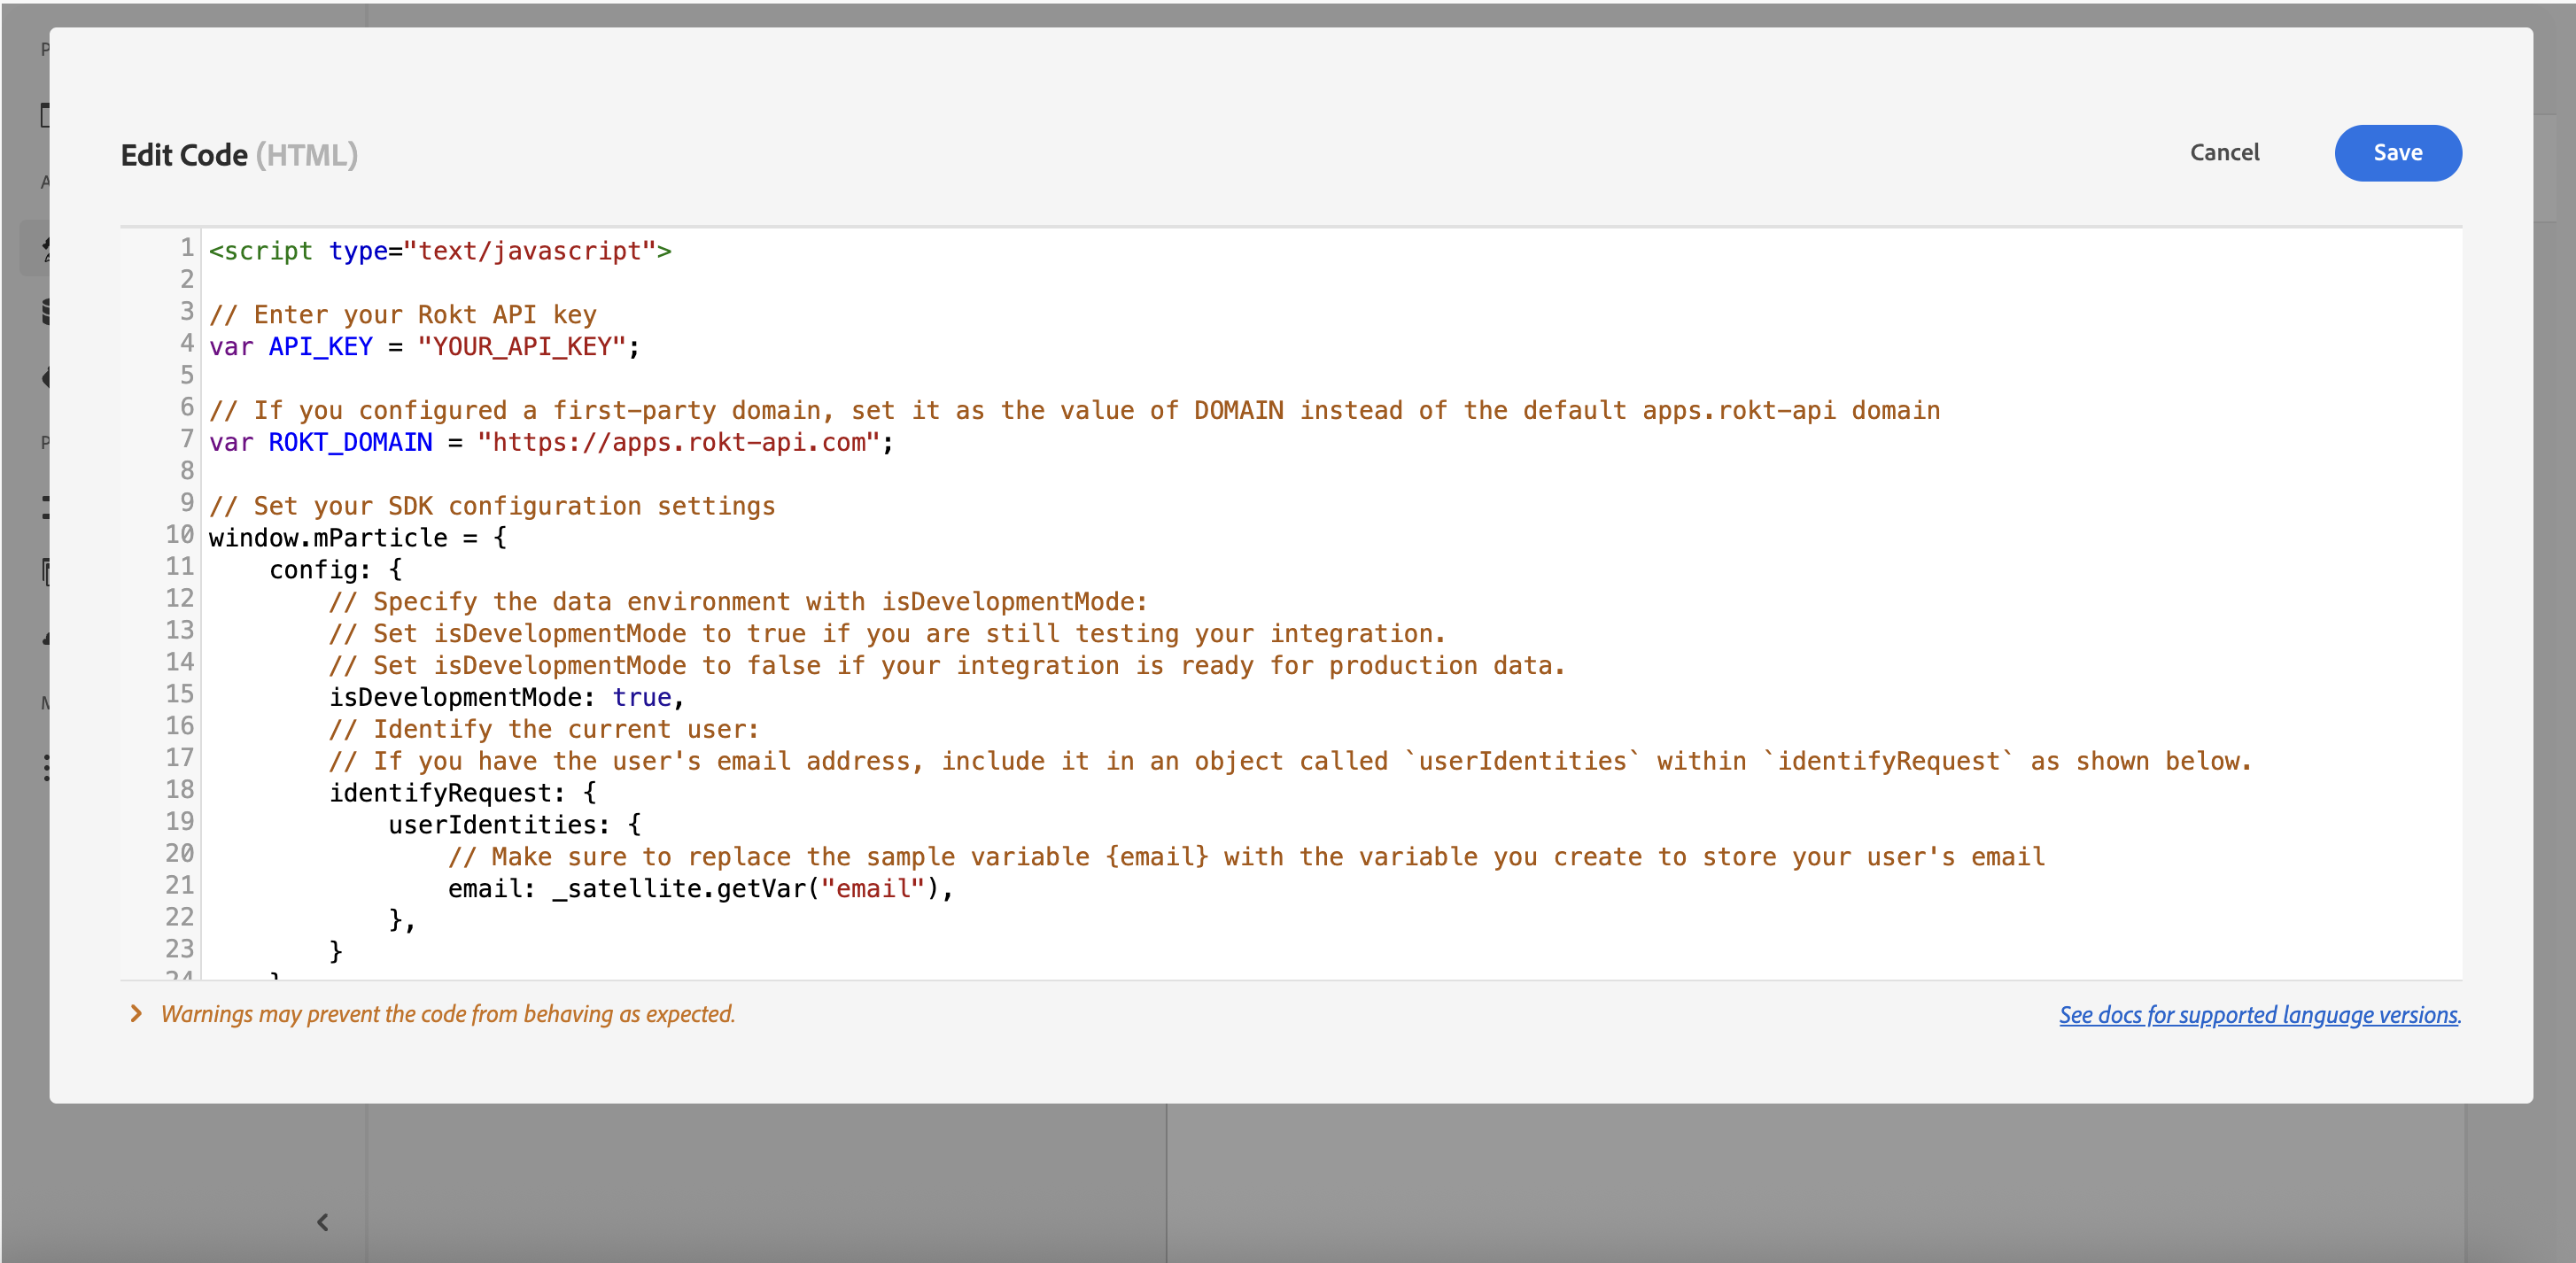
- 言語としてHTMLを選択し、以下のスニペットを貼り付けます:
<script>
// Rokt APIキーを入力�してください
const API_KEY = "YOUR_API_KEY";
// ファーストパーティドメインを設定した場合は、デフォルトのapps.rokt-apiドメインの代わりにDOMAINの値として設定してください
const ROKT_DOMAIN = "https://apps.rokt-api.com";
// SDKの設定を行います
window.mParticle = {
config: {
// isDevelopmentModeでデータ環境を指定します:
// 統合をまだテスト中の場合はisDevelopmentModeをtrueに設定します。
// 統合が本番データに対応している場合はisDevelopmentModeをfalseに設定します。
isDevelopmentMode: true,
// 現在のユーザーを識別します:
// ユーザーのメールアドレスがある場合は、以下のように`identifyRequest`内の`userIdentities`オブジェクトに含めてください。
identifyRequest: {
userIdentities: {
// サンプル変数{email}をユーザーのメールを保存するために作成した変数に置き換えてください
email: _satellite.getVar('email'),
// ハッシュ化されたメールアドレスは`other`フィールドに渡す必要があります
other: _satellite.getVar('hashed_email')
},
}
},
};
// SDKをロードします
(function(e) { window.mParticle = window.mParticle || {}; window.mParticle.EventType = { Unknown: 0, Navigation: 1, Location: 2, Search: 3, Transaction: 4, UserContent: 5, UserPreference: 6, Social: 7, Other: 8, Media: 9 }; window.mParticle.eCommerce = { Cart: {} }; window.mParticle.Identity = {}; window.mParticle.Rokt = {}; window.mParticle.config = window.mParticle.config || {}; window.mParticle.config.rq = []; window.mParticle.config.snippetVersion = 2.8; window.mParticle.ready = function(e) { window.mParticle.config.rq.push(e); }; ["endSession", "logError", "logBaseEvent", "logEvent", "logForm", "logLink", "logPageView", "setSessionAttribute", "setAppName", "setAppVersion", "setOptOut", "setPosition", "startNewSession", "startTrackingLocation", "stopTrackingLocation"].forEach(function(e) { window.mParticle[e] = function() { var t = Array.prototype.slice.call(arguments); t.unshift(e); window.mParticle.config.rq.push(t); }; }); ["setCurrencyCode", "logCheckout"].forEach(function(e) { window.mParticle.eCommerce[e] = function() { var t = Array.prototype.slice.call(arguments); t.unshift("eCommerce." + e); window.mParticle.config.rq.push(t); }; }); ["identify", "login", "logout", "modify"].forEach(function(e) { window.mParticle.Identity[e] = function() { var t = Array.prototype.slice.call(arguments); t.unshift("Identity." + e); window.mParticle.config.rq.push(t); }; }); ["selectPlacements","hashAttributes","hashSha256","setExtensionData","use","getVersion","terminate"].forEach(function(e) { window.mParticle.Rokt[e] = function() { var t = Array.prototype.slice.call(arguments); t.unshift("Rokt." + e); window.mParticle.config.rq.push(t); }; }); var t = window.mParticle.config.isDevelopmentMode ? 1 : 0, n = "?env=" + t, a = window.mParticle.config.dataPlan; if (a) { var o = a.planId, r = a.planVersion; o && (r && (r < 1 || r > 1e3) && (r = null), n += "&plan_id=" + o + (r ? "&plan_version=" + r : "")); } var i = window.mParticle.config.versions, s = []; i && Object.keys(i).forEach(function(e) { s.push(e + "=" + i[e]); }); var c = document.createElement("script"); c.type = "text/javascript"; c.async = !0; window.ROKT_DOMAIN = ROKT_DOMAIN || 'https://apps.rokt-api.com'; mParticle.config.domain = ROKT_DOMAIN.split('//')[1]; c.src = ROKT_DOMAIN + "/js/v2/" + e + "/app.js" + n + "&" + s.join("&"); var l = document.getElementsByTagName("script")[0]; l.parentNode.insertBefore(c, l); })(API_KEY);
</script>
- 設定を入力します:
YOUR_API_KEYを、Rokt アカウントマネージャーから提供された API キーに置き換えます。- ファーストパーティドメイン統合用にカスタムドメインを設定した場合は、
https://apps.rokt-api.comを新しいドメインに置き換えます。 - タグを本番データで使用する準備ができたら、
isDevelopmentModeをfalseに設定します。タグをまだテスト中の場合は、trueのままにしておきます。 emailが、ユーザーのハッシュ化されていないメールアドレスを保存するために作成したデータ要素に設定されていることを確認します。上記のスニペットでは、_satellite.getVar('email')�を使用してデータ要素にアクセスできます。
- アクション設定で 変更を保持 をクリックし、保存 します。
ユーザーを識別するユーザーを識別する への直接リンク
現在のユーザーを Rokt に識別するルールも作成する必要があります。このルールをサイトに含め、ユーザーがメールアドレスを提供したらすぐに発火するようにします。
- プロパティの概要ページから、ルール タブを開き、ルールを追加 を選択します。
- ルールに Rokt Identify のような説明的な名前を付け、ルールを発火させるイベントを作成します。
- ユーザーがメールアドレスを提供したらすぐにこのルールが発火するようにイベントを設定します。使用するイベントは、特定の統合に依存します。
:::注意 ユーザー識別ルールに使用する正確なイベント設定は、統合に依存します。イベントを記録する前にユーザーが正常に識別されるように、このルールを最適に実装する方法について質問がある場合は、Rokt アカウントマネージャーに相談してください。 :::
- アクションを作成し、拡張機能として Core を、アクションタイプとして カスタムコード を選択します。
- 言語として HTML を選択し、次のスニペットを貼り付けます:
<script>
const identifyRequest = {
    userIdentities: {
        // 生のハッシュ化されていないメールを使用している場合は、`email` フィールドに渡します
        email: _satellite.getVar('email'),
        // ハッシュ化されたメールを使用している場合は、`other` フィールドに渡します
        other: _satellite.getVar('hashed_email')
    }
};
window.mParticle.Identity.identify(identifyRequest);
</script>
- ユーザーの生のハッシュ化されていないメールアドレスを Rokt に送信する場合は、
emailに設定します。ハッシュ化されたメールアドレスを送信する場合は、otherに設定します。例の変数名 (emailおよびhashed-email) を、ユーザーのメールアドレスを保存するために作成したデータ要素名に置き換えてください。 - アクション設定で 変更を保持 をクリックし、保存 します。
ページビューのトラッキングページビューのトラッキング への直接リンク
広告主は、各ページが読み込まれるとすぐにページビ��ューのルールを追加することで、コンバージョンファネルの各ページのビューをトラッキングする必要があります。
- プロパティの概要ページから、ルール タブを開き、ルールを追加 を選択します。
- ルールに Rokt Page View などのわかりやすい名前を付け、ルールが発火するようにイベントを作成します。
- 各ページが読み込まれるとすぐにこのルールが発火するようにイベントを設定します。使用するイベントは、特定の統合によって異なります。
ページビュールールの正確なイベント設定は、統合によって異なります。ページがトラッキングされるようにこのルールを最適に実装する方法について質問がある場合は、Roktアカウントマネージャーに相談してください。
- アクションを作成し、拡張機能として Core を選択し、アクションタイプとして Custom Code を選択します。
- 言語として HTML を選択し、次のスニペットを貼り付けます:
<script>
window.mParticle.ready(
  function() {
    mParticle.logPageView(
        // ページ名
        "page view",
        // ページを説明する属性を含むオブジェクト
        {
            "url": window.location.toString(),
            "product": "Example Product Name",
            // 他のページ固有の属性をキー/値ペアとして追加
            "custom-attribute-name": "custom-attribute-value"
        }
    );
  }
);
</script>
Web SDK の logPageView メソッドは、2つの引数を取ります:
- ページ名:読み込まれているページの名前の文字列
- カスタム属性:ページに関する情報を含むキー/値ペアのオブジェクト
ページ名フィールドは、一般的なページ名に設定する必要があります。例えば、eコマースウェブサイトには何百もの商品詳細ページがあるかもしれません。これらを正しく記録するには、一般的な名前(例:「商品詳細ページ」)を使用し、ページのURLや他の属性を属性として記録する必要があります。
コンバージョンのログコンバージョンのログ への直接リンク
Rokt SDK を初期化するためのルールを作成することに加えて、Rokt 広告主の統合にはコンバージョンをログするためのルールも必要です。
-
プロパティの概要ページから、ルール タブを開き、ルールを追加 を選択します。
-
ルールに Rokt Log Conversion などのわかりやすい名前を付け、ルールが発火するようにイベントを作成します。
-
次のステップは、サイトがマルチページアプリケーション(MPA)かシングルページアプリケーション(SPA)かによって異なります:
-
マルチページアプリケーションのトリガー設定マルチページアプリケーションのトリガー設定 への直接リンク
- イベントタイプを Core → DOM Ready または Core → Page Bottom に設定します。
- 条件の下で、Core → Path Without Query String または Page URL 条件を追加します。
- タグを発火させるページを識別するための一致ルールを入力します。例えば、確認ページが
example.com/cart/payment/confirmationの場合、識別パラメータはcart、payment、またはconfirmationのいずれかにすることができます。
-
シングルページアプリケーションのトリガー設定シングルページアプリケーションのトリガー設定 への直接リンク
- イベントタイプを Core → History Change に設定します。
- 条件の下で、Core → Page URL 条件を追加します。
- タグを発火させるページを識別するための一致ルールを入力します。例えば、確認ページが
example.com/cart/payment/confirmationの場合、識別パラメータはcart、payment、またはconfirmationのいずれかにすることができます。
-
-
アクションを作成し、拡張機能として Core を選択し、アクションタイプとして Custom Code を選択します。
-
言語として HTML を選択し、次のスニペットを貼り付けます:
<script>
window.mParticle.ready(
  function() {
        var currentUser = mParticle.Identity.getCurrentUser();
        currentUser.setUserAttribute("firstname", _satellite.getVar('first_name'));
        currentUser.setUserAttribute("lastname", _satellite.getVar('last_name'));
        currentUser.setUserAttribute("zipcode", _satellite.getVar('zipcode'));
        currentUser.setUserAttribute("mobile", _satellite.getVar('mobile'));

        mParticle.logEvent(
        "conversion", // イベントの名前
        mParticle.EventType.Transaction, // イベントタイプ
        {
            "conversiontype": _satellite.getVar('conversiontype'), // コンバージョンのタイプ
            "confirmationref": _satellite.getVar('confirmationref'), // トランザクションID / 注文ID
            "amount": _satellite.getVar('amount'), // トランザクション金額 例: 300.5
            "currency": _satellite.getVar('currency'), // トランザクション通貨 例: USD
        }
    );
  }
);
</script>
- サイトのデータレイヤーに基づいて作成した変数で、Rokt に転送したい各属性を設定します。
スニペット内の例の属性を自分のデータ要素に置き換えることを忘れないでください。
- アクション設定で 変更を保持 をクリックし、保存 します。
ルールの順序ルールの順序 への直接リンク
Adobe Experience Platform は、異なるルール間で同じイベントを共有していても、ルールの実行順序を保証しません。後続のイベントルールが正しく発火するようにするには、共有カスタムイベントを使用してこれらのルールのシーケンスを間接的に制御できます。
- 初期化スニペットに次のカスタムイベントを追加します:
window.dispatchEvent(new Event("roktReady"));
- 後続のルールで、カスタムイベントイベントタイプを持つイベントを追加します
- イベントタイプを設定したイベント名に設定します。
- ルールに関連する条件を追加し�ます
Adobe Experience Platform での変数の設定Adobe Experience Platform での変数の設定 への直接リンク
データレイヤーの理解データレイヤーの理解 への直接リンク
データレイヤーは、開発者によってウェブページに実装されている必要があります。
データレイヤーは、Adobe Experience Platform のデータ要素と共有したい情報をすべて含むオブジェクトです。イベントや変数などの情報はデータレイヤーを介して Adobe に共有でき、変数の値や特定のイベントに基づいて Adobe Experience Platform のデータ要素でトリガーを設定できます。
Adobe は、新規または再構築された実装に Adobe Client Data Layer を使用することを推奨しています。他のデータレイヤー仕様を使用することも自由です。組織のニーズに合った一貫したデータレイヤーに合わせることが最も重要です。
データレイヤーの動作についての詳細は、Adobe Experience 開発者ガイド を参照してください。
データレイヤーの例
window.adobeDataLayer = window.adobeDataLayer || [];

window.adobeDataLayer.push({
  email: "jenny.smith@rokt.com",
  user: { firstname: "Jenny", lastname: "Smith" },
  ecommerce: { transaction: { amount: "12.36" } },
  event: "page loaded",
});
データ要素の特定データ要素の特定 への直接リンク
データ要素は Adobe Experience Platform に設定され、データレイヤーと一致します。データ要素についての詳細は、Adobe Experience 開発者ガイド を参照してください。
ページ上のデータレイヤーの構造は、Adobe Experience Platform のデータ要素名に影響します。次の例を参照してください。データレイヤーの一部としてデータコレクターオブジェクトを使用する場合、オブジェクトとプロパティをデータ要素にキャプチャするためのパスでドット表記を使用します。例: _myData.pageName、adobeDataLayer.pageName など。
データレイヤースクリプト例 1:
window.adobeDataLayer.push({
  email: "jenny.smith@rokt.com",
});
データレイヤーパス名: adobeDataLayer.email
データレイヤースクリプト例 2:
window.adobeDataLayer.push({
  user: {
    firstname: "Jenny",
  },
});
データレイヤーパス名: adobeDataLayer.user.firstname
データレイヤースクリプト例 3:
window.adobeDataLayer.push({
  ecommerce: {
    transaction: {
      amount: "12.36",
    },
  },
});
データレイヤーパス名: adobeDataLayer.ecommerce.transaction.amount
JavaScript 変数データ要素タイプは、配列参照をブラケットではなくドットとして扱うため、firstname データ要素を adobeDataLayer.user[0].firstname として参照することはできません。
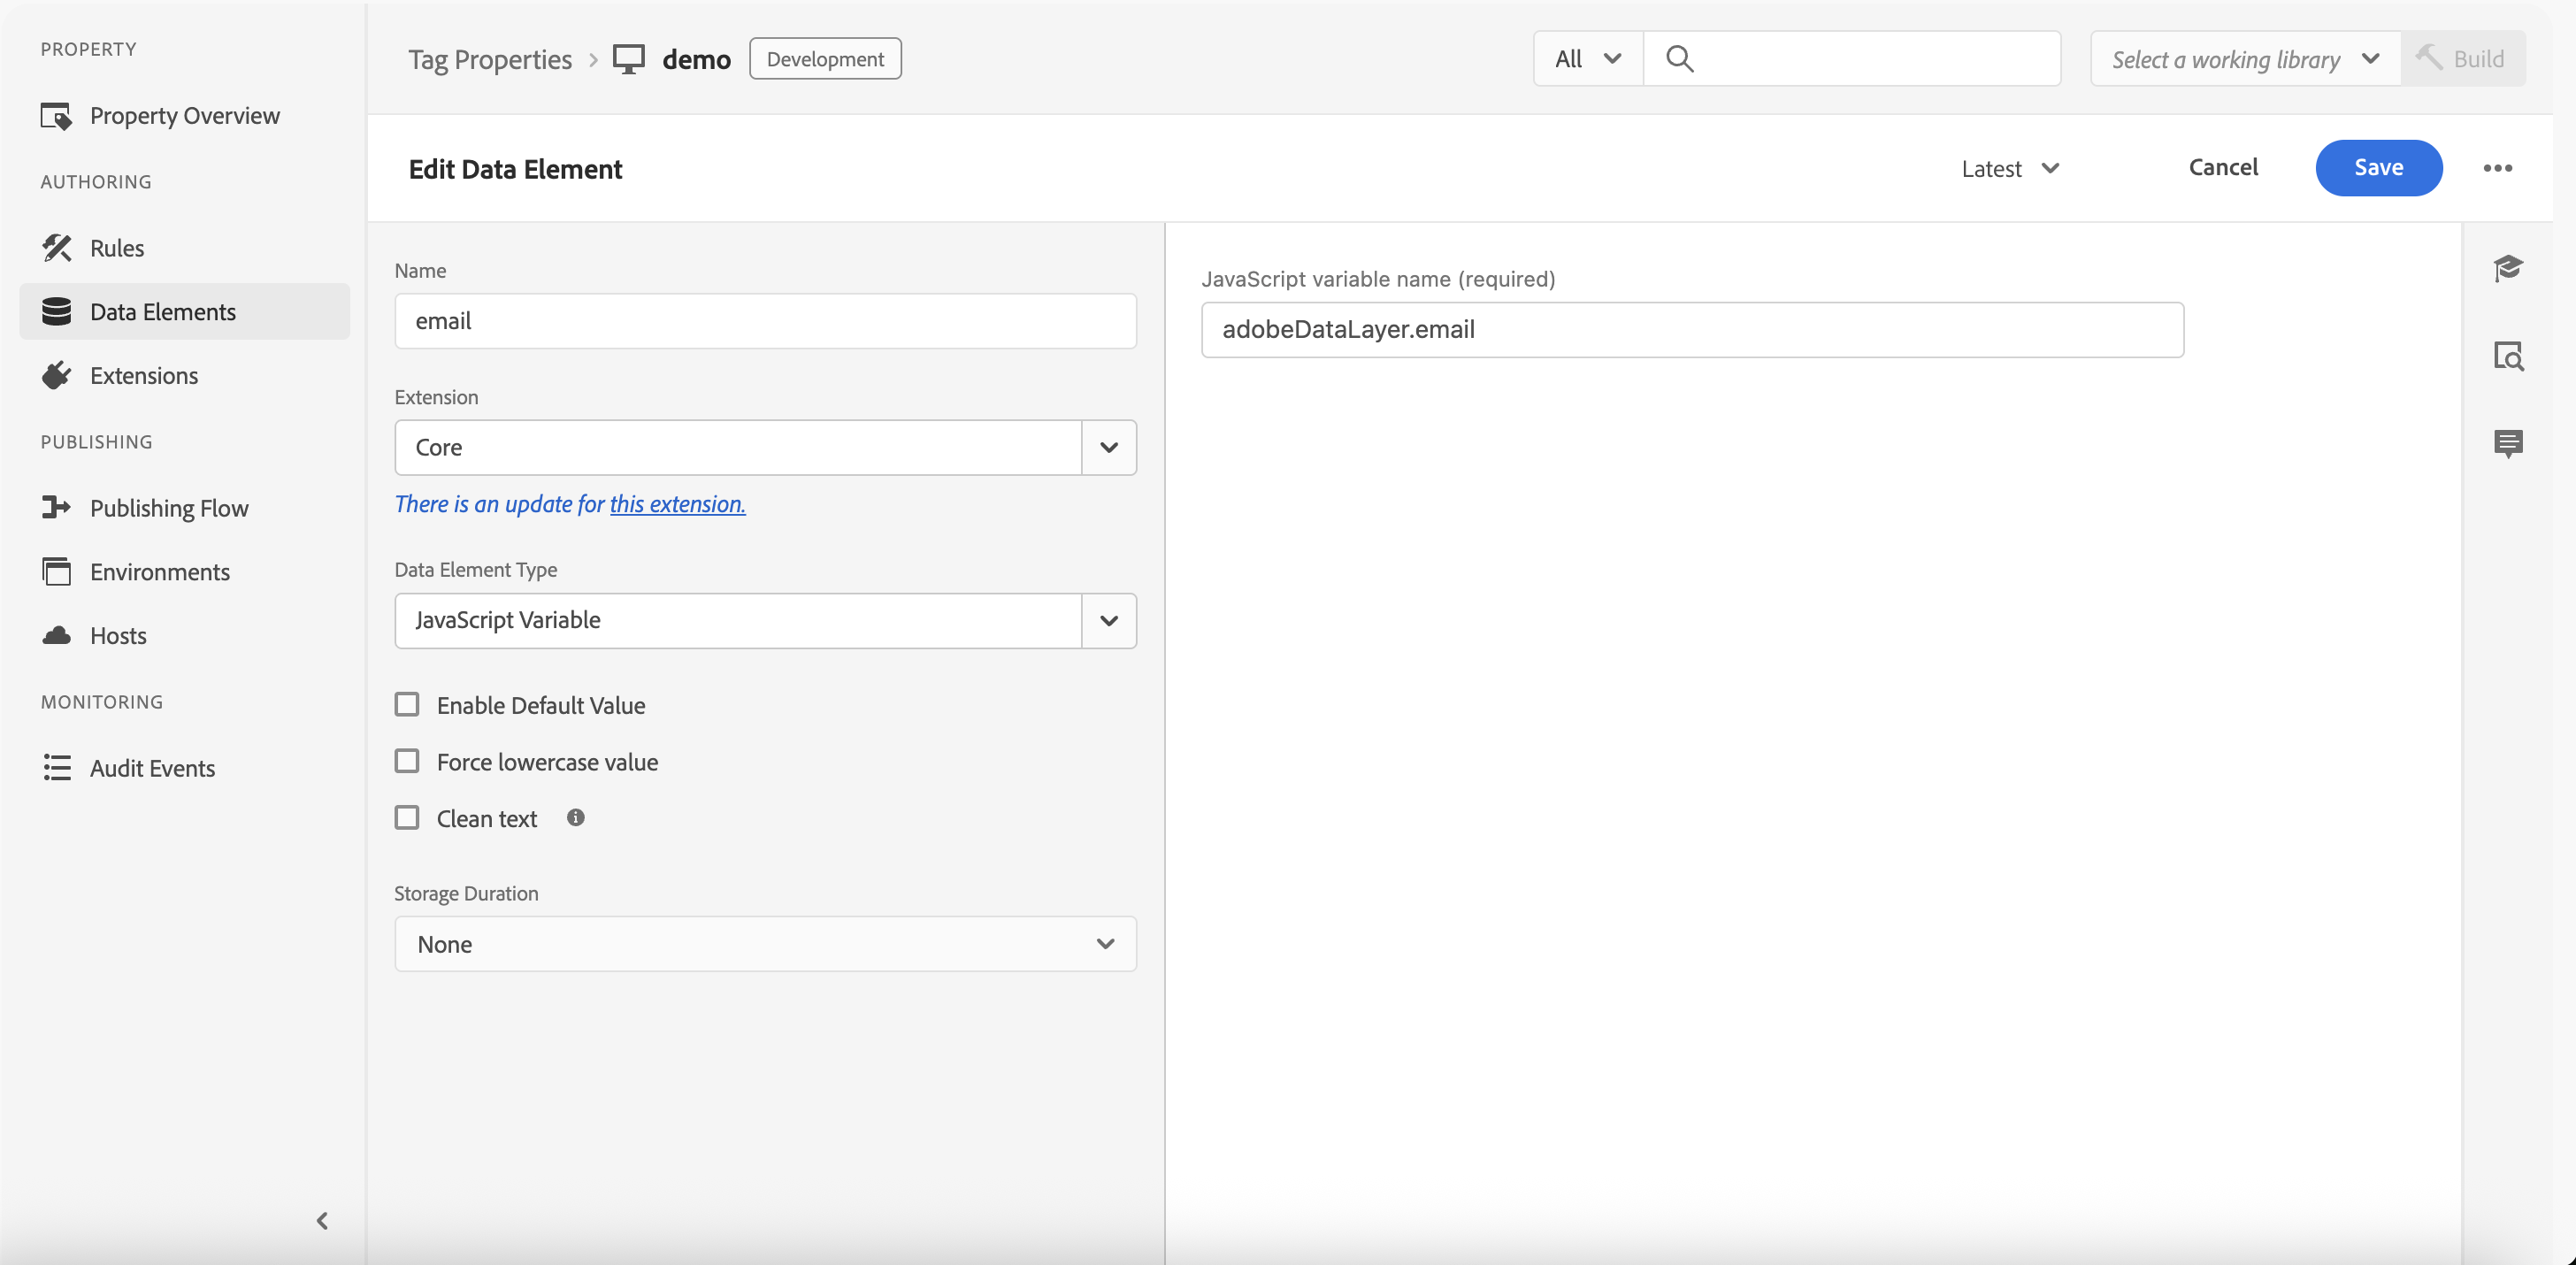
データ要素の追加データ要素の追加 への直接リンク
- データ要素 タブに移動し、データ要素の追加 を選択します。
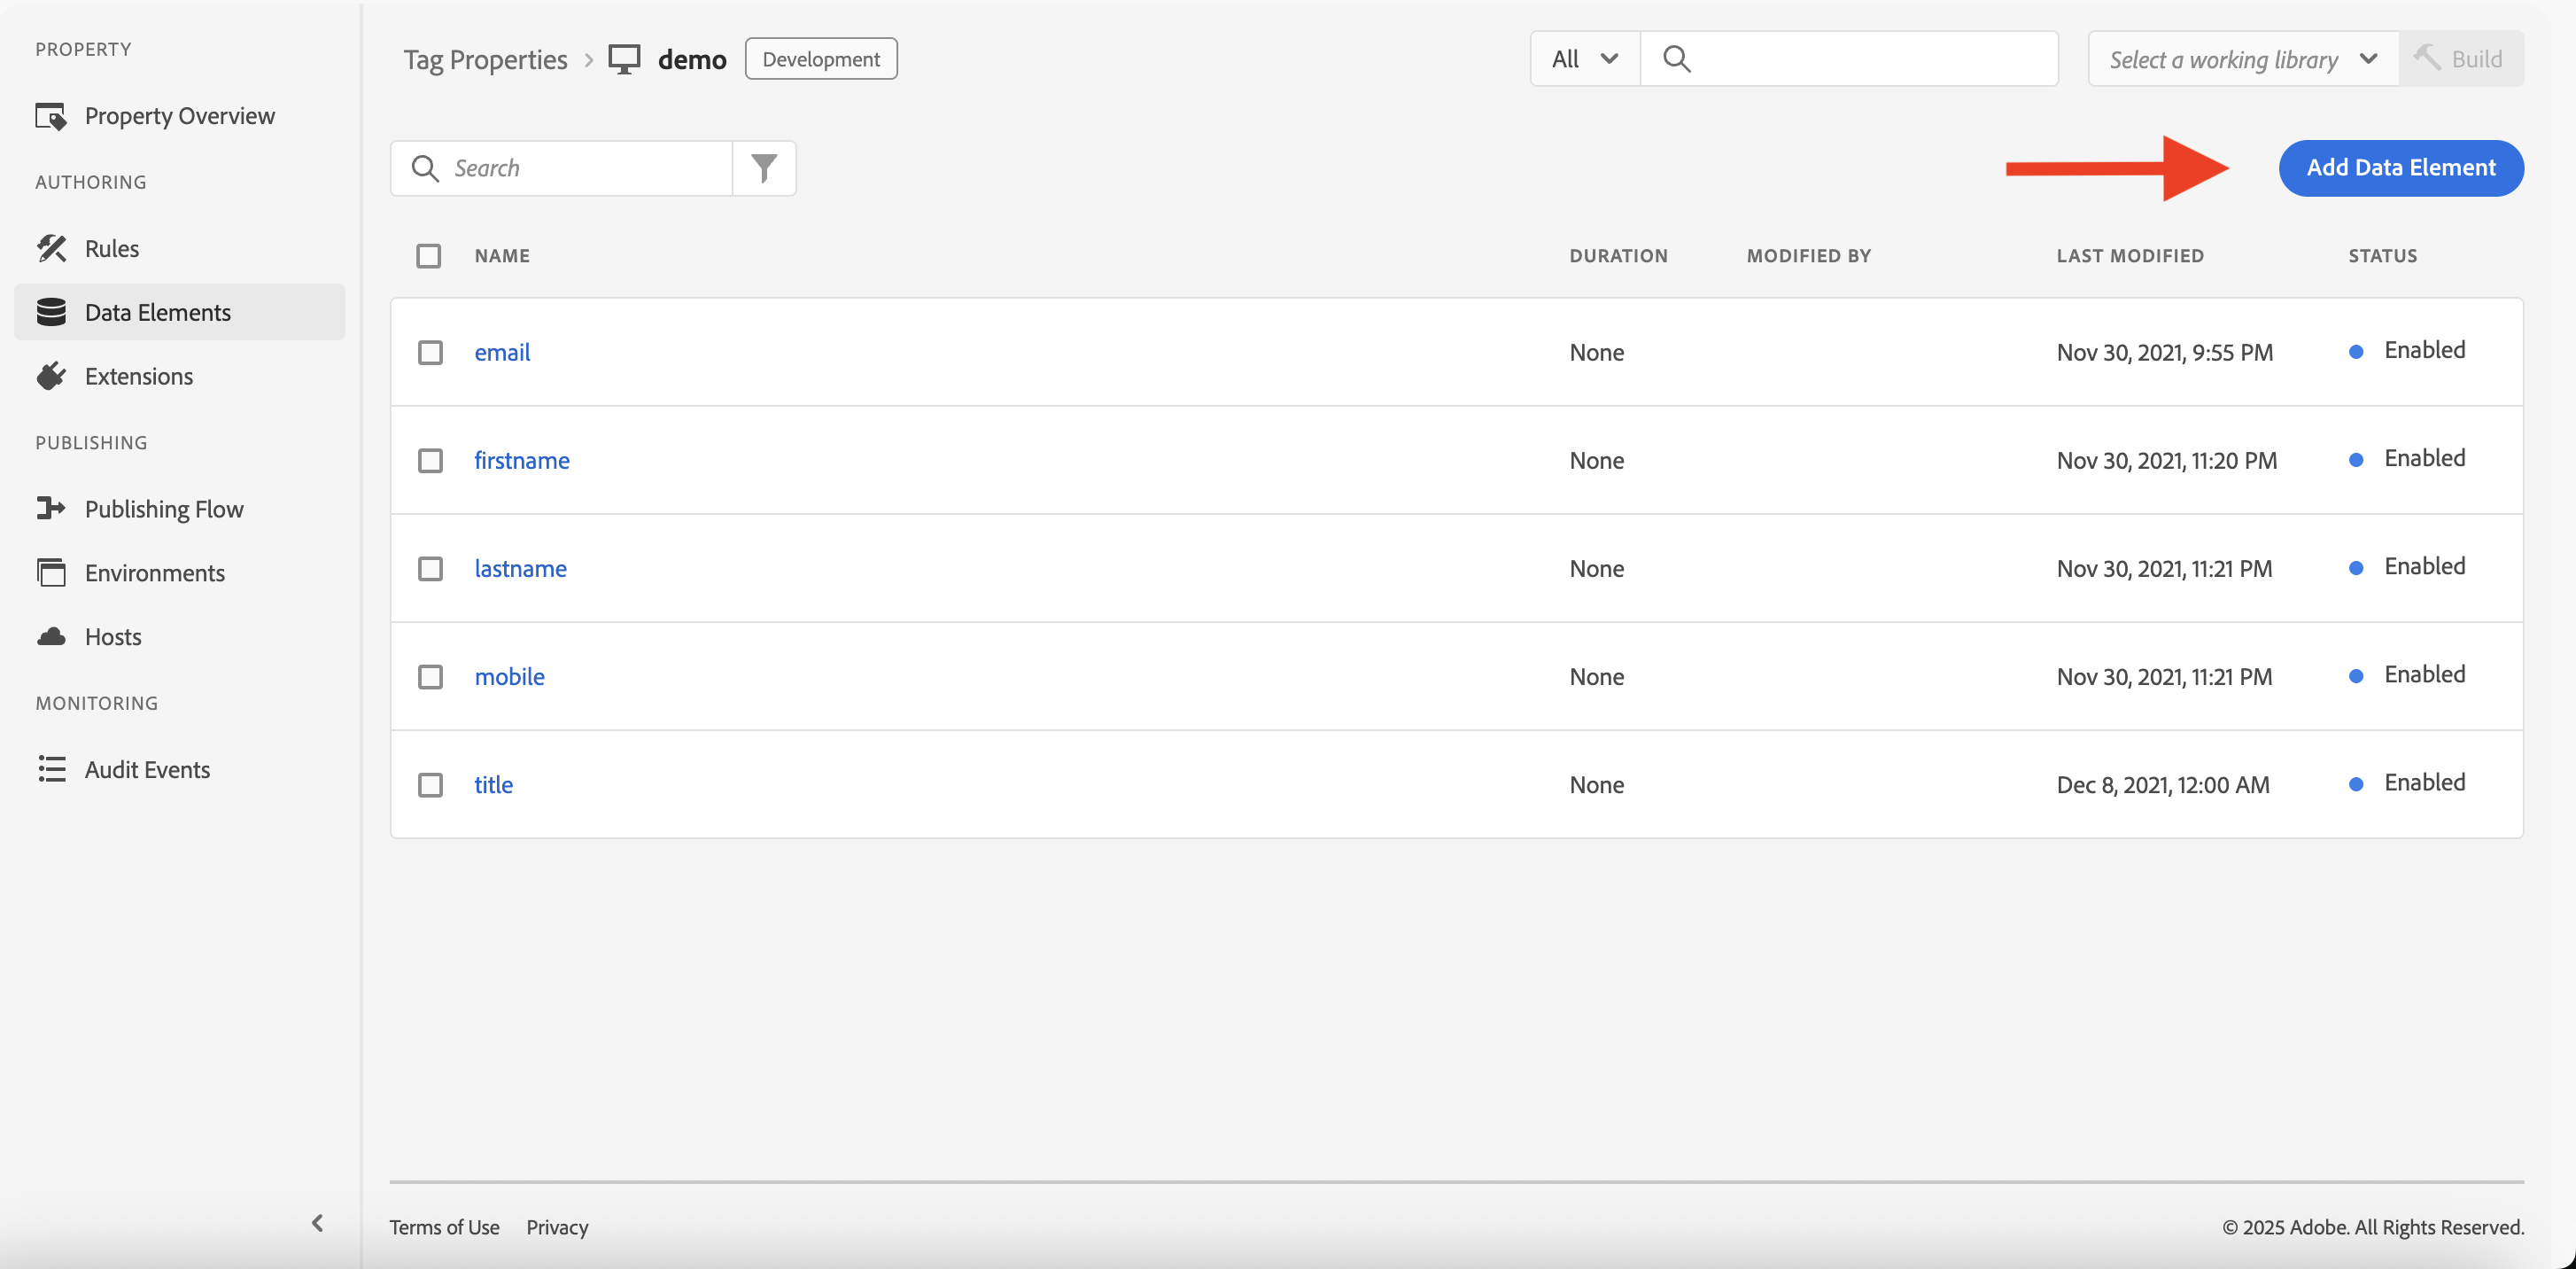
- 変数に名前を付け、拡張機能として Core を選択します。
- データ要素タイプ には、開発者が値を保存した方法を使用します
- メモリ内の値には JavaScript 変数 を使用します(例: adobeDataLayer.email)
- 値がブラウザの localStorage に永続化されている場合のみ ローカルストレージ を使用します
- 開発者によってデータレイヤー設定で変数名と一致するパス名を入力します。
Rokt は以下の属性の変数を作成することを推奨しています:
emailfirstnamelastnamezipcodemobileconversiontypeconfirmationrefamountcurrency