Adobe Experience Platform Integration for Advertisers
This page explains how to implement the Web SDK for Rokt Ads using Adobe Experience Platform to close the loop by linking conversions back to your campaigns. By linking conversions back to your Rokt Ads engagement, you can enable more accurate attribution, real-time optimization, and campaign measurement.
You'll learn how to create data elements in Adobe based on your data layer and how to create rules to initialize the Rokt SDK and log conversions.
Add the Rokt ExtensionDirect link to Add the Rokt Extension
-
Sign in to Adobe Experience Platform.
-
Navigate to the Extensions tab and search mParticle by Rokt in the Catalog.
-
Click on the mParticle by Rokt Extension and click Install.
-
Navigate to the installed mParticle by Rokt extension in the Extensions tab and click Configure.
-
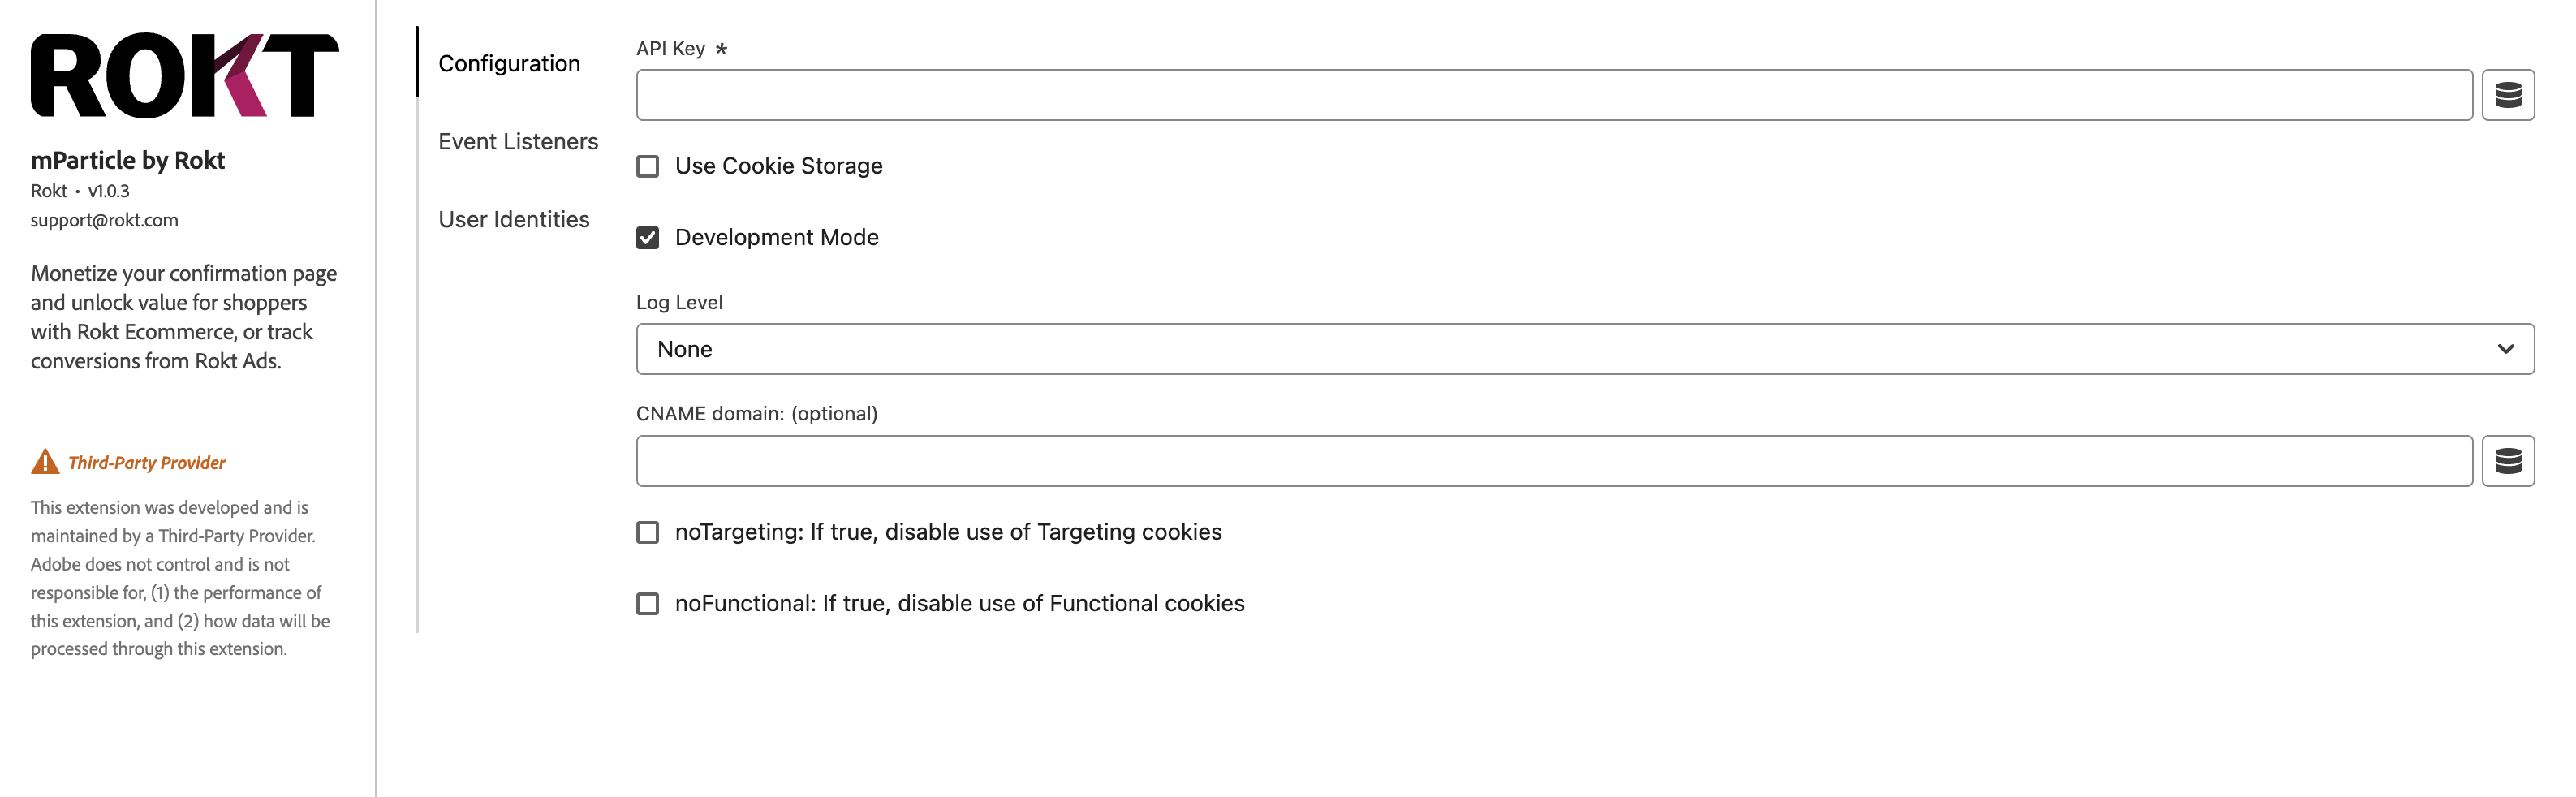
Enter your configuration settings in the Configuration tab:
- Under API Key, enter the API key provided to you by your Rokt account manager.
- Enable Use Cookie Storage if your website uses multiple subdomains (for example,
mysite.comandcheckout.mysite.com). - If you are testing your integration, enable the Development Mode flag. Once your integration is ready for production data, this flag should be disabled.
- The mParticle by Rokt Extension allows developers to specify a Log Level which will send warnings, errors, and other information directly from your integration. It is recommended to set the Log Level to Verbose while testing your integration.
- If you set up a custom domain for a first-party domain integration, enter your new domain name under CNAME domain. Please enter the domain in the following format
rkt.yourcompany.com. - Enable noTargeting and noFunctional to disable targeting/functional cookies, which are normally used for personalization and enhanced checkout experiences.
For a more detailed discussion, see Cookie Consent Flags.
-
Configure Identity in the User Identities tab:
- If you are going to integrate raw email, enter the data element you have created in the
Emailfield. - If you are going to integrate hashed email (SHA-256), enter the data element you have created in the
Email SHA256field.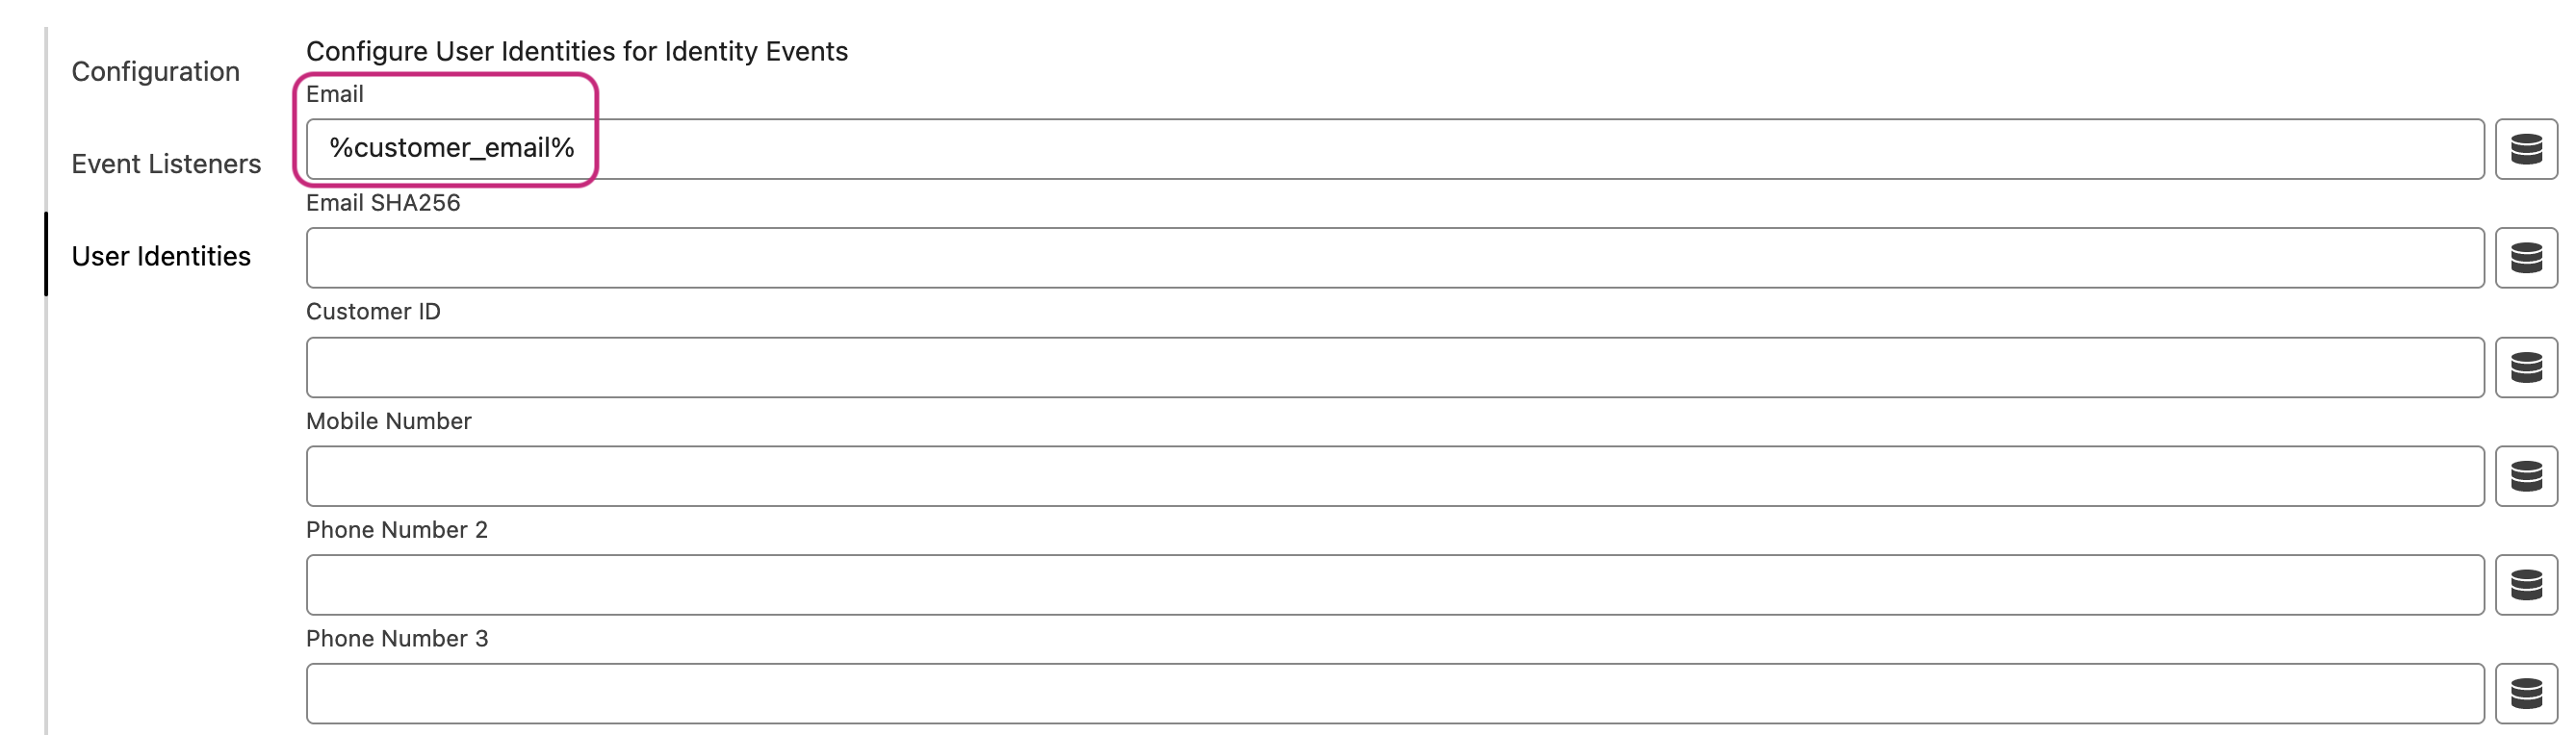
- If you are going to integrate raw email, enter the data element you have created in the
-
Click Save.
Create your RulesDirect link to Create your Rules
Initialize the Rokt SDKDirect link to Initialize the Rokt SDK
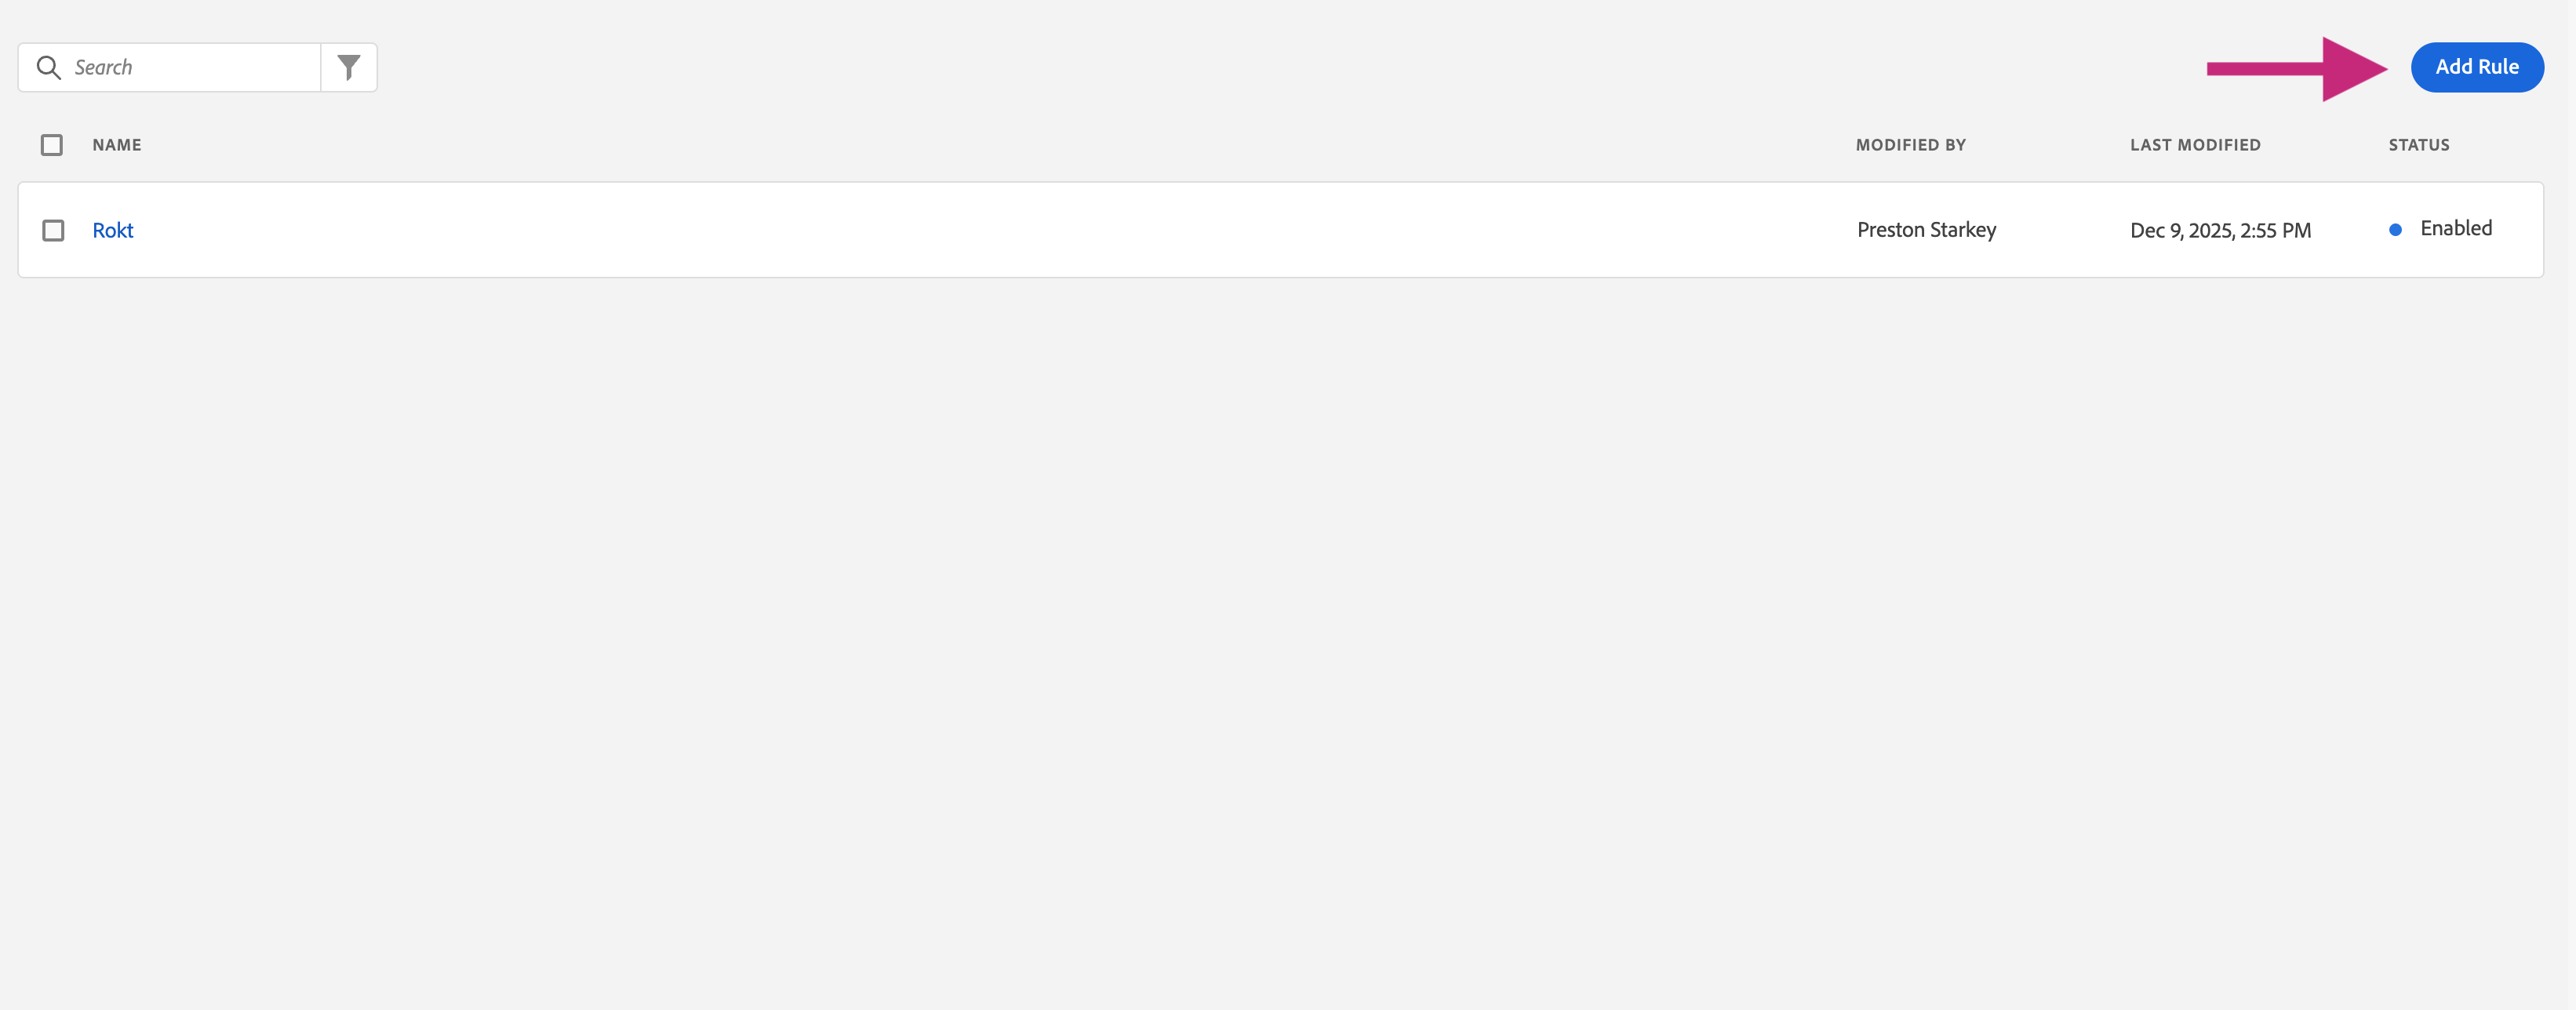
- Navigate to the Rules tab and choose Add Rule.
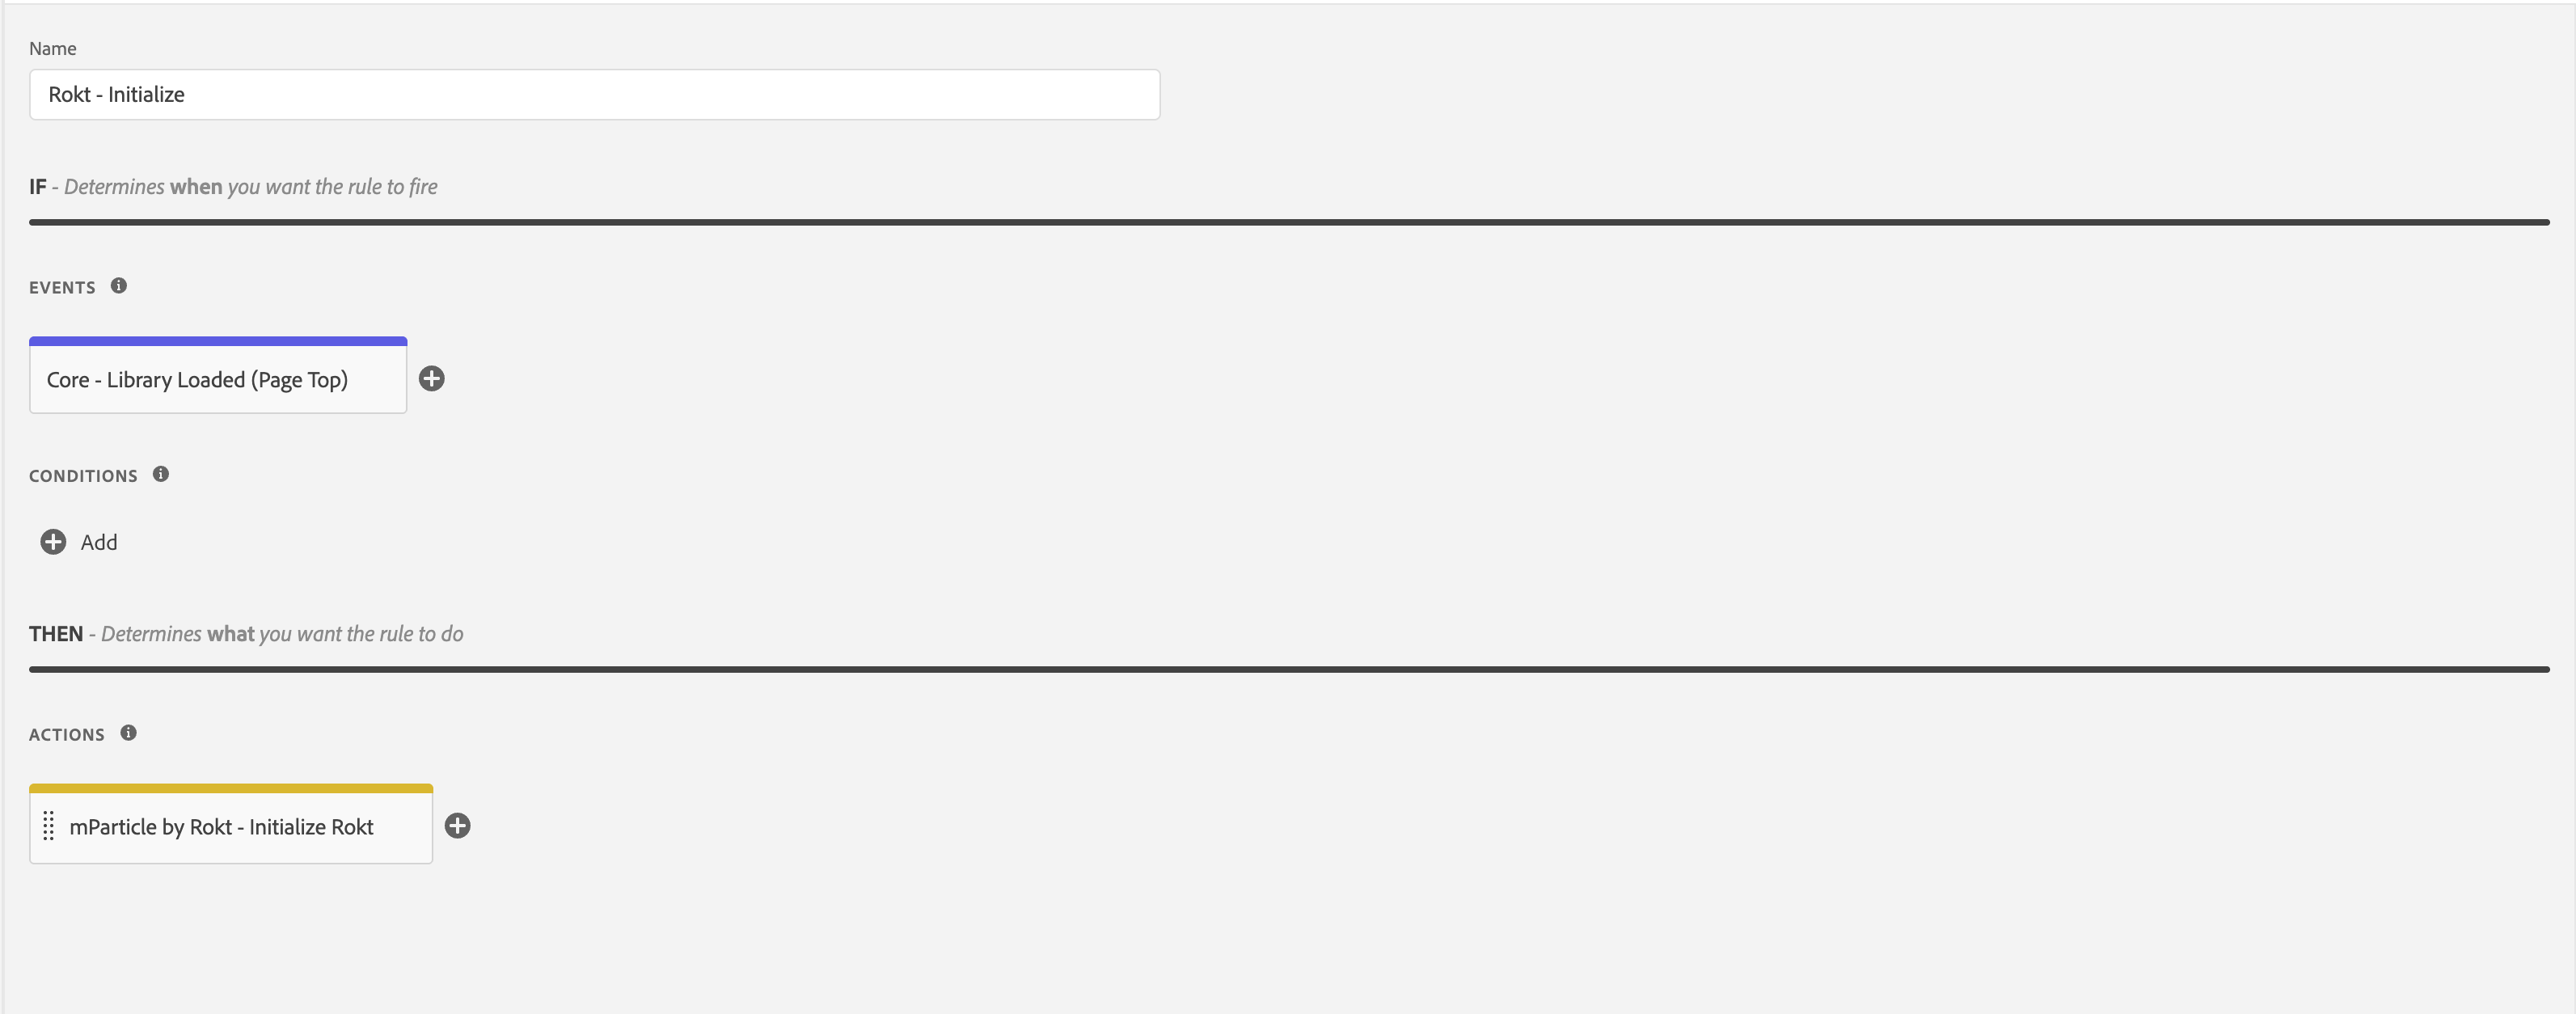
- Give your Rule a descriptive name, such as
Rokt - Initialization, and create your Event to make the rule fire.
Every site is different, but Rokt recommends using the Event Type Library Loaded (Page Top) to ensure the Initialization Action loads as soon as possible.
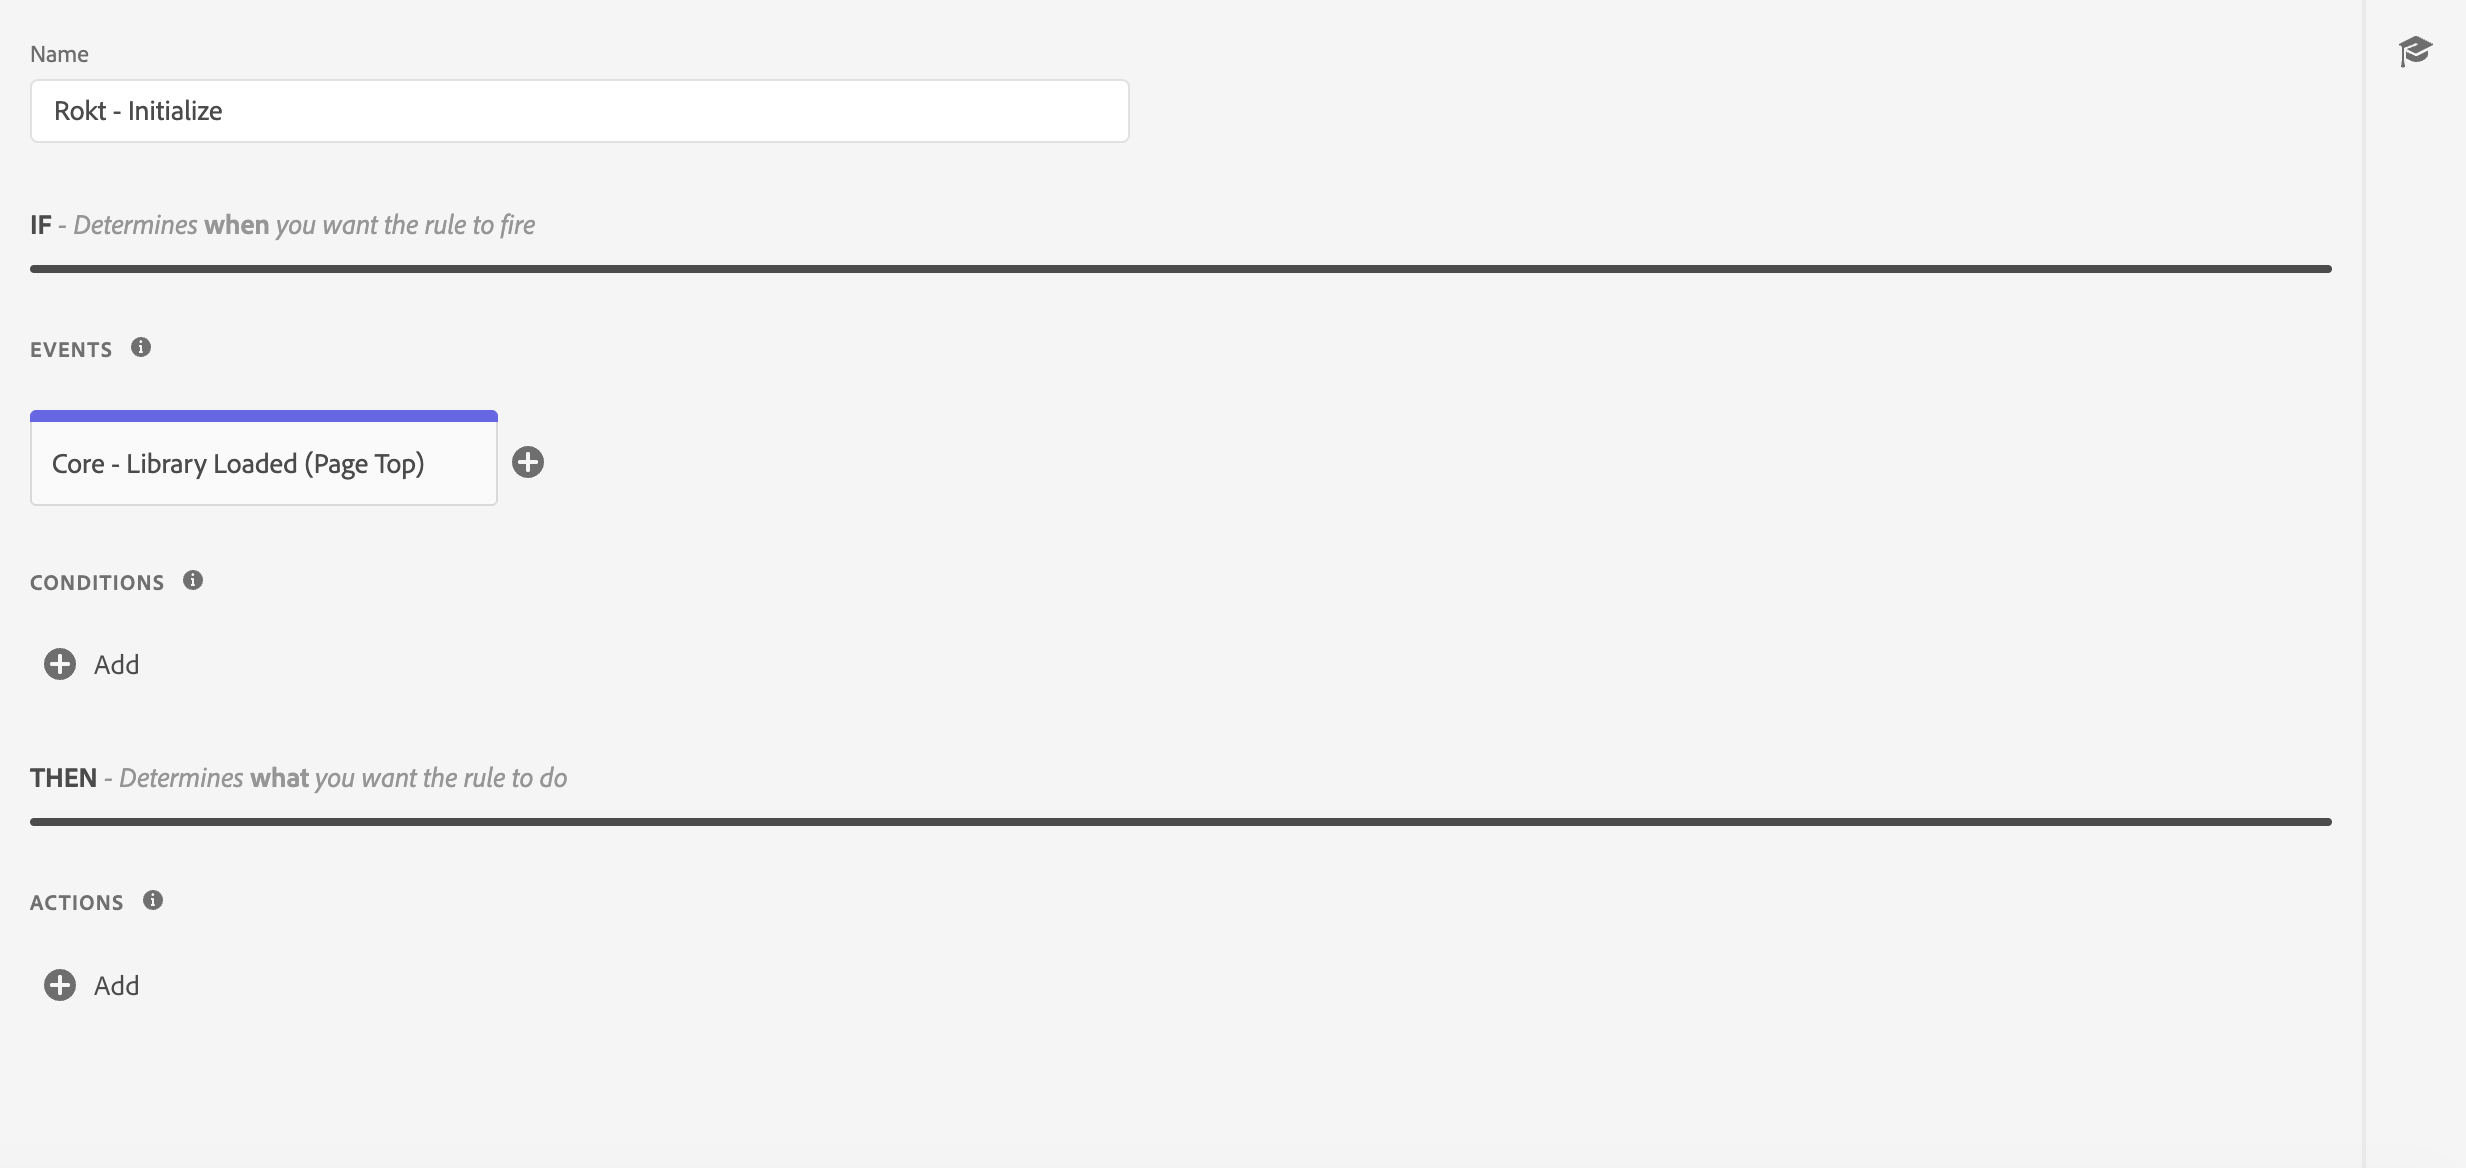 3. Create your Action and choose mParticle by Rokt as the Extension and Initialize Rokt as the Action Type.
4. Click Keep Changes in the Action Configuration and Save to Library.
3. Create your Action and choose mParticle by Rokt as the Extension and Initialize Rokt as the Action Type.
4. Click Keep Changes in the Action Configuration and Save to Library.
Every site is different, but Rokt recommends firing the Initialization Action on every page. This ensures the lowest offer delivery latency and the highest user identification accuracy.
Identify the UserDirect link to Identify the User
You should create a Rule that identifies the current user to Rokt. Make sure to include this Rule in your site so it is fired as soon as the email address is known.
- Navigate to the Rules tab and choose Add Rule.
- Give your Rule a descriptive name, such as
Rokt - Identify, and create your Event to make the rule fire.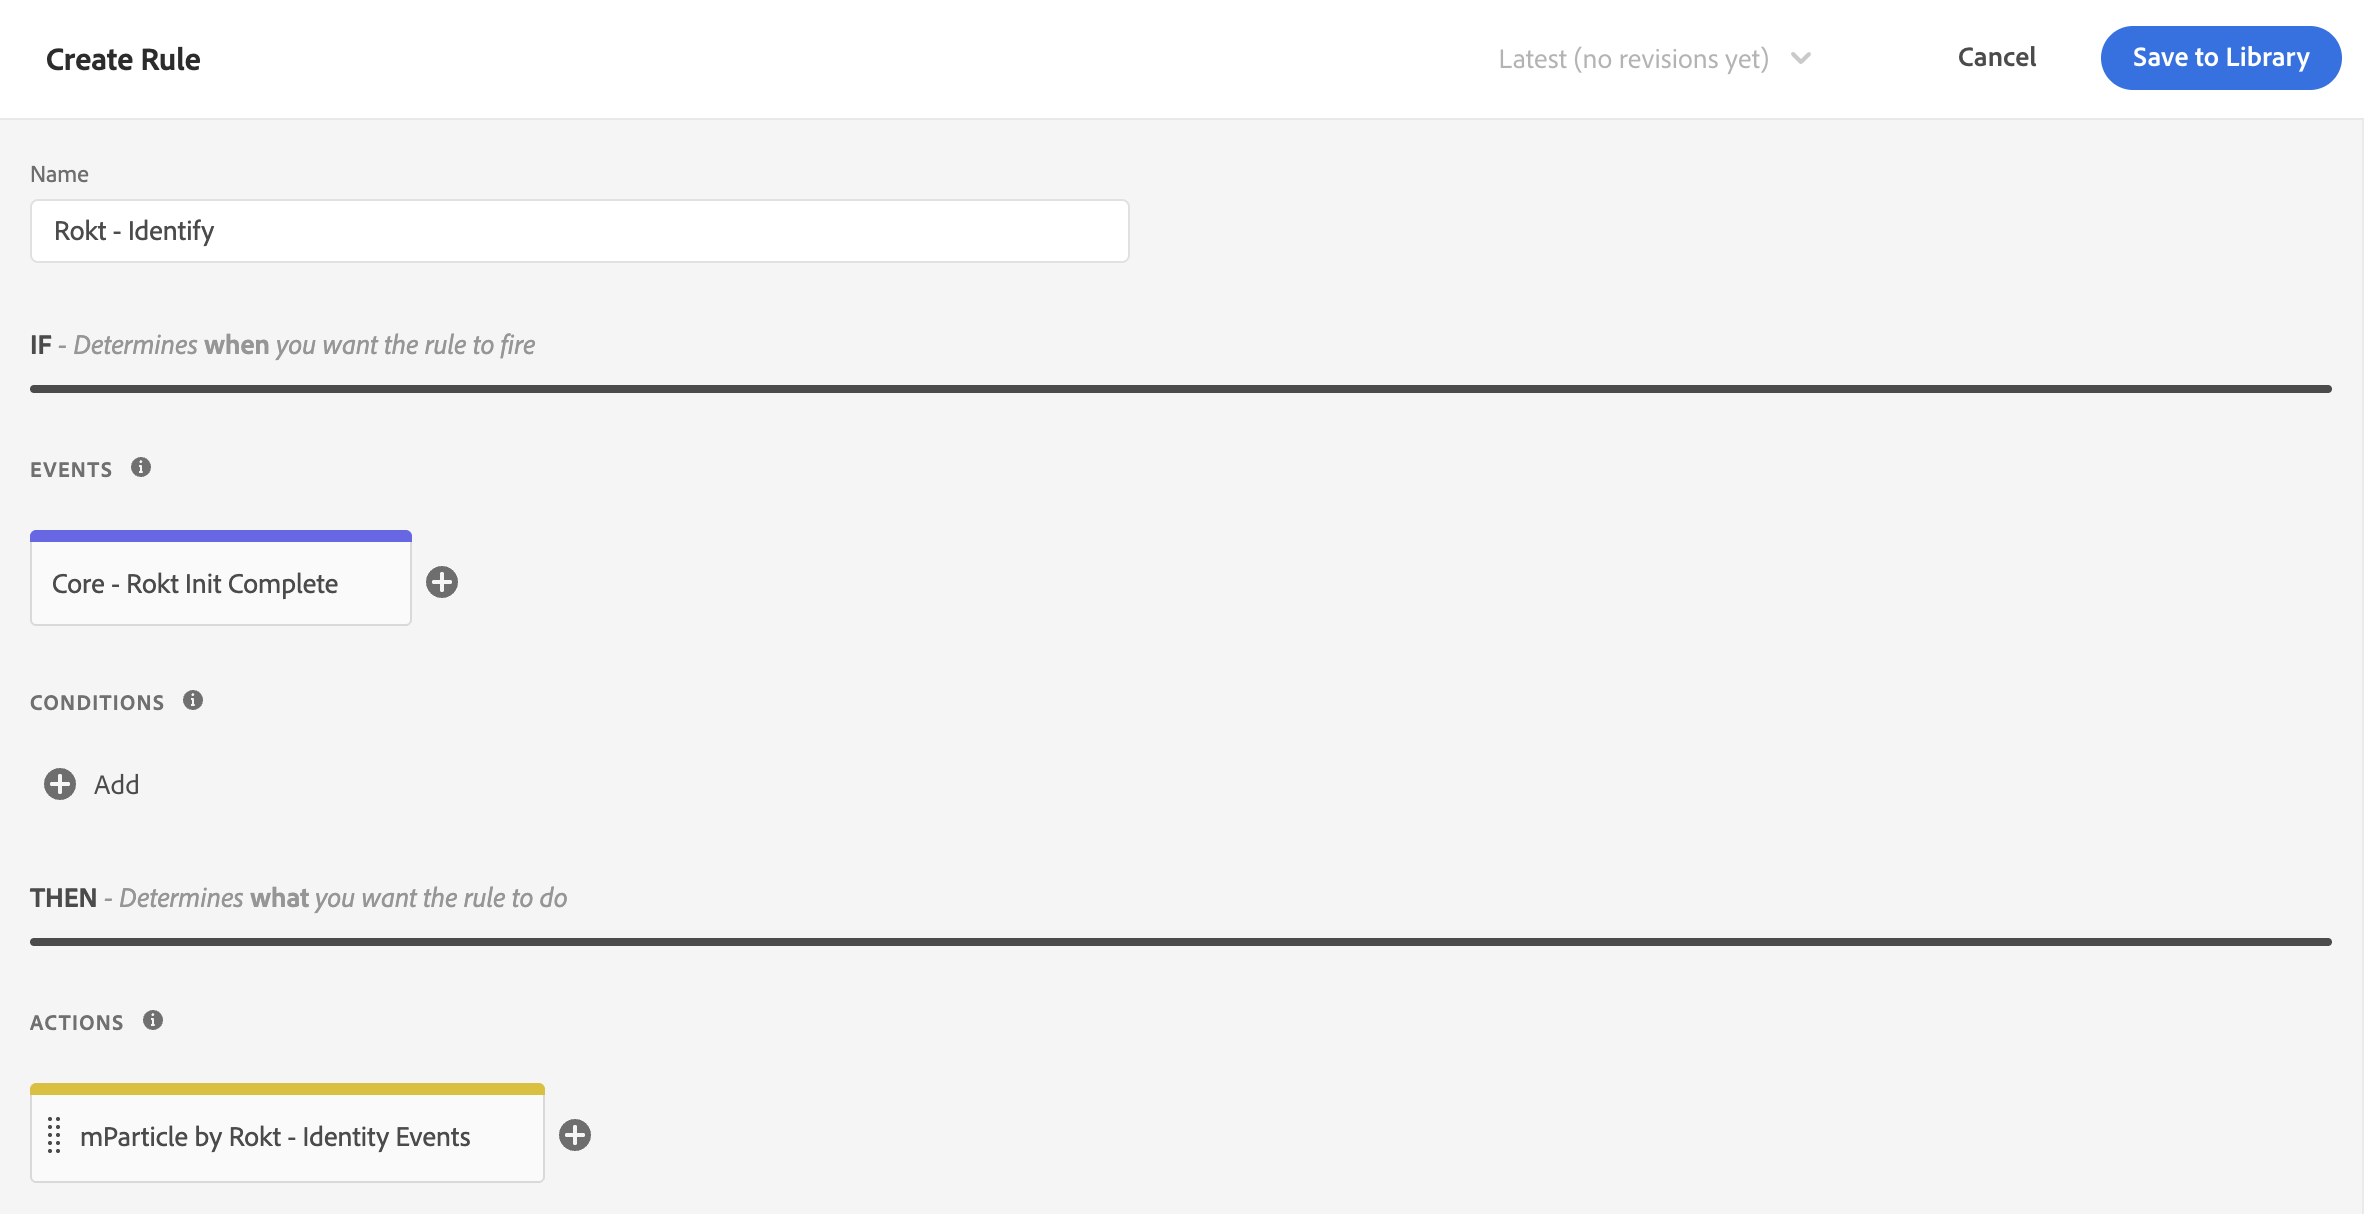
- Create your Action and choose mParticle by Rokt as the Extension and Identity Events as the Action Type.
- Select Identify as the Identity Method.
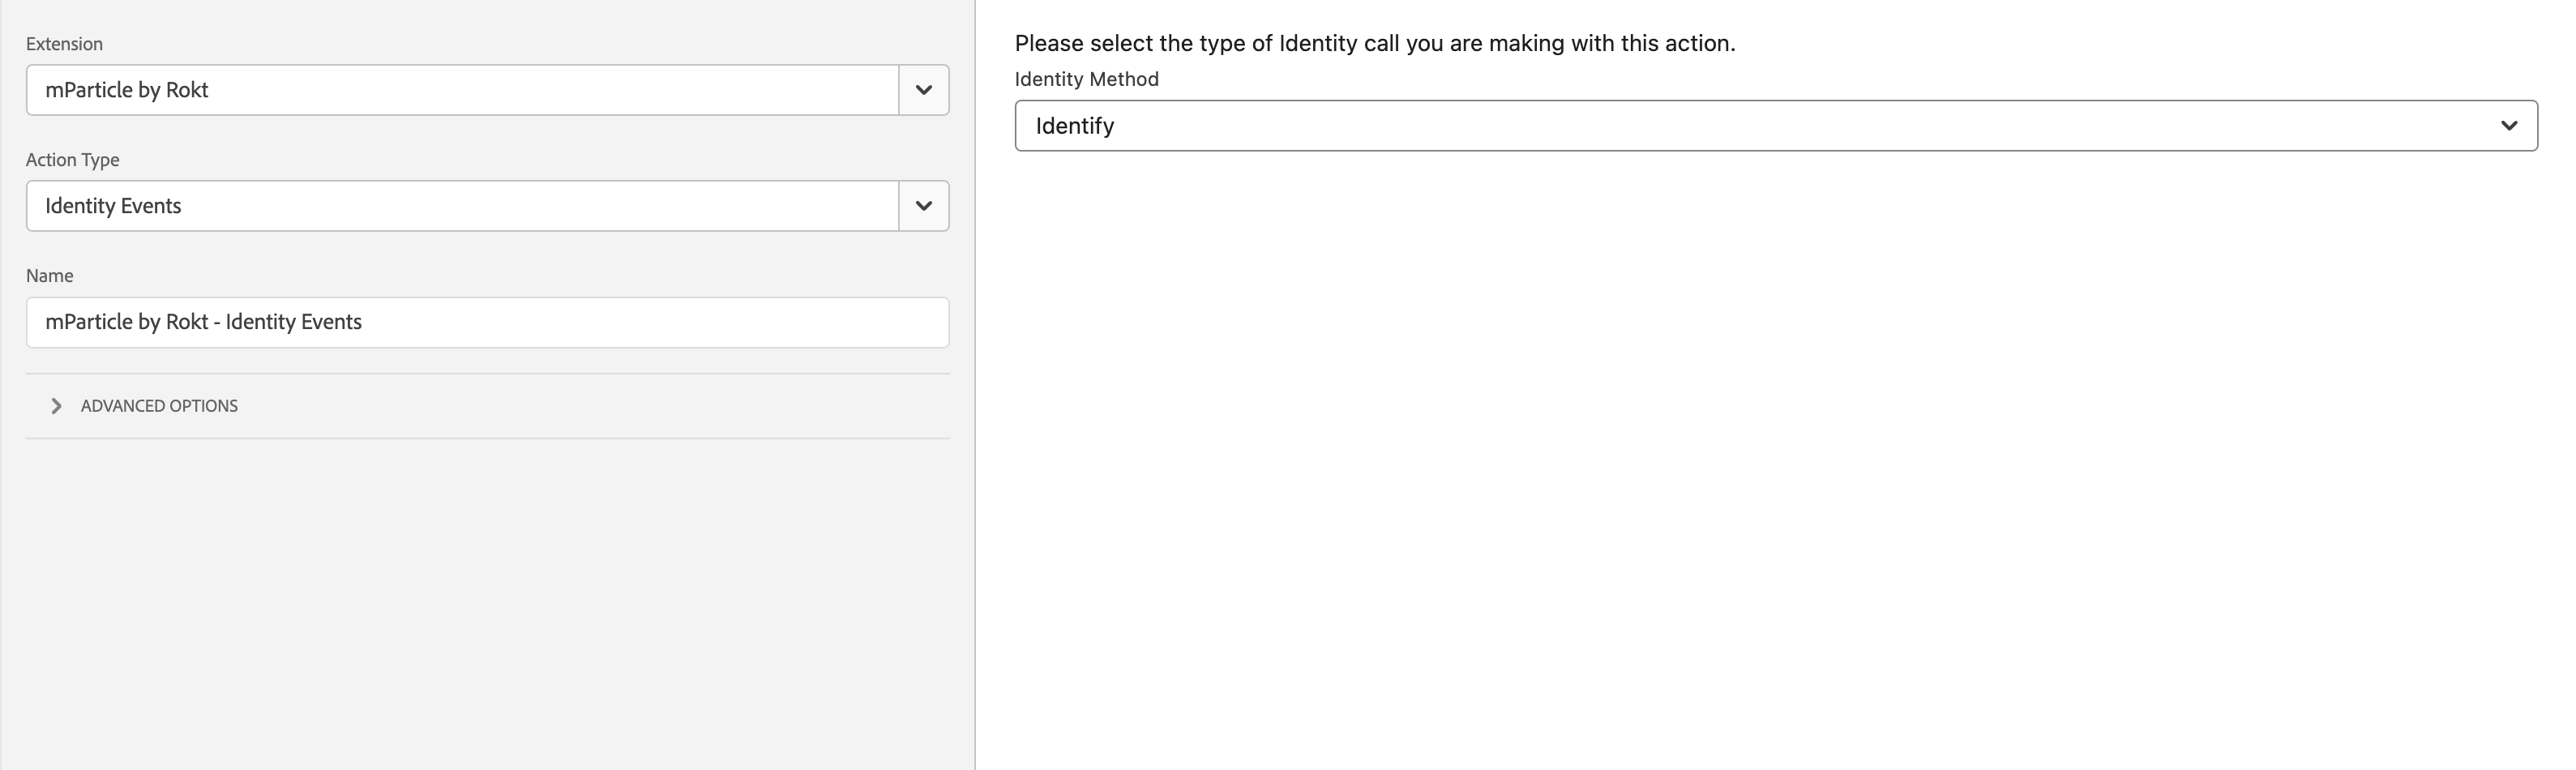
- Click Keep Changes in the Action Configuration and Save to Library.
Once this action has run, it will identify the user using the Email/Email SHA256 value from the Extension settings.
Log Page ViewsDirect link to Log Page Views
You should log page views as soon as each page in the user's transaction journey is loaded. To enable Page Views:
- Navigate to the Rules tab and choose Add Rule.
- Give your Rule a descriptive name, such as
Rokt - Page View, and create your Event to make the rule fire.
Every site is different, but Rokt recommends logging page views as soon as the page loads and the Initialize Rokt action has fired. Please see Combining Rules for more info.
- Create your Action and choose mParticle by Rokt as the Extension and Log Page View as the Action Type.
- Add the Log Page View configurations for Page Settings, Custom Attributes, and Custom Flags.
The Log Page View action accepts the following fields:
- Event Name: a string for the name of the page being loaded
- Custom Attributes: an object of key/value pairs containing information about the page
- Custom Flags: an object of key/value pairs containing information about the page, usually specific to a technology partner; e.g. SnapchatConversions.ClickId
The page name field should be set to a generic page name. For example, an Ecommerce website could have hundreds of product detail pages. To log these correctly, you should use a generic name (e.g. "Product Detail Page") and then log the url and other attributes of the page as attributes.
In the example below, the Log Page View action:
- Under Event Name, set the value
page view.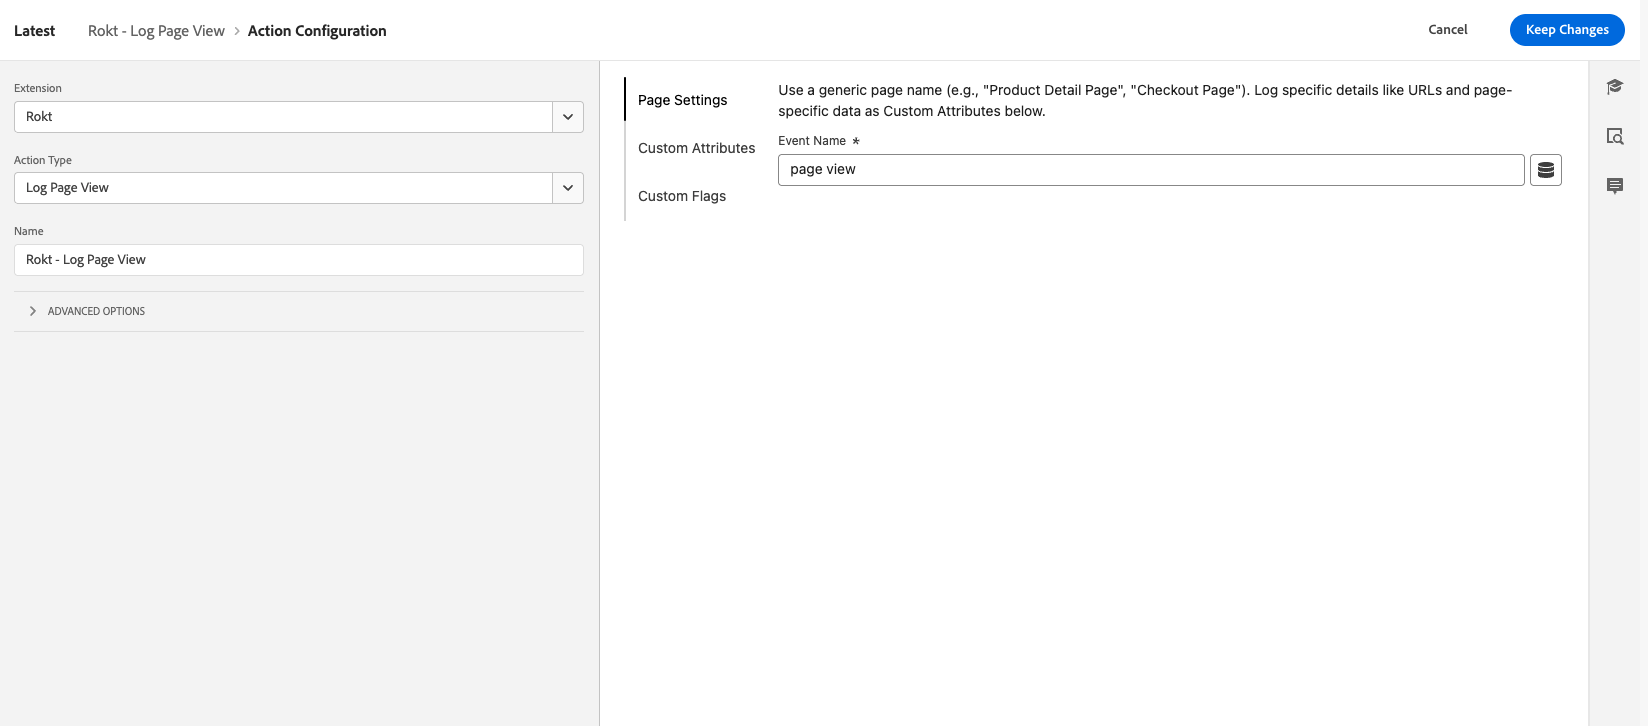
- Set a
screen_nameData Element derived from the last segment of the URL path (with a fallback to "home"). - Set a
urlData Element capturing the full URL of the current page. - Set a
referring-pageData Element, captured fromdocument.referrer.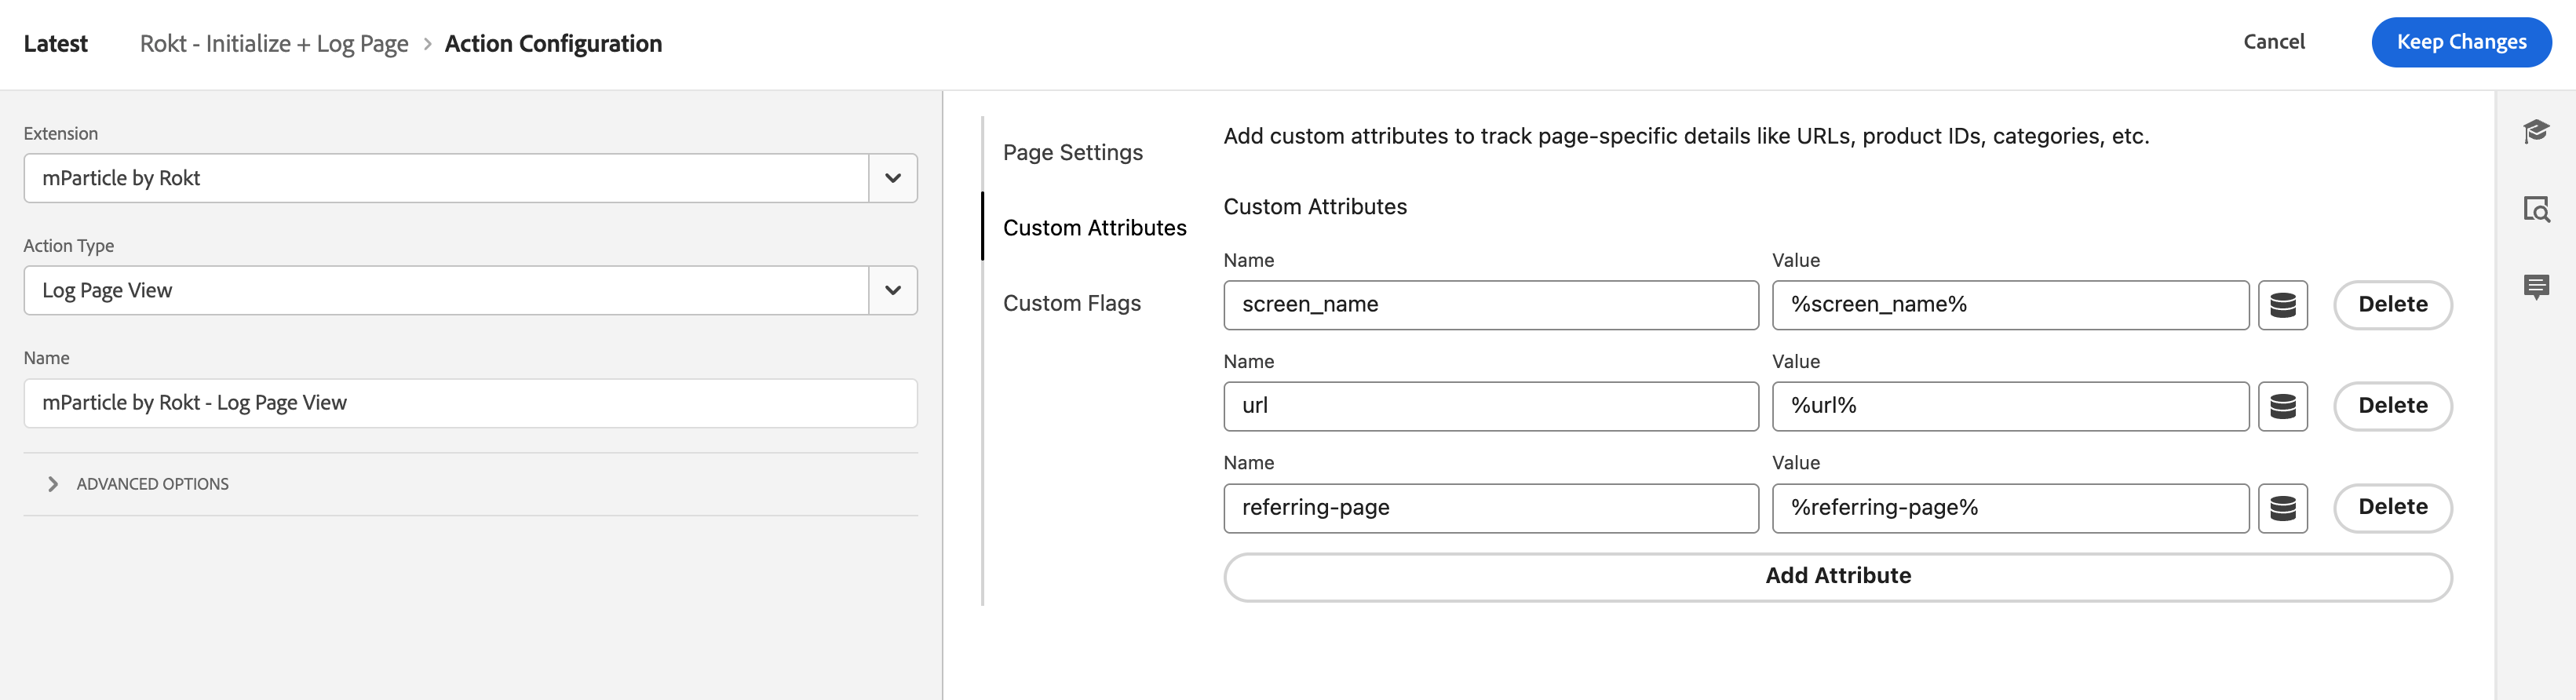
For guidance on how to build these Data Elements, please see the Recommended Screen View Event Attributes below.
- Click Keep Changes in the Action Configuration and Save to Library.
Log a ConversionDirect link to Log a Conversion
In addition to creating a Rule to initialize the Rokt SDK, Rokt Ads integrations also require a Rule to log a conversion event.
- Navigate to the Rules tab and choose Add Rule.
- Give your Rule a descriptive name, such as
Rokt - Log Conversion, and create your Event to make the rule fire.
The exact trigger configuration will vary for every site. Below are examples of trigger configurations depending on whether your site is a multi-page application (MPA) or a single-page application (SPA):
-
Trigger configuration for multi-page applicationsDirect link to Trigger configuration for multi-page applications
- Set the Event Type to Core → DOM Ready, Core → Page Bottom, or Core - Rokt Init Complete if you are using the
roktInitCompleteCustom Event. - Under Conditions, add a Core → Path Without Query String condition.
- Enter a matching rule to identify the page where the tag should fire. For example, if your confirmation page is
example.com/cart/payment/confirmationthe identifying parameter can be any of/cart,/payment, or/confirmation.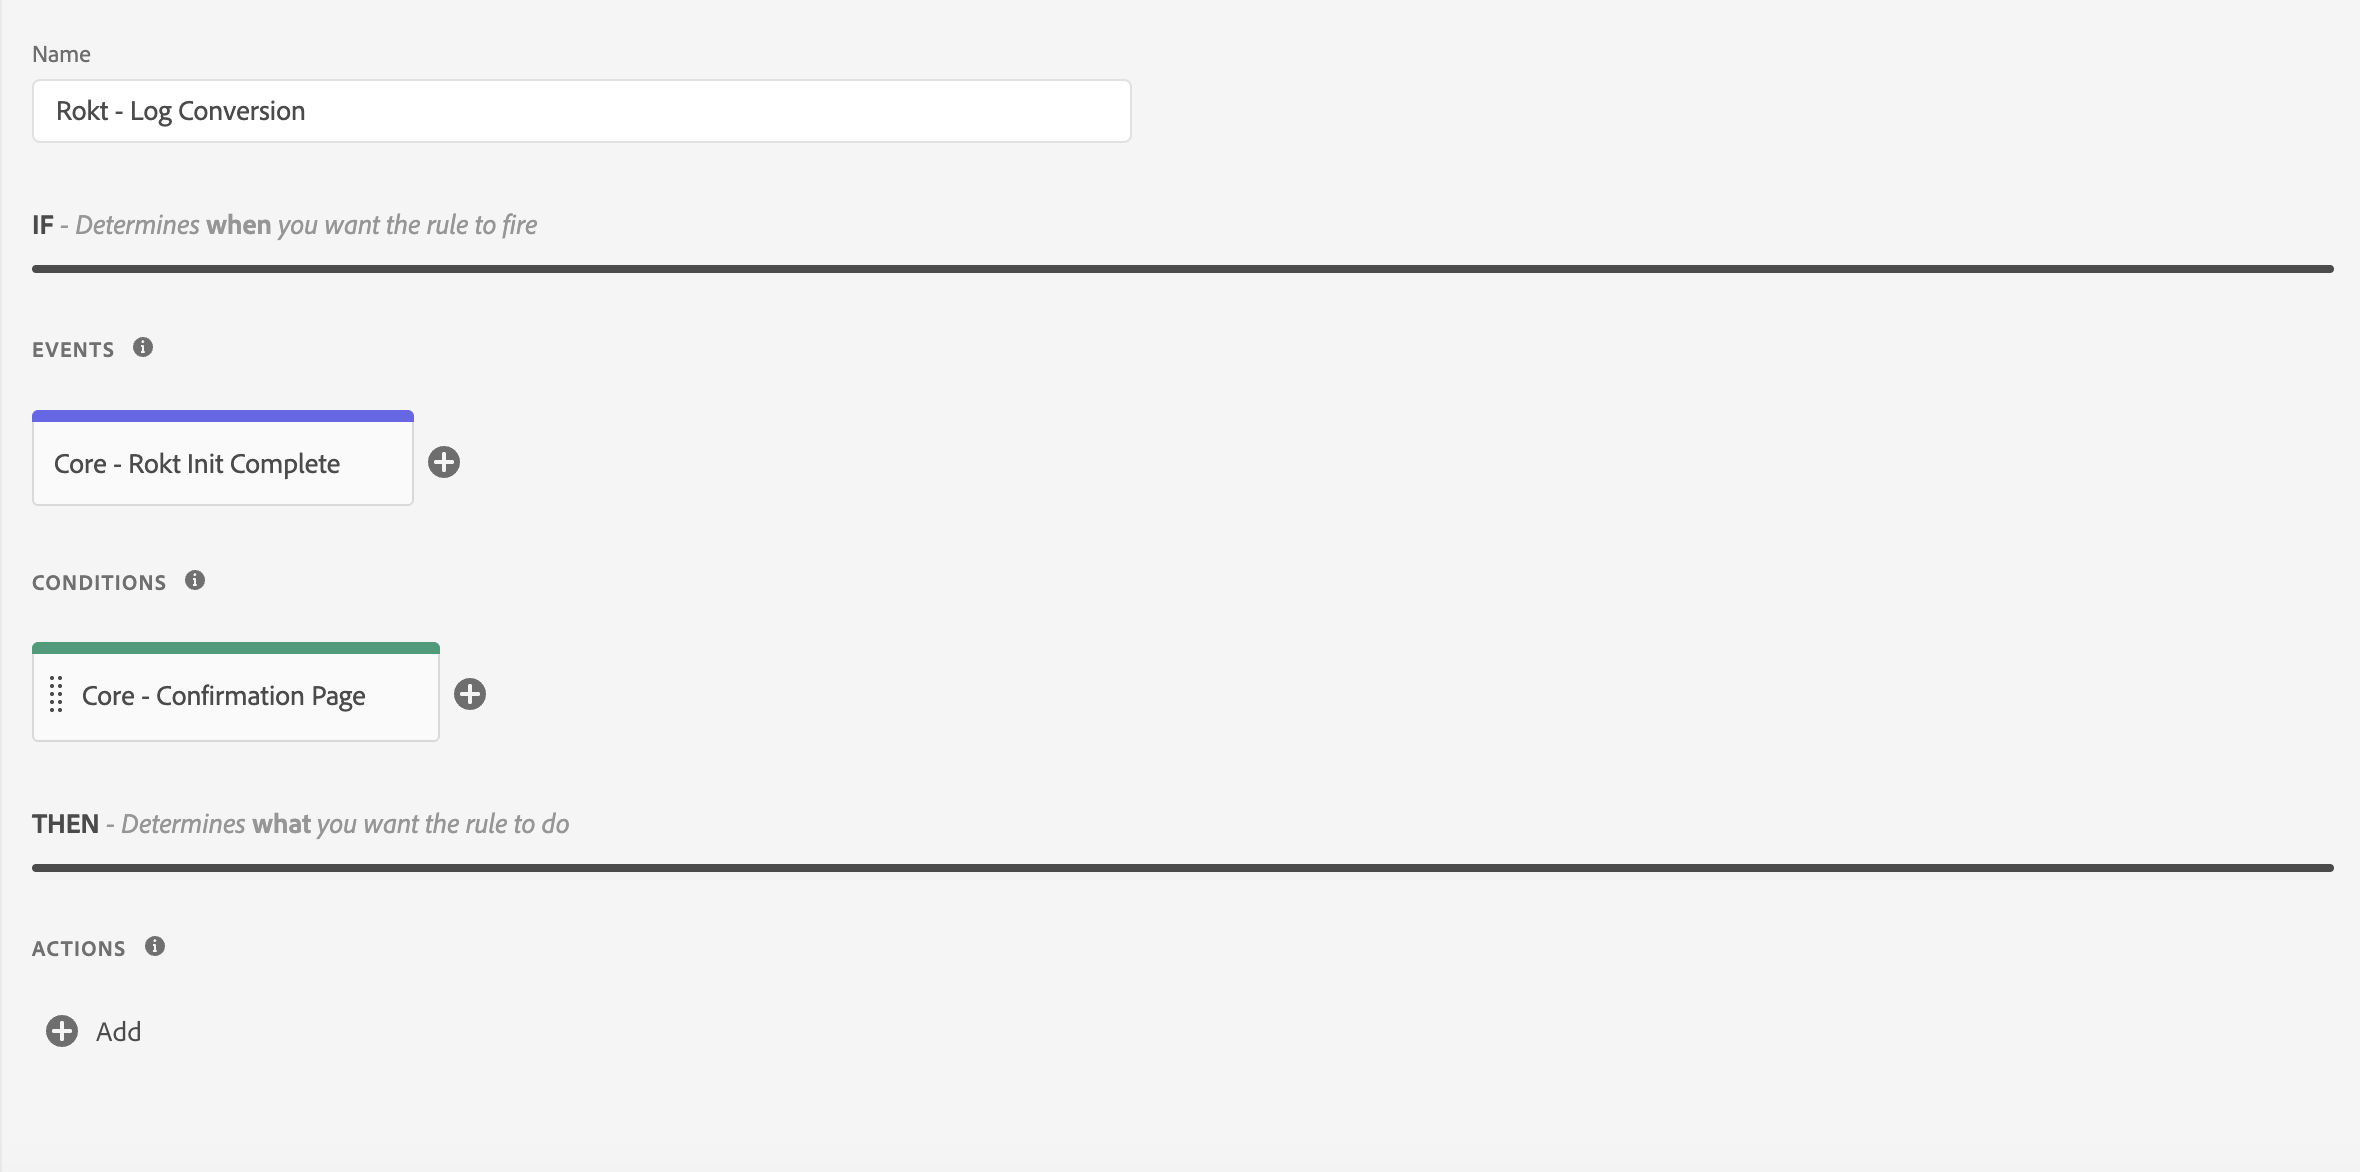
- Set the Event Type to Core → DOM Ready, Core → Page Bottom, or Core - Rokt Init Complete if you are using the
-
Trigger configuration for single page applicationsDirect link to Trigger configuration for single page applications
- Set the Event Type to Core → History Change.
- Under Conditions, add a Core → Path Without Query String condition.
- Enter a matching rule to identify the page where the tag should fire. For example, if your confirmation page is
example.com/cart/payment/confirmationthe identifying parameter can be any of/cart,/payment, or/confirmation.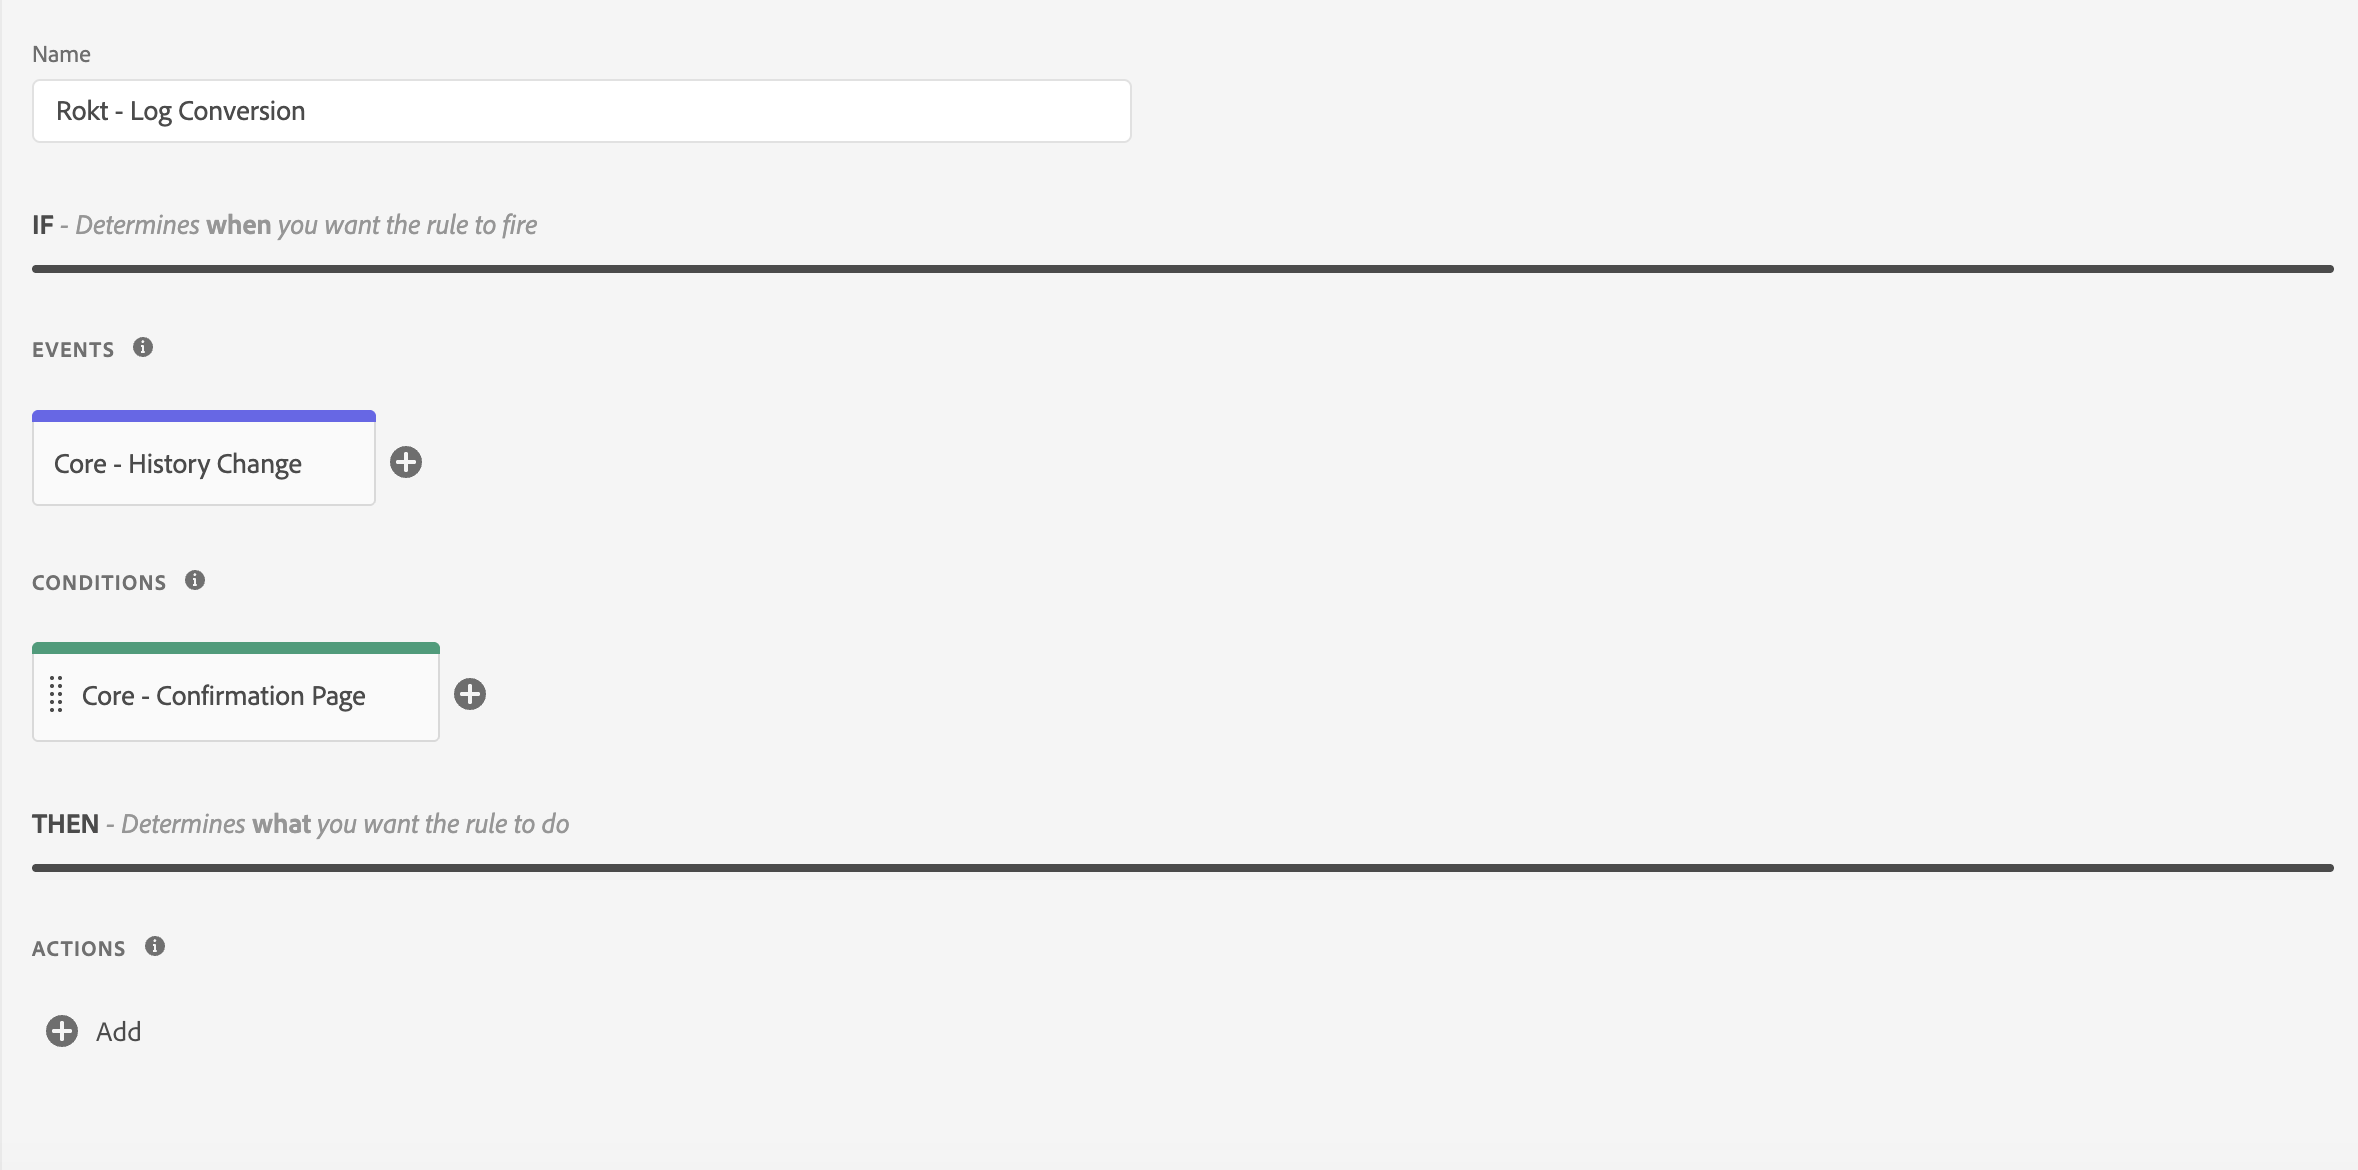
-
Create your Action and choose mParticle by Rokt as the Extension and Log Event as the Action Type.
-
Set the following Event Settings:
- For Event Name, enter
conversion. - For Event Type, select
Transaction.
- For Event Name, enter

- Under the Custom Attributes tab, add any attributes that are related to your conversion event. Please see below for a list of Recommended Event Attributes.
- Under the User Attributes tab, add any attributes that are related to your identified user. Please see below for a list of Recommended User Attributes.
- Click Keep Changes in the Action Configuration and Save.
Setup RecommendationsDirect link to Setup Recommendations
Rule OrderingDirect link to Rule Ordering
Adobe Experience Platform does not guarantee rule execution order across different rules, even if they share the same event. To ensure the subsequent events are fired correctly, you can indirectly control sequencing of these rules using a Shared Custom Event.
It is crucial that actions are firing in the expected order. For example:
- For Multi-Page Applications (MPAs), the Initialize Rokt action must be fired before any subsequent actions can be fired on any page loads.
- If you are identifying a user and logging a conversion on the same page, the Identity Events action must be fired before the Log Event action can be fired.
To ensure your subsequent Actions will fire after the Initialize Rokt Action, you can add the following custom event so it fires after the action has fired on each page:
- In your Initialize Rokt Action configuration, ensure you have
Wait to run next actionenabled in Advanced Options. - In your Initialize Rokt Rule configuration, add a new Action with Core as the Extension and Custom Code as the Action Type. Name this Action
Core - Rokt Init Complete. - Select
JavaScriptas the Language and in the Editor, paste the following line:
window.dispatchEvent(new CustomEvent("roktInitComplete"));
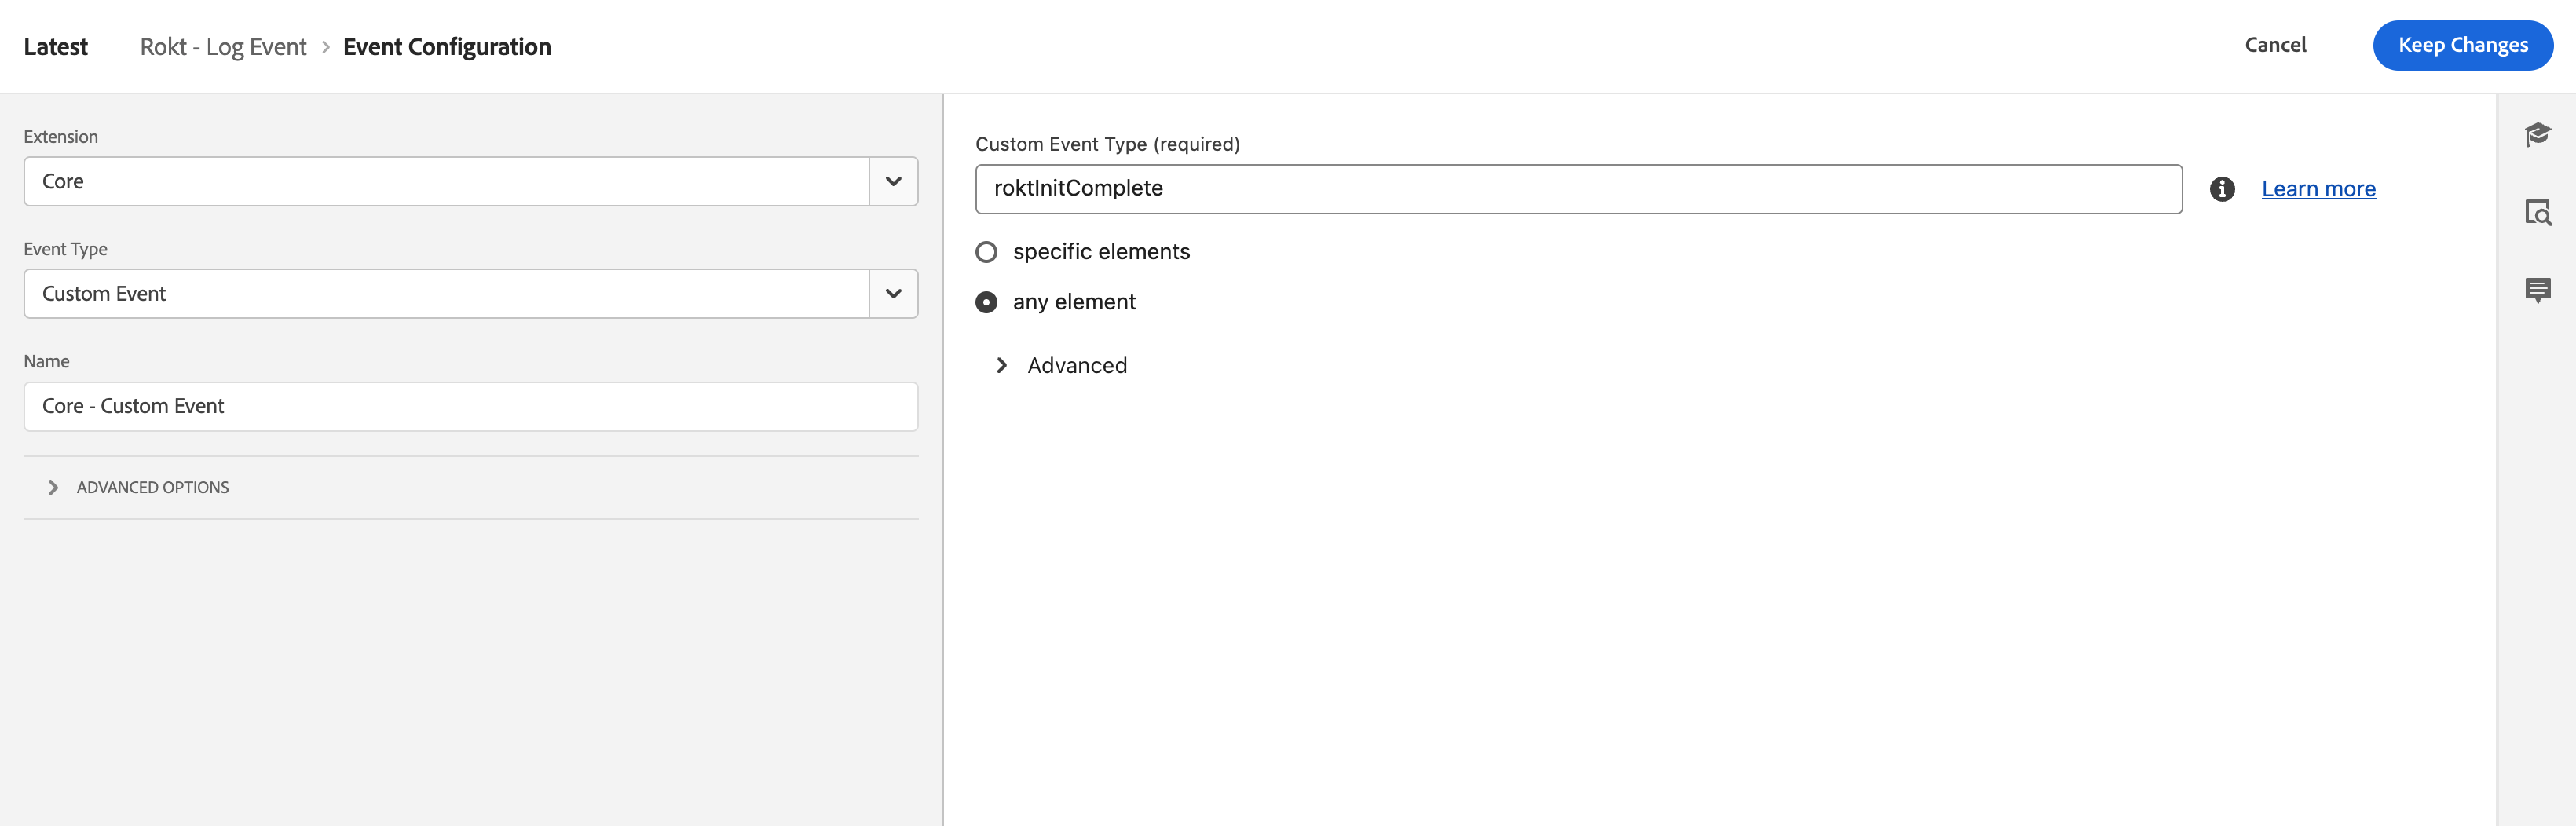
- In subsequent rule setups, such as Log Event or Log Page View, trigger your action from an Event with a Core Extension and Custom Event Event Type.
- Set the Custom Event Type to
roktInitCompleteand selectany element. - Click Keep Changes.
- Add any other relevant Conditions to your Rule configuration to ensure it fires on the correct page(s).
This setup will ensure that you are firing the actions in the correct order on each page.
Repeat this same setup to enable a roktIdentityComplete custom event to ensure your Identity Action has fired before the Log Event Action.
Combining RulesDirect link to Combining Rules
Rokt recommends combining multiple mParticle by Rokt Actions into one rule. One example is combining the Initialize Rokt & Log Page View actions as they are both loaded on all pages.
- Repeat steps 1-3 from Rule Ordering.
- Create a new Action and choose mParticle by Rokt as the Extension and Log Page View as the Action Type.
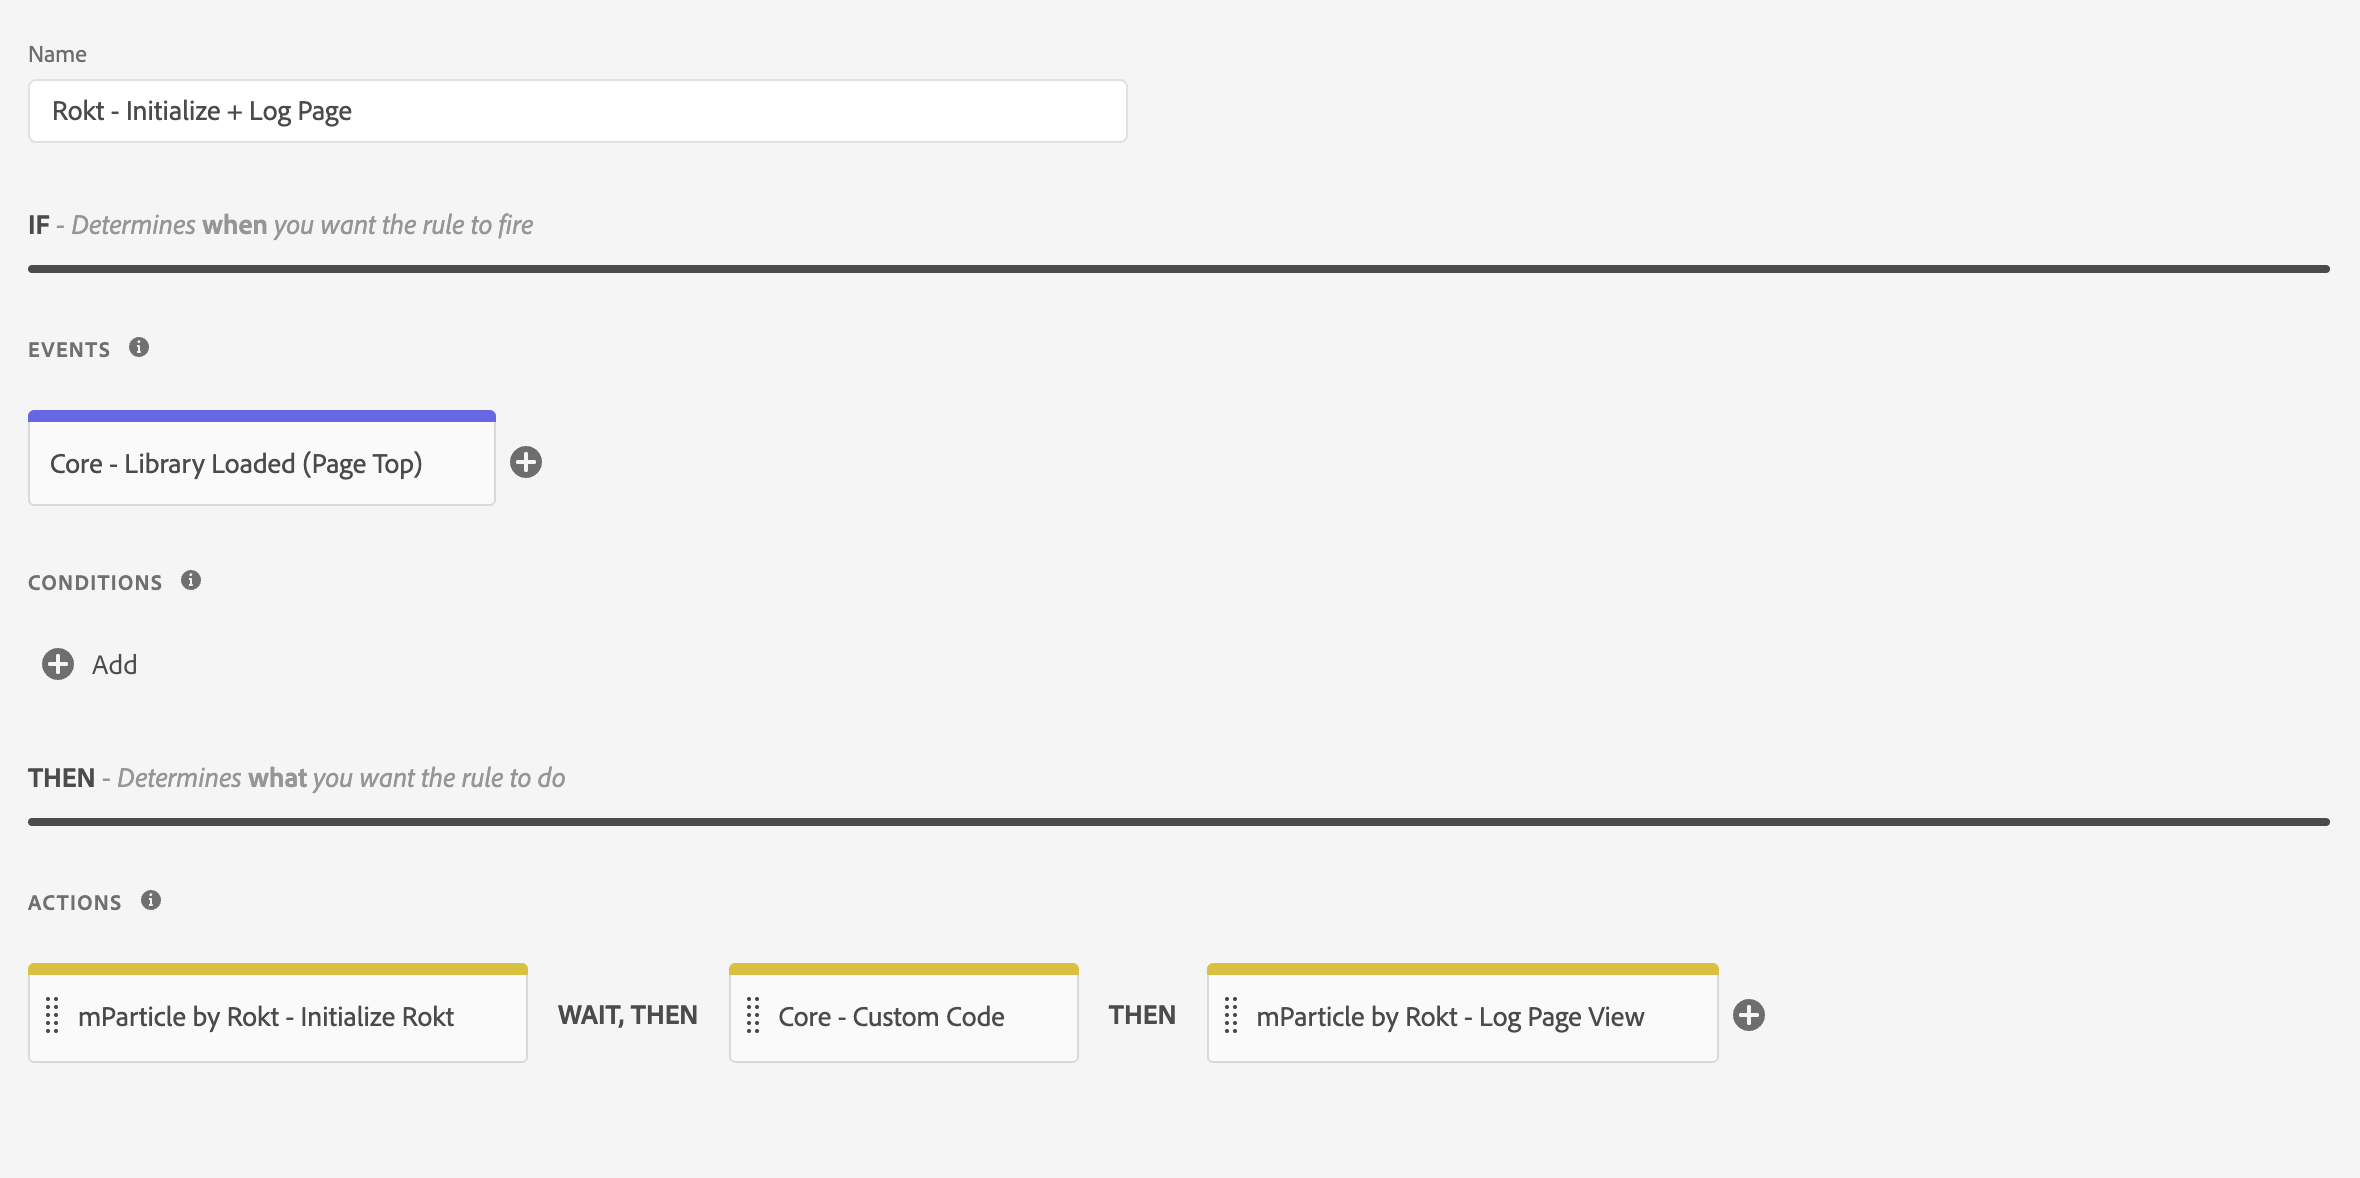
This will ensure that the Initialize Rokt and Log Page View actions are run in the same rule on every page.
Data ElementsDirect link to Data Elements
Understanding the data layerDirect link to Understanding the data layer
The data layer should have been implemented on your web page by your developers.
A data layer is an object that contains all of the information that you want to share with Adobe Experience Platform's Data Elements. Information such as events or variables can be shared to Adobe via the data layer, and triggers can be set up in Adobe Experience Platform's Data Elements based on the values of variables or based on the specific events.
Adobe recommends using the Adobe Client Data Layer for new or restructured implementations. You are free to use other data layer specifications. Aligning to a consistent data layer that meets your organization’s needs is the most important.
Refer to the Adobe Experience developer guide for comprehensive details on how the data layer works.
Example of a data layerDirect link to Example of a data layer
window.adobeDataLayer = window.adobeDataLayer || [];

window.adobeDataLayer.push({
  email: "jenny.smith@rokt.com",
  user: { firstname: "Jenny", lastname: "Smith" },
  ecommerce: { transaction: { amount: "12.36" } },
  event: "page loaded",
});
Identifying your data elementsDirect link to Identifying your data elements
Data elements are set up in your Adobe Experience Platform and are matched to the data layer. Refer to the Adobe Experience developer guide for more details about Data elements.
The structure of your data layer on your page affects the data element name in your Adobe Experience Platform. See the following examples. If you use a data collector object as part of your data layer, simply use dot notation in the path to reference the object and property you want to capture into the data element, like _myData.pageName, or adobeDataLayer.pageName, etc.
Example data layer script 1:
window.adobeDataLayer.push({
  email: "jenny.smith@rokt.com",
});
Data layer path name: adobeDataLayer.email
Example data layer script 2:
window.adobeDataLayer.push({
  user: {
    firstname: "Jenny",
  },
});
Data layer path name: adobeDataLayer.user.firstname
Example data layer script 3:
window.adobeDataLayer.push({
  ecommerce: {
    transaction: {
      amount: "12.36",
    },
  },
});
Data layer path name: adobeDataLayer.ecommerce.transaction.amount
The JavaScript variable data element type treats array references as dots instead of brackets, so referencing the firstname data element as adobeDataLayer.user[0].firstname will not work.
Adding data elementsDirect link to Adding data elements
-
Navigate to the Data Elements tab and choose Add Data Element.
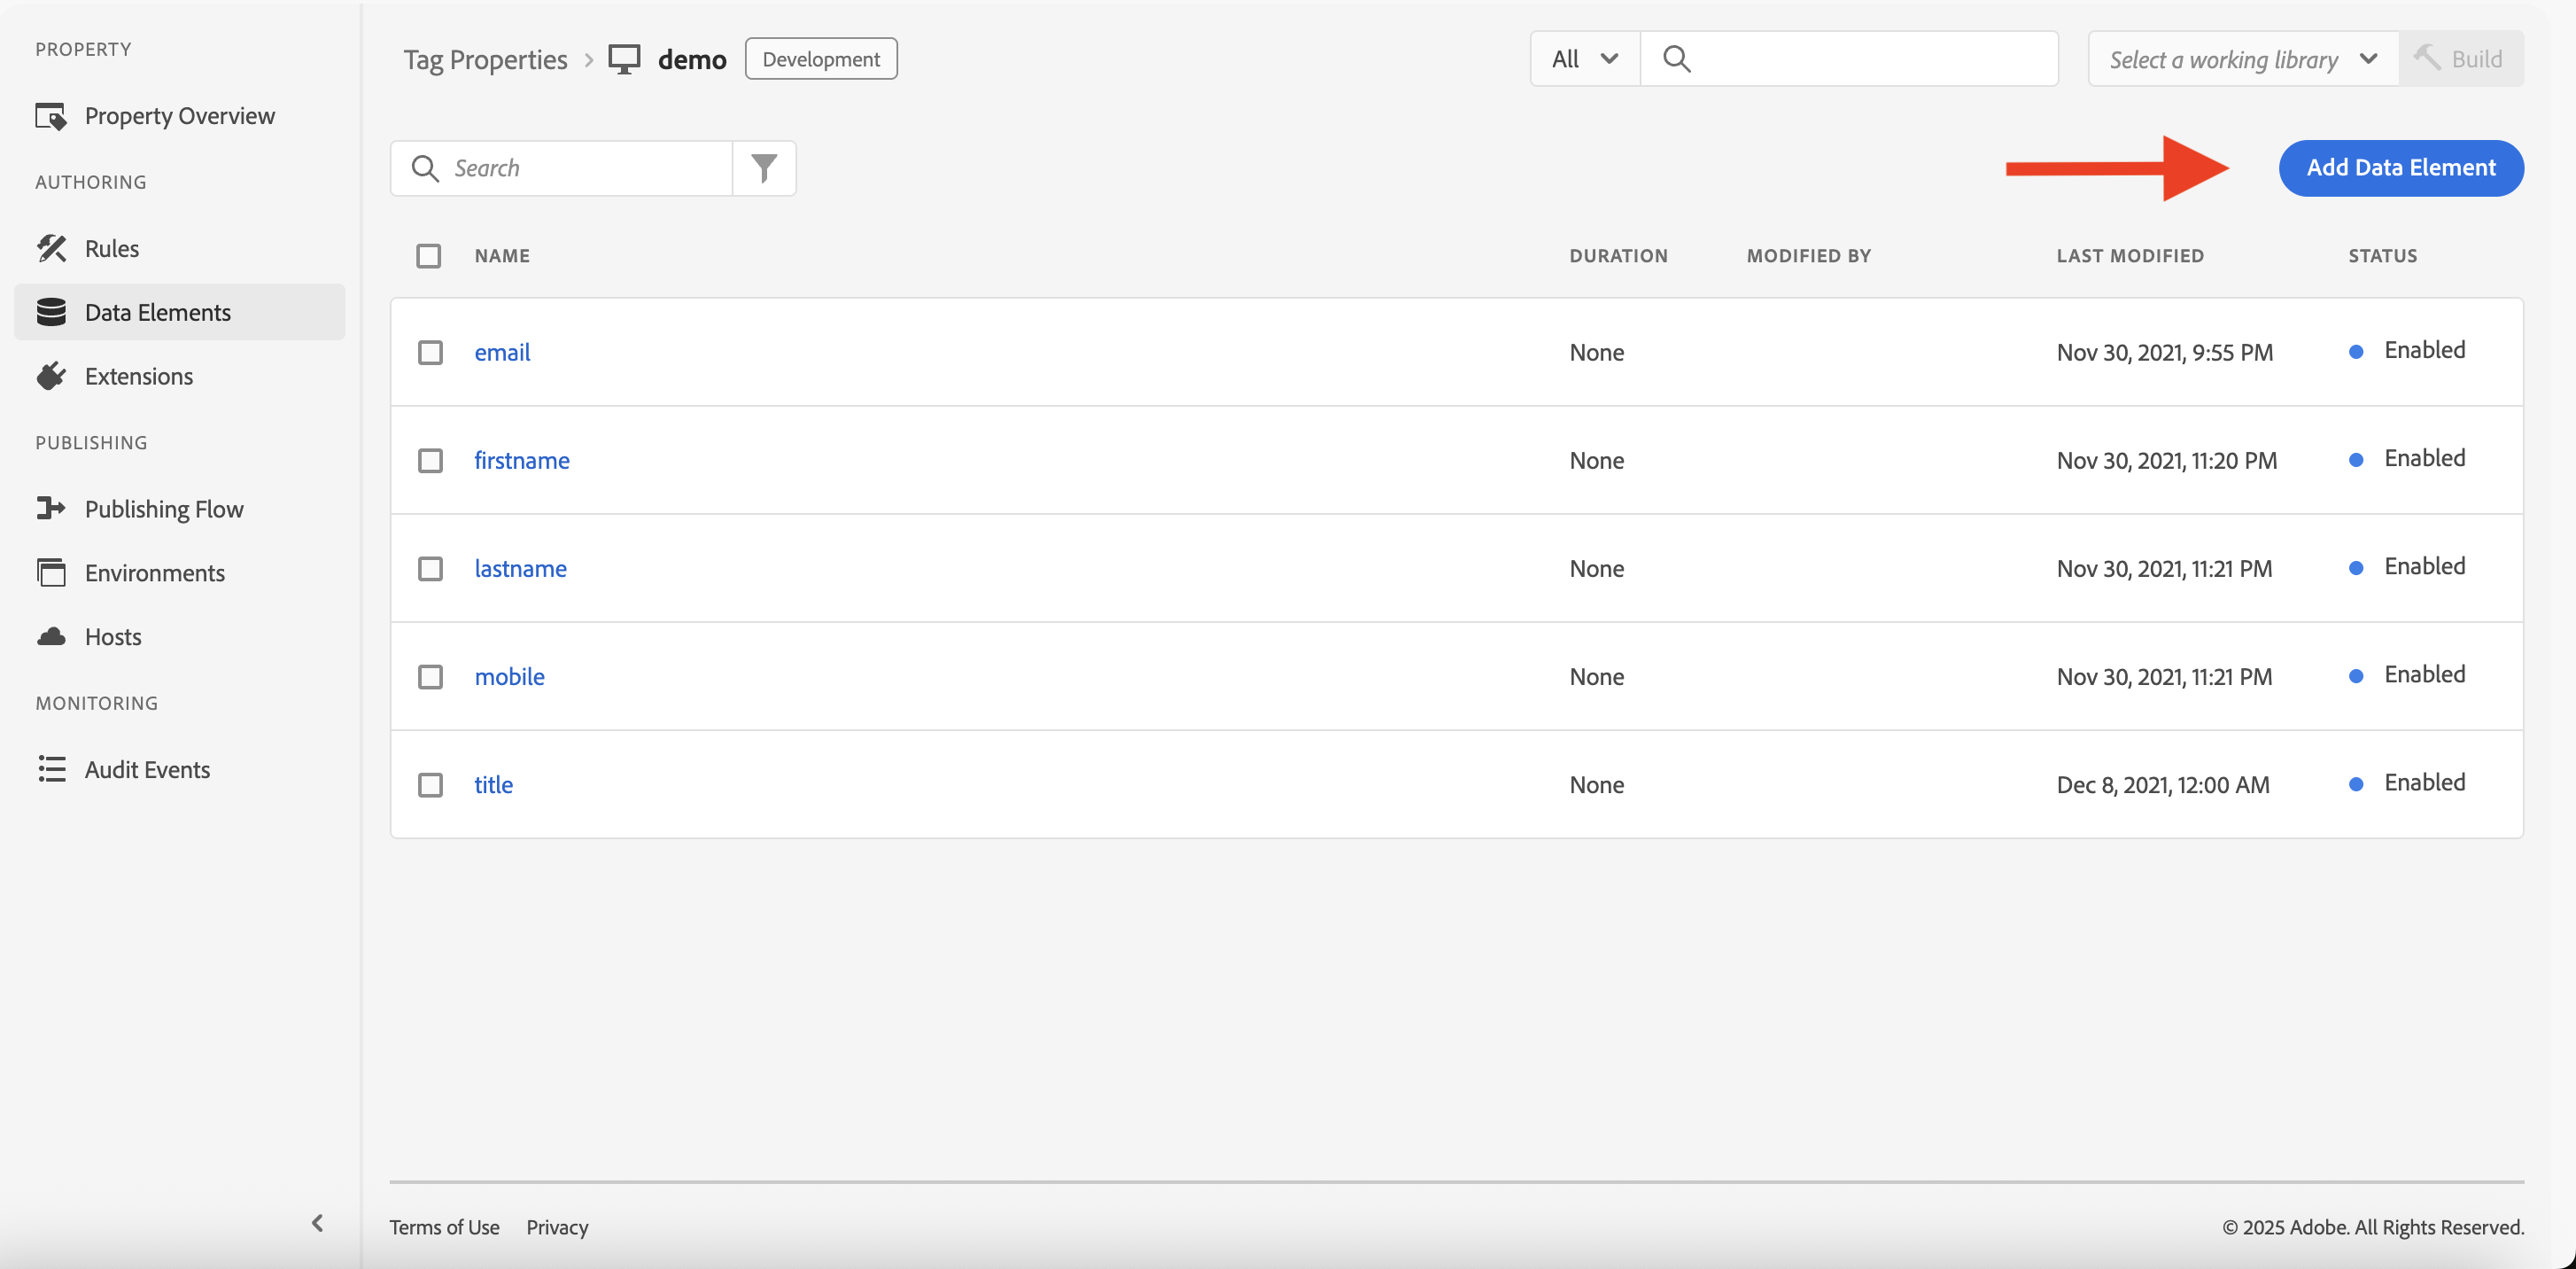
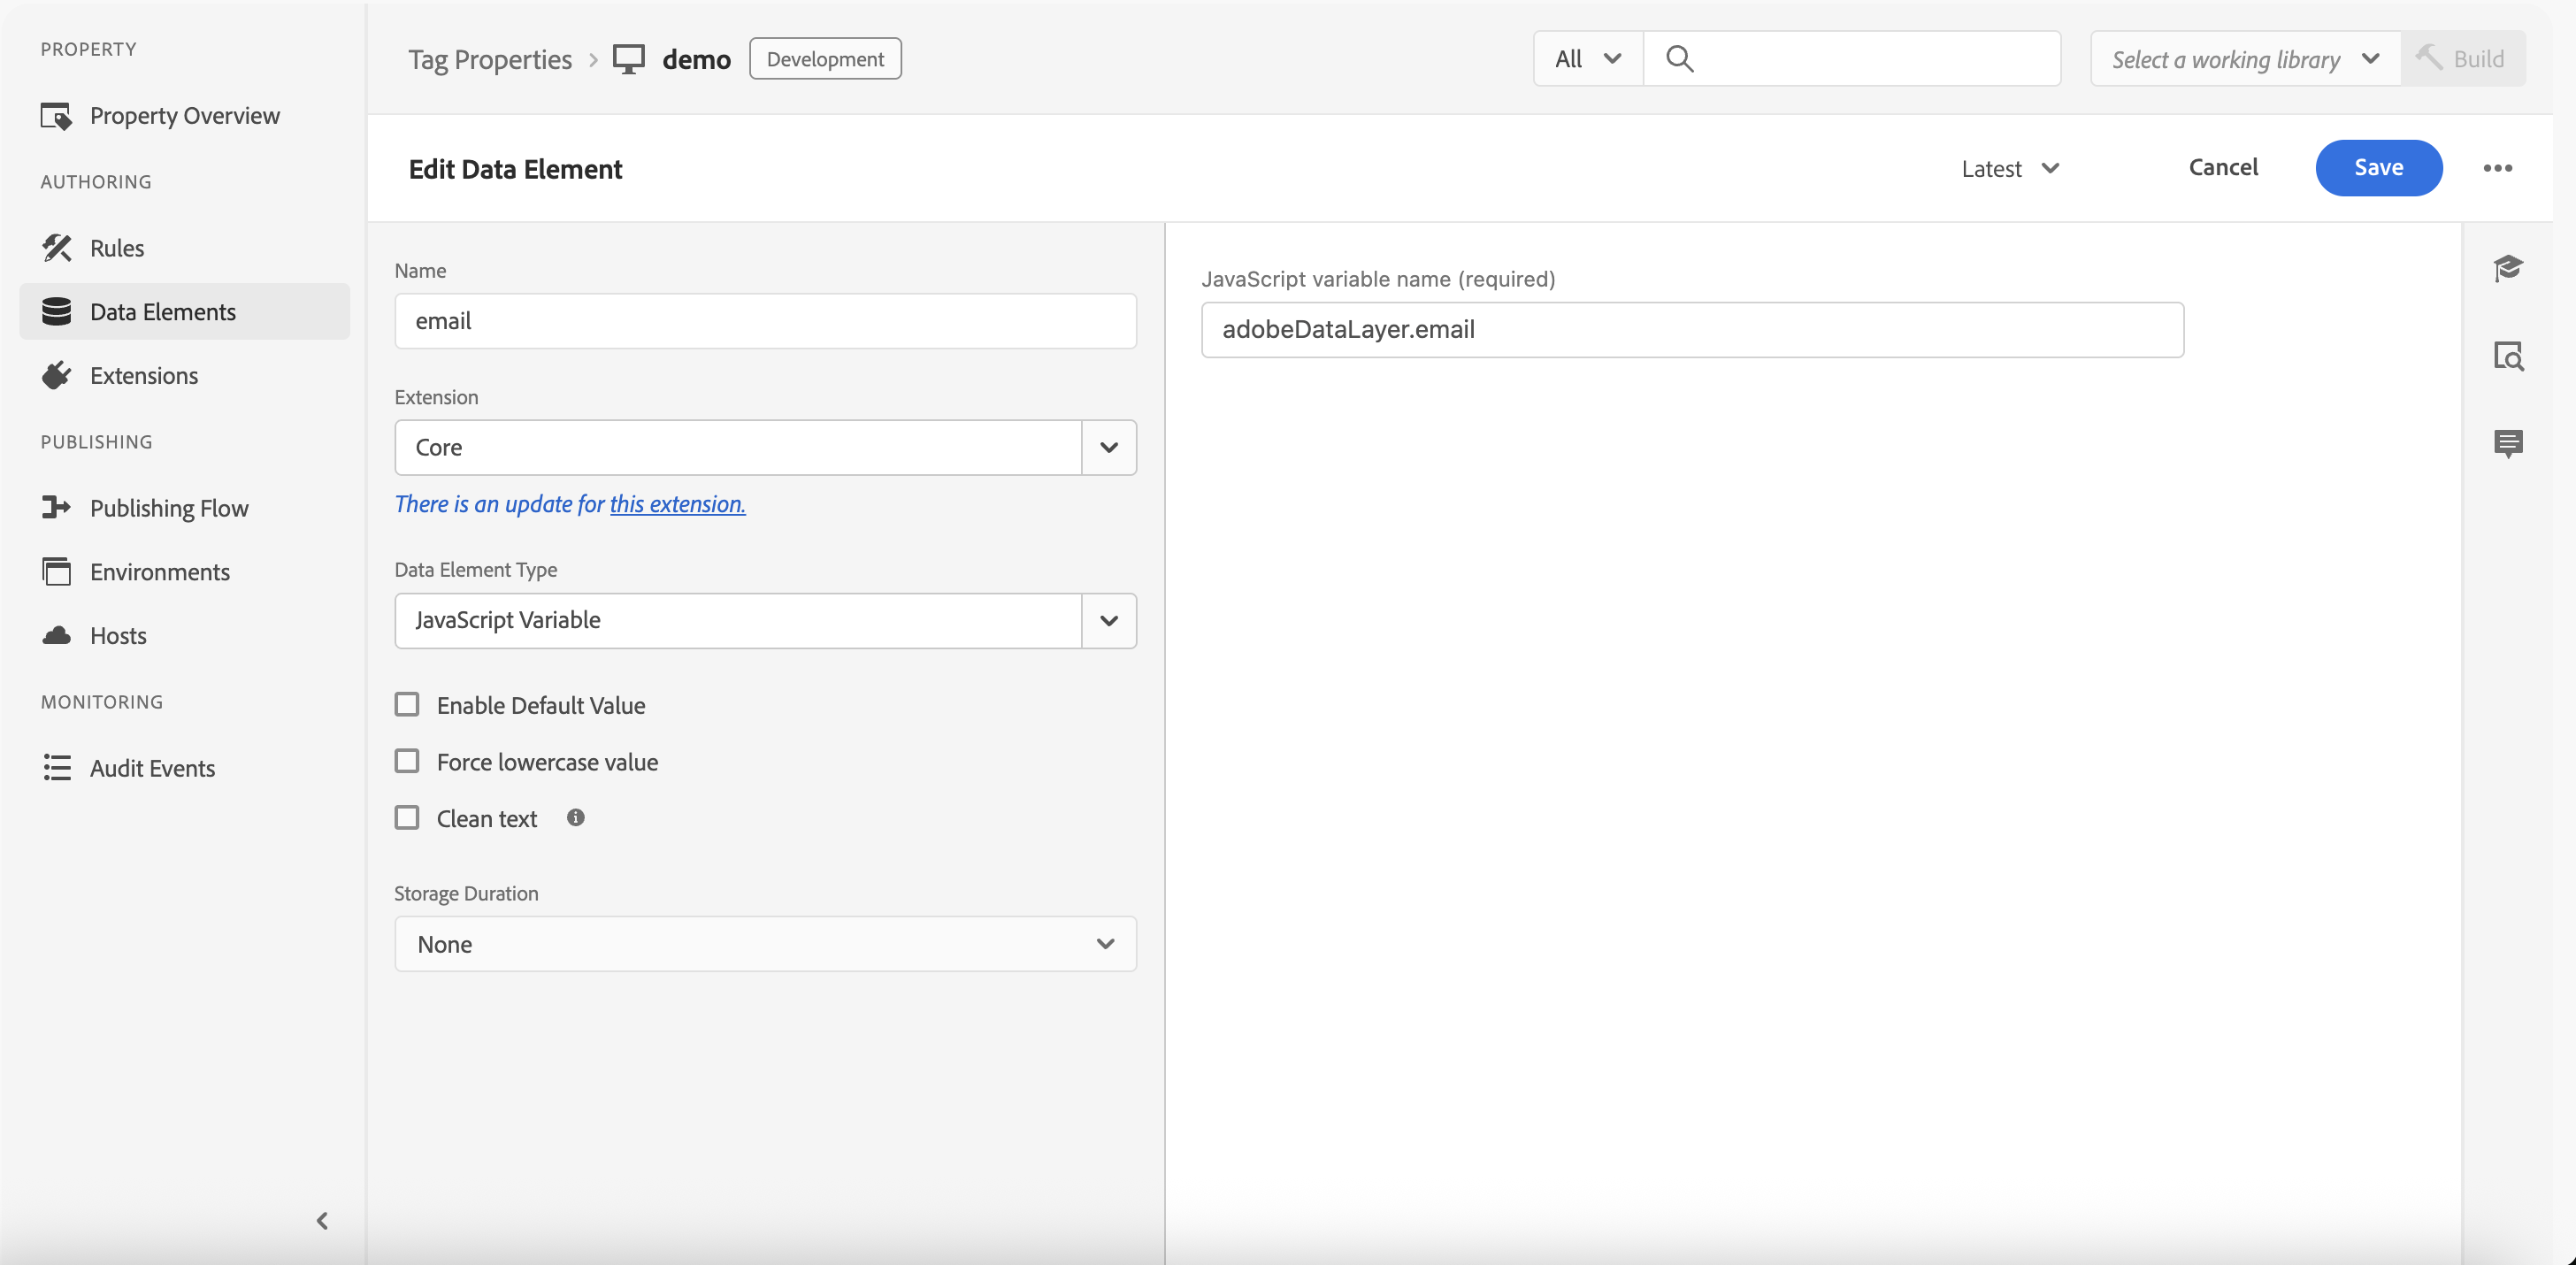
-
Name your variable and choose Core as the extension.
- Use however your developer stored your values for Data Element Type
- Use JavaScript Variable for in-memory values (e.g.,
adobeDataLayer.email) - Use Local Storage only if the values are persisted in the browser’s localStorage
-
Enter the path name that matches the variable name in your data layer setup by your developer.
Recommended User AttributesDirect link to Recommended User Attributes
Rokt recommends setting as many of the following user attributes as possible:
| User Attribute Key | Example Value | Notes |
|---|---|---|
| firstname | John | The customer's first name. |
| lastname | Doe | The customer's last name. |
| mobile | 3125551515 | Phone numbers can be formatted either as 1112345678 or +1 (222) 345-6789. |
| age | 33 | The customer's age. |
| dob | 19900717 | Date of birth. Formatted as yyyymmdd. |
| gender | M | The customer's gender. For example, M, Male, F, or Female. |
| city | Brooklyn | The customer's city. |
| state | NY | The customer's state. |
| zip | 11201 | The customer's zip code. |
| title | Mr | The customer's title. For example, Mr, Mrs, Ms. |
| language | en | Language associated with the purchase. |
| value | 52.25 | The value of the customer. |
| predictedltv | 136.23 | The total predicted lifetime value of the customer. |
Recommended Conversion Event AttributesDirect link to Recommended Conversion Event Attributes
Rokt recommends setting as many of the following conversion event attributes as possible:
| Event Attribute Key | Example Value | Notes |
|---|---|---|
| amount | 300.5 | Purchase amount (including tax & fees) |
| conversiontype | purchase | |
| confirmationref | XYZ123 | |
| paymenttype | Gift card | Chase, Visa | comma‑separated strings (platform, card brand, payment network). Pipes (|) separate split payments |
| currency | USD |
All attributes (including list attributes and tags) must have distinct names.
Recommended Screen View Event AttributesDirect link to Recommended Screen View Event Attributes
An example of attributes Rokt recommends for Advertisers to send are screen_name, url, and referring-page. To add these attributes as Data Elements:
-
Navigate to the Data Elements tab and choose Add Data Element.
-
Name your variable and choose Core as the extension.
- For
screen_name:- Set the Data Element Type as Custom Code
- Click Open Editor and paste the following line:
return location.pathname.split("/").filter(Boolean).pop() || "home"; - For
url:- Set the Data Element Type as Page Info
- In the Attribute dropdown, select URL
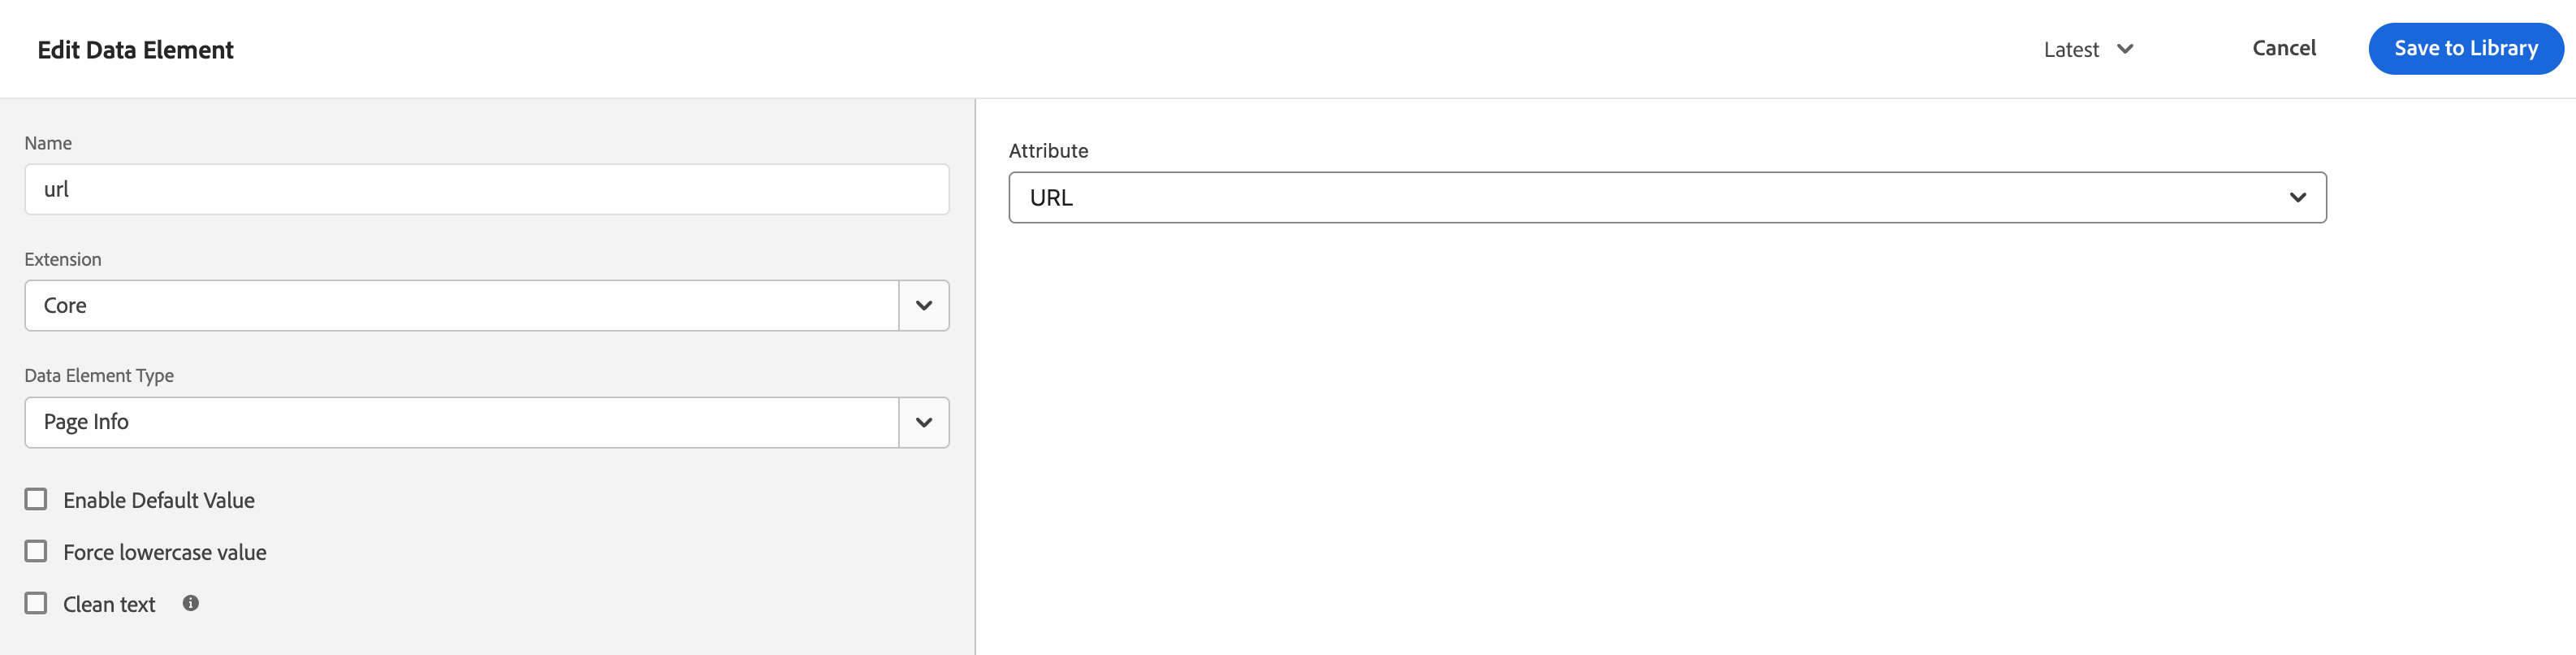
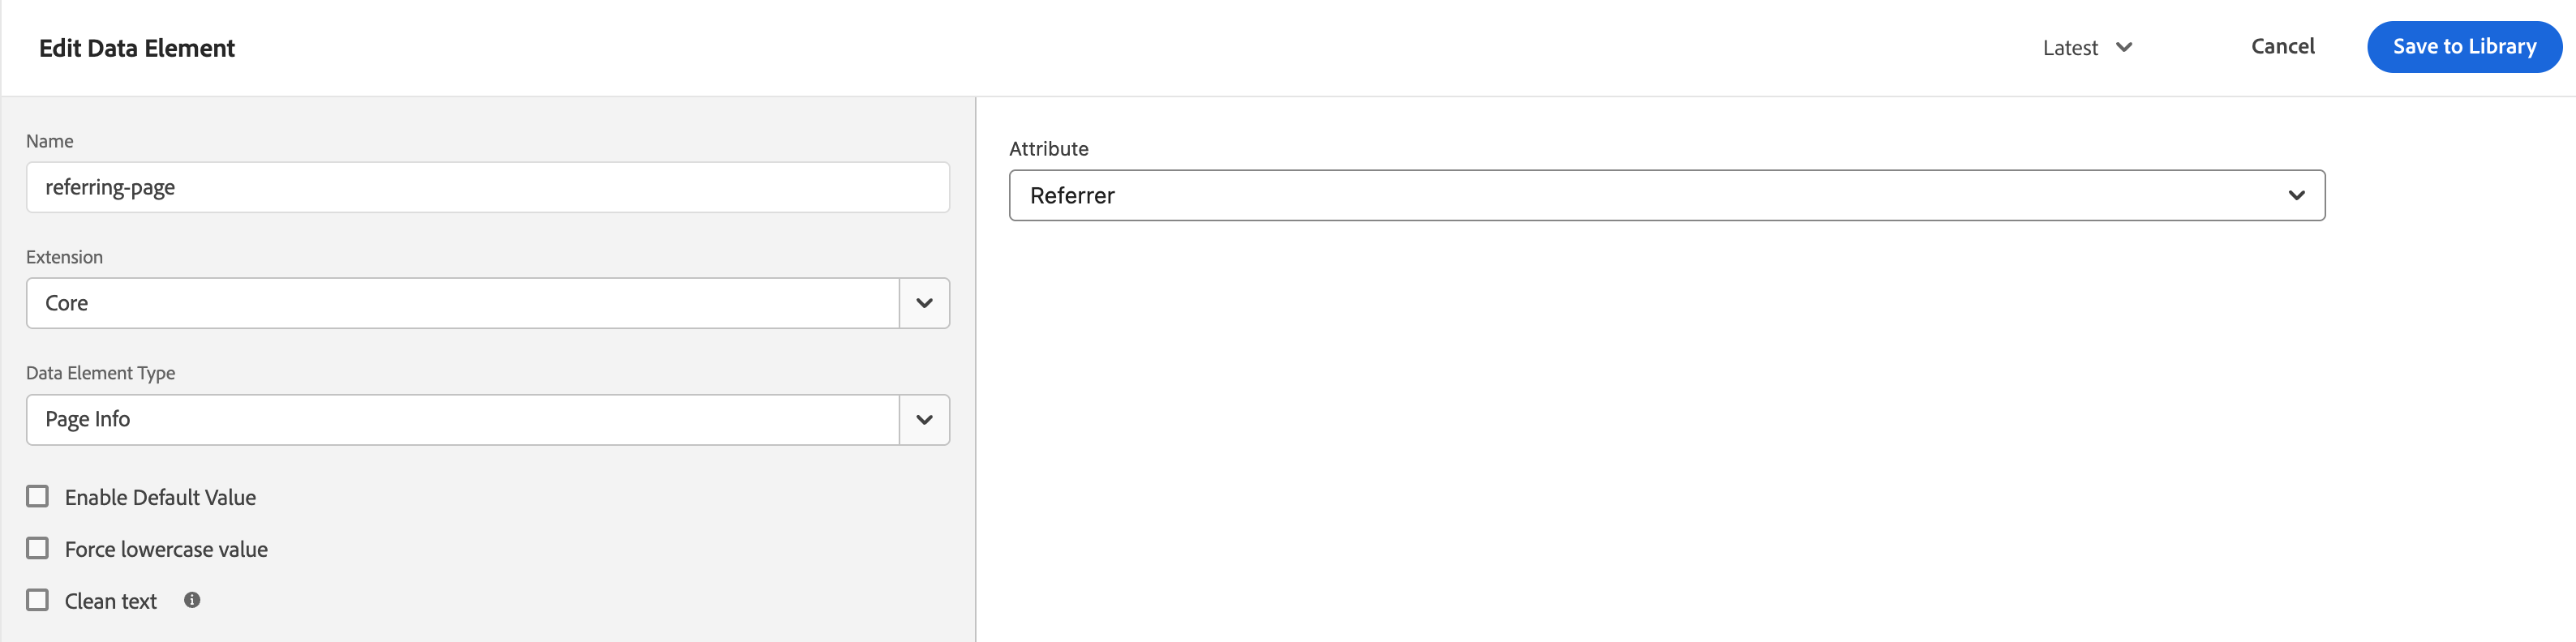
- For
referring-page:- Set the Data Element Type as Page Info
- In the Attribute dropdown, select Referrer
- For
-
Click Save and Save to Library Now you can reference these Data Elements in your Log Page View Custom Attributes.