Intégration de Google Tag Manager pour les annonceurs
Cette page explique comment implémenter les annonces Rokt avec Google Tag Manager pour boucler la boucle en reliant les conversions à vos campagnes. En reliant les conversions à l'engagement de vos annonces, vous pouvez activer une attribution plus précise, une optimisation en temps réel et une mesure de campagne.
Vous apprendrez comment :
- Créer des variables GTM qui lisent les valeurs de la couche de données de votre site
- Créer des balises GTM pour initialiser le SDK Rokt, identifier les utilisateurs et enregistrer les événements de conversion
Avant de commencerLien direct vers Avant de commencer
Assurez-vous d'avoir :
- Accès au bon conteneur Google Tag Manager pour votre site
- Une couche de données déjà implémentée sur votre site (généralement faite par vos développeurs)
- Votre clé API Rokt (fournie par votre gestionnaire de compte Rokt)
Comprendre la couche de donnéesLien direct vers Comprendre la couche de données
Vos développeurs doivent implémenter la couche de données sur votre site.
Une couche de données est un objet qui contient toutes les informations que vous souhaitez partager avec Google Tag Manager (GTM). Des informations telles que des événements ou des variables peuvent être partagées avec Google Tag Manager via la couche de données, et des déclencheurs peuvent être configurés dans Google Tag Manager en fonction des valeurs des variables (par exemple, déclencher une balise de remarketing lorsque purchase_total > $100) ou en fonction des événements spécifiques. Les valeurs des variables peuvent également être partagées avec d'autres balises (par exemple, ajouter purchase_total dans le champ de valeur d'une balise).
Consultez le guide du développeur GTM de Google pour des détails complets sur le fonctionnement de la couche de données.
Exemple de couche de données :
window.dataLayer = window.dataLayer || [];

window.dataLayer.push({
  email: "jenny.smith@rokt.com",
  user: {
    firstname: "Jenny",
    lastname: "Smith",
  },
  ecommerce: {
    transaction: {
      amount: "12.36",
    },
  },
  event: "gtm.transactionComplete",
});
Identifier vos noms de variablesLien direct vers Identifier vos noms de variables
Les variables sont configurées dans votre compte GTM et sont associées à la couche de données. Consultez le guide du développeur GTM pour plus de détails sur les variables.
La structure de votre couche de données sur votre page affecte le nom de la variable de la couche de données dans votre GTM.
Exemple de script de couche de données 1 :
window.dataLayer.push({
  email: "jenny.smith@rokt.com",
});
Nom de la variable de la couche de données : email
Exemple de script de couche de données 2 :
window.dataLayer.push({
  user: {
    firstname: "Jenny",
  },
});
Nom de la variable de la couche de données : user.firstname
Exemple de script de couche de données 3 :
window.dataLayer.push({
  ecommerce: {
    transaction: {
      amount: "12.36",
    },
  },
});
Nom de la variable de la couche de données : ecommerce.transaction.amount
Créez vos variables dans Google Tag ManagerLien direct vers Créez vos variables dans Google Tag Manager
- Connectez-vous à votre conteneur Google Tag Manager.
- Cliquez sur Variables.
- Sous Variables définies par l'utilisateur, cliquez sur Nouveau.
- Entrez un nom pour votre variable.
- Cliquez sur Choisir un type de variable pour commencer la configuration...
- Sous Variables de page, sélectionnez Variable de couche de données.
- Entrez le Nom de la variable de couche de données. Consultez les exemples ci-dessus pour identifier le nom de la variable en fonction de la structure de votre couche de données.
- Cliquez sur Enregistrer.
Rokt recommande de créer des variables pour les attributs que vous prévoyez d'envoyer à Rokt, tels que :
emailfirstnamelastnamemobileconversiontypeconfirmationrefbillingzipcodeamountpaymenttypecountrylanguagecurrency
Configurez la balise d'Initialisation et de Journalisation des Vues de PageLien direct vers Configurez la balise d'Initialisation et de Journalisation des Vues de Page
La balise mParticle par Rokt - Initialisation et Journalisation des Vues de Page peut :
- Initialiser le SDK Rokt
- Journaliser les vues de page
Utilisez ces étapes pour créer la balise d'Initialisation et de Journalisation des Vues de Page :
- Cliquez sur Balises dans la navigation à gauche de votre conteneur et cliquez sur Nouveau.
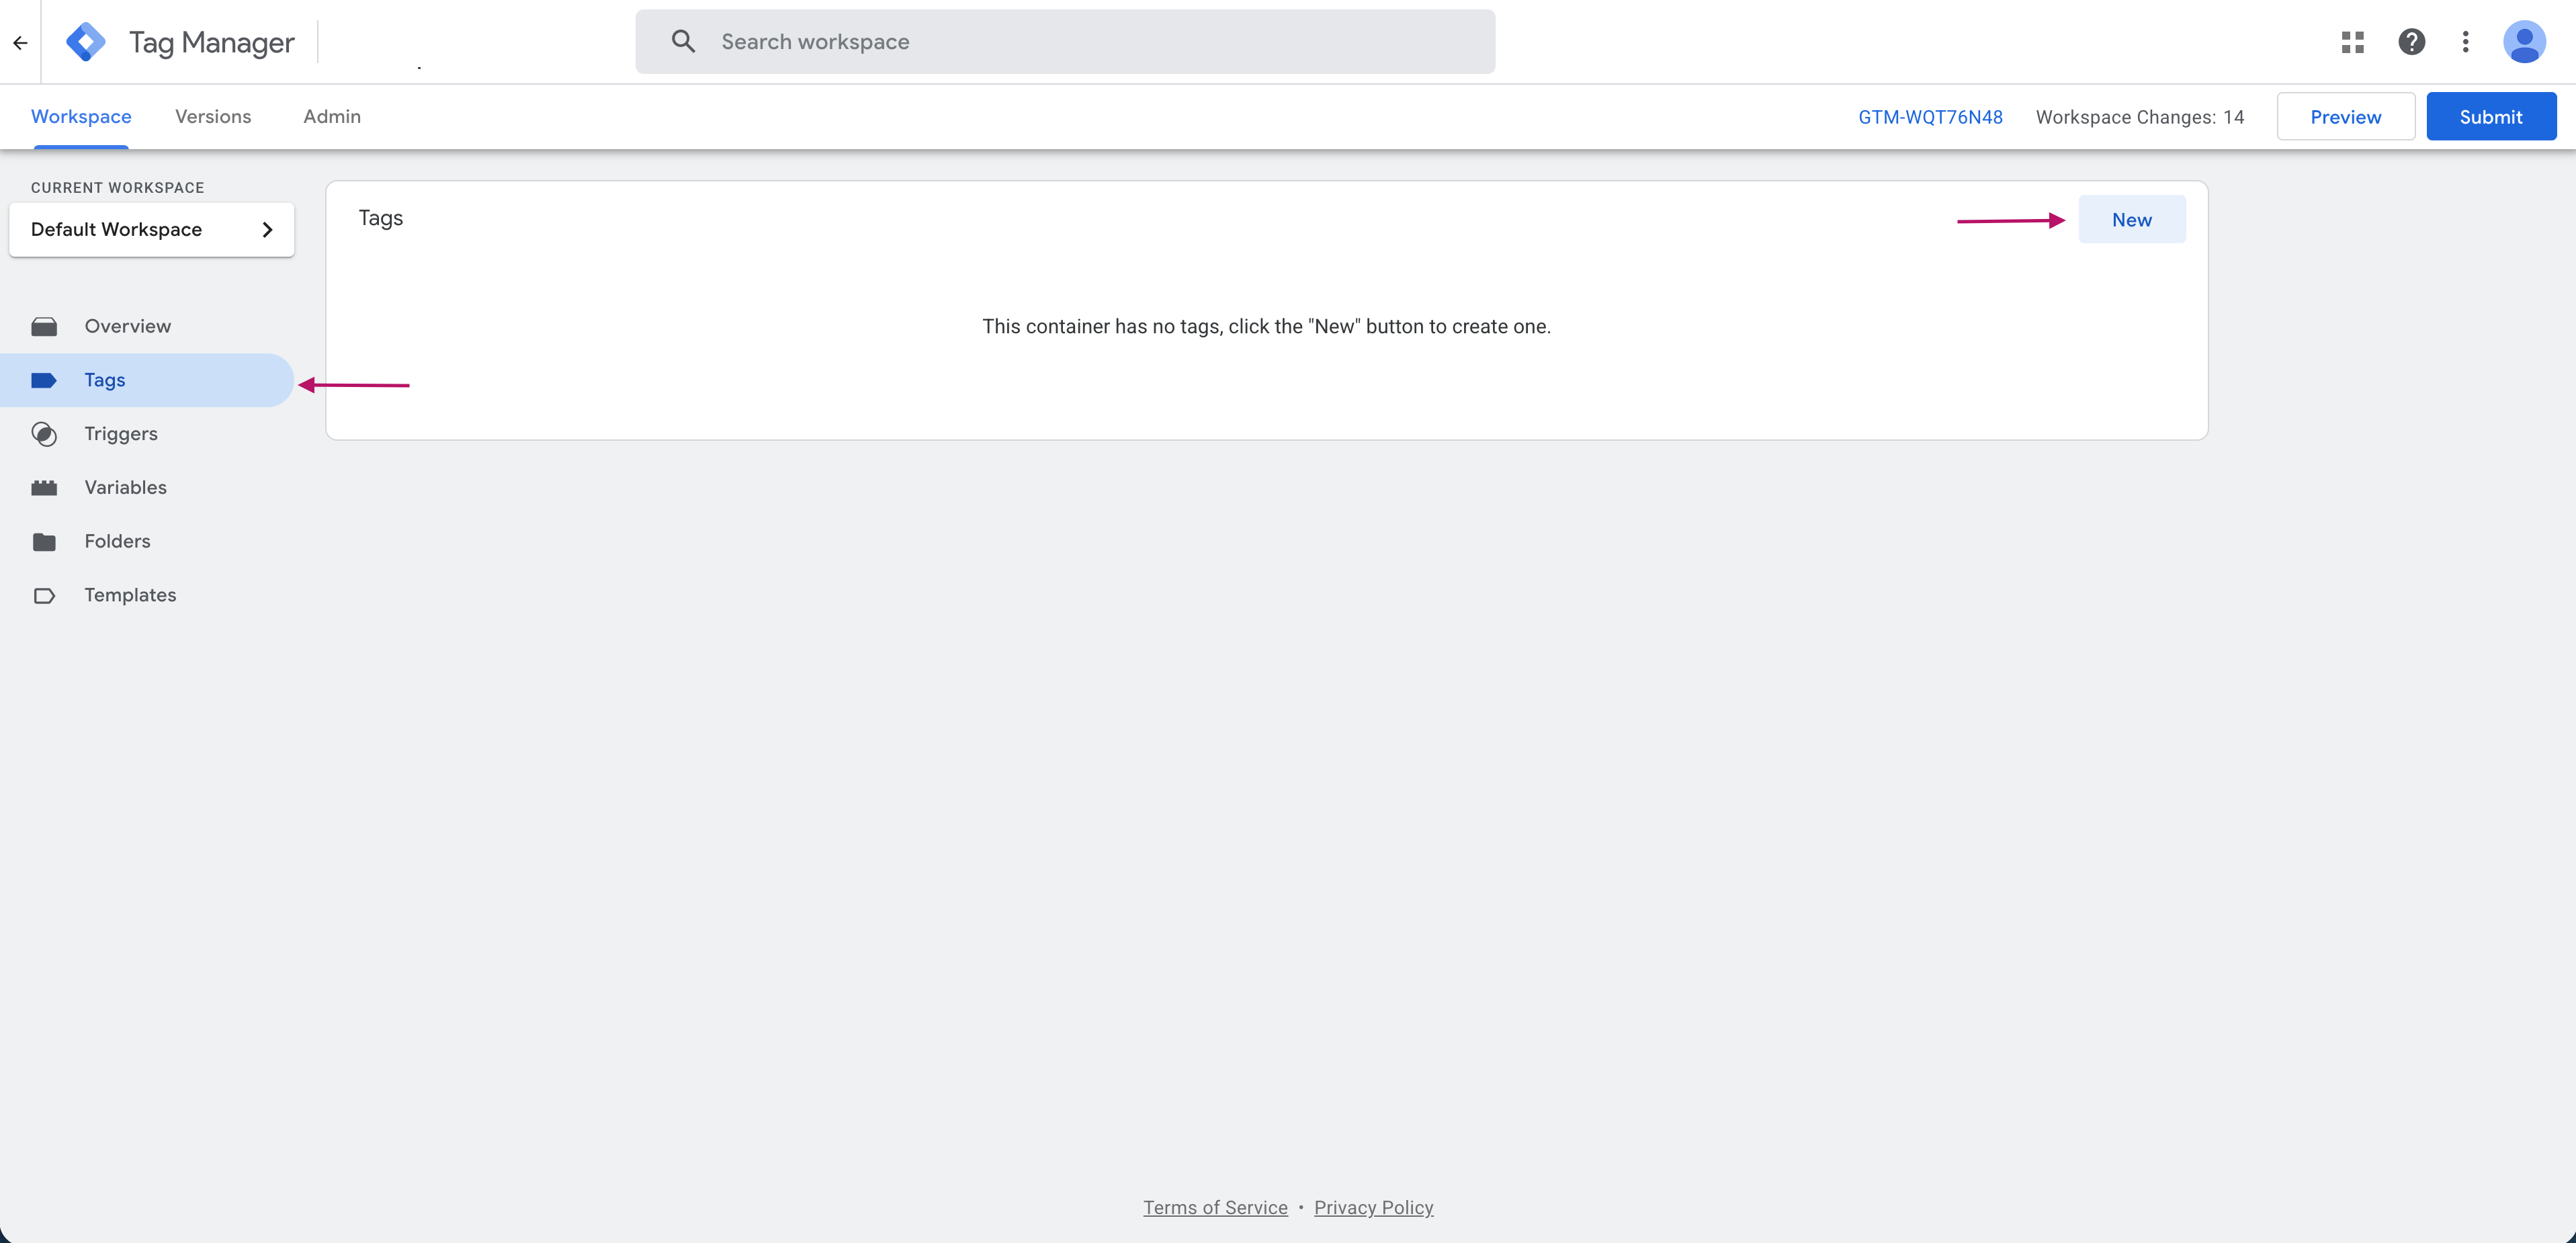
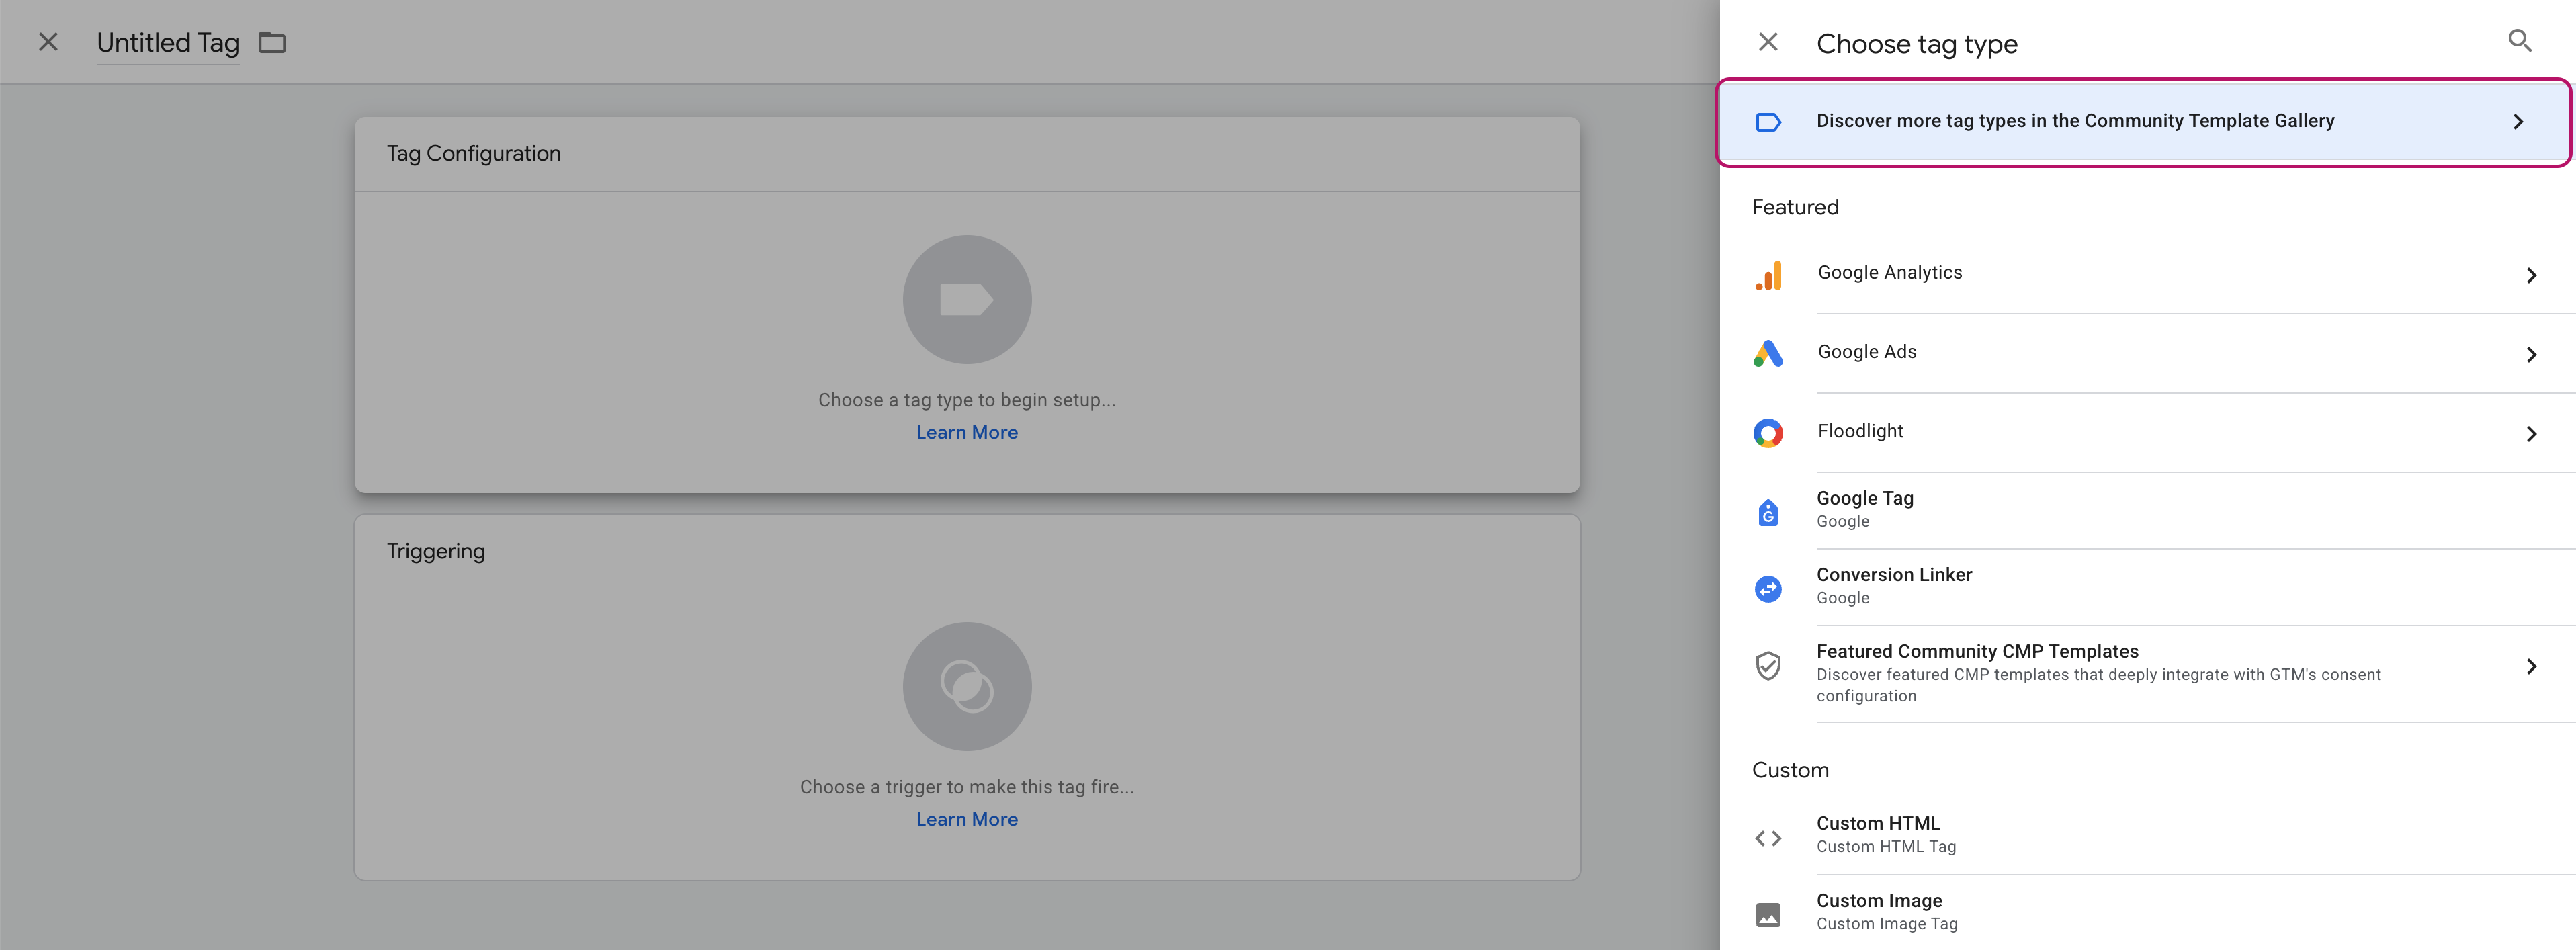
- Sélectionnez Configuration de la balise.
- Sélectionnez Découvrez plus de types de balises dans la Galerie de Modèles Communautaires.
- Recherchez
Roktet sélectionnez mParticle par Rokt - Initialisation et Journalisation des Vues de Page.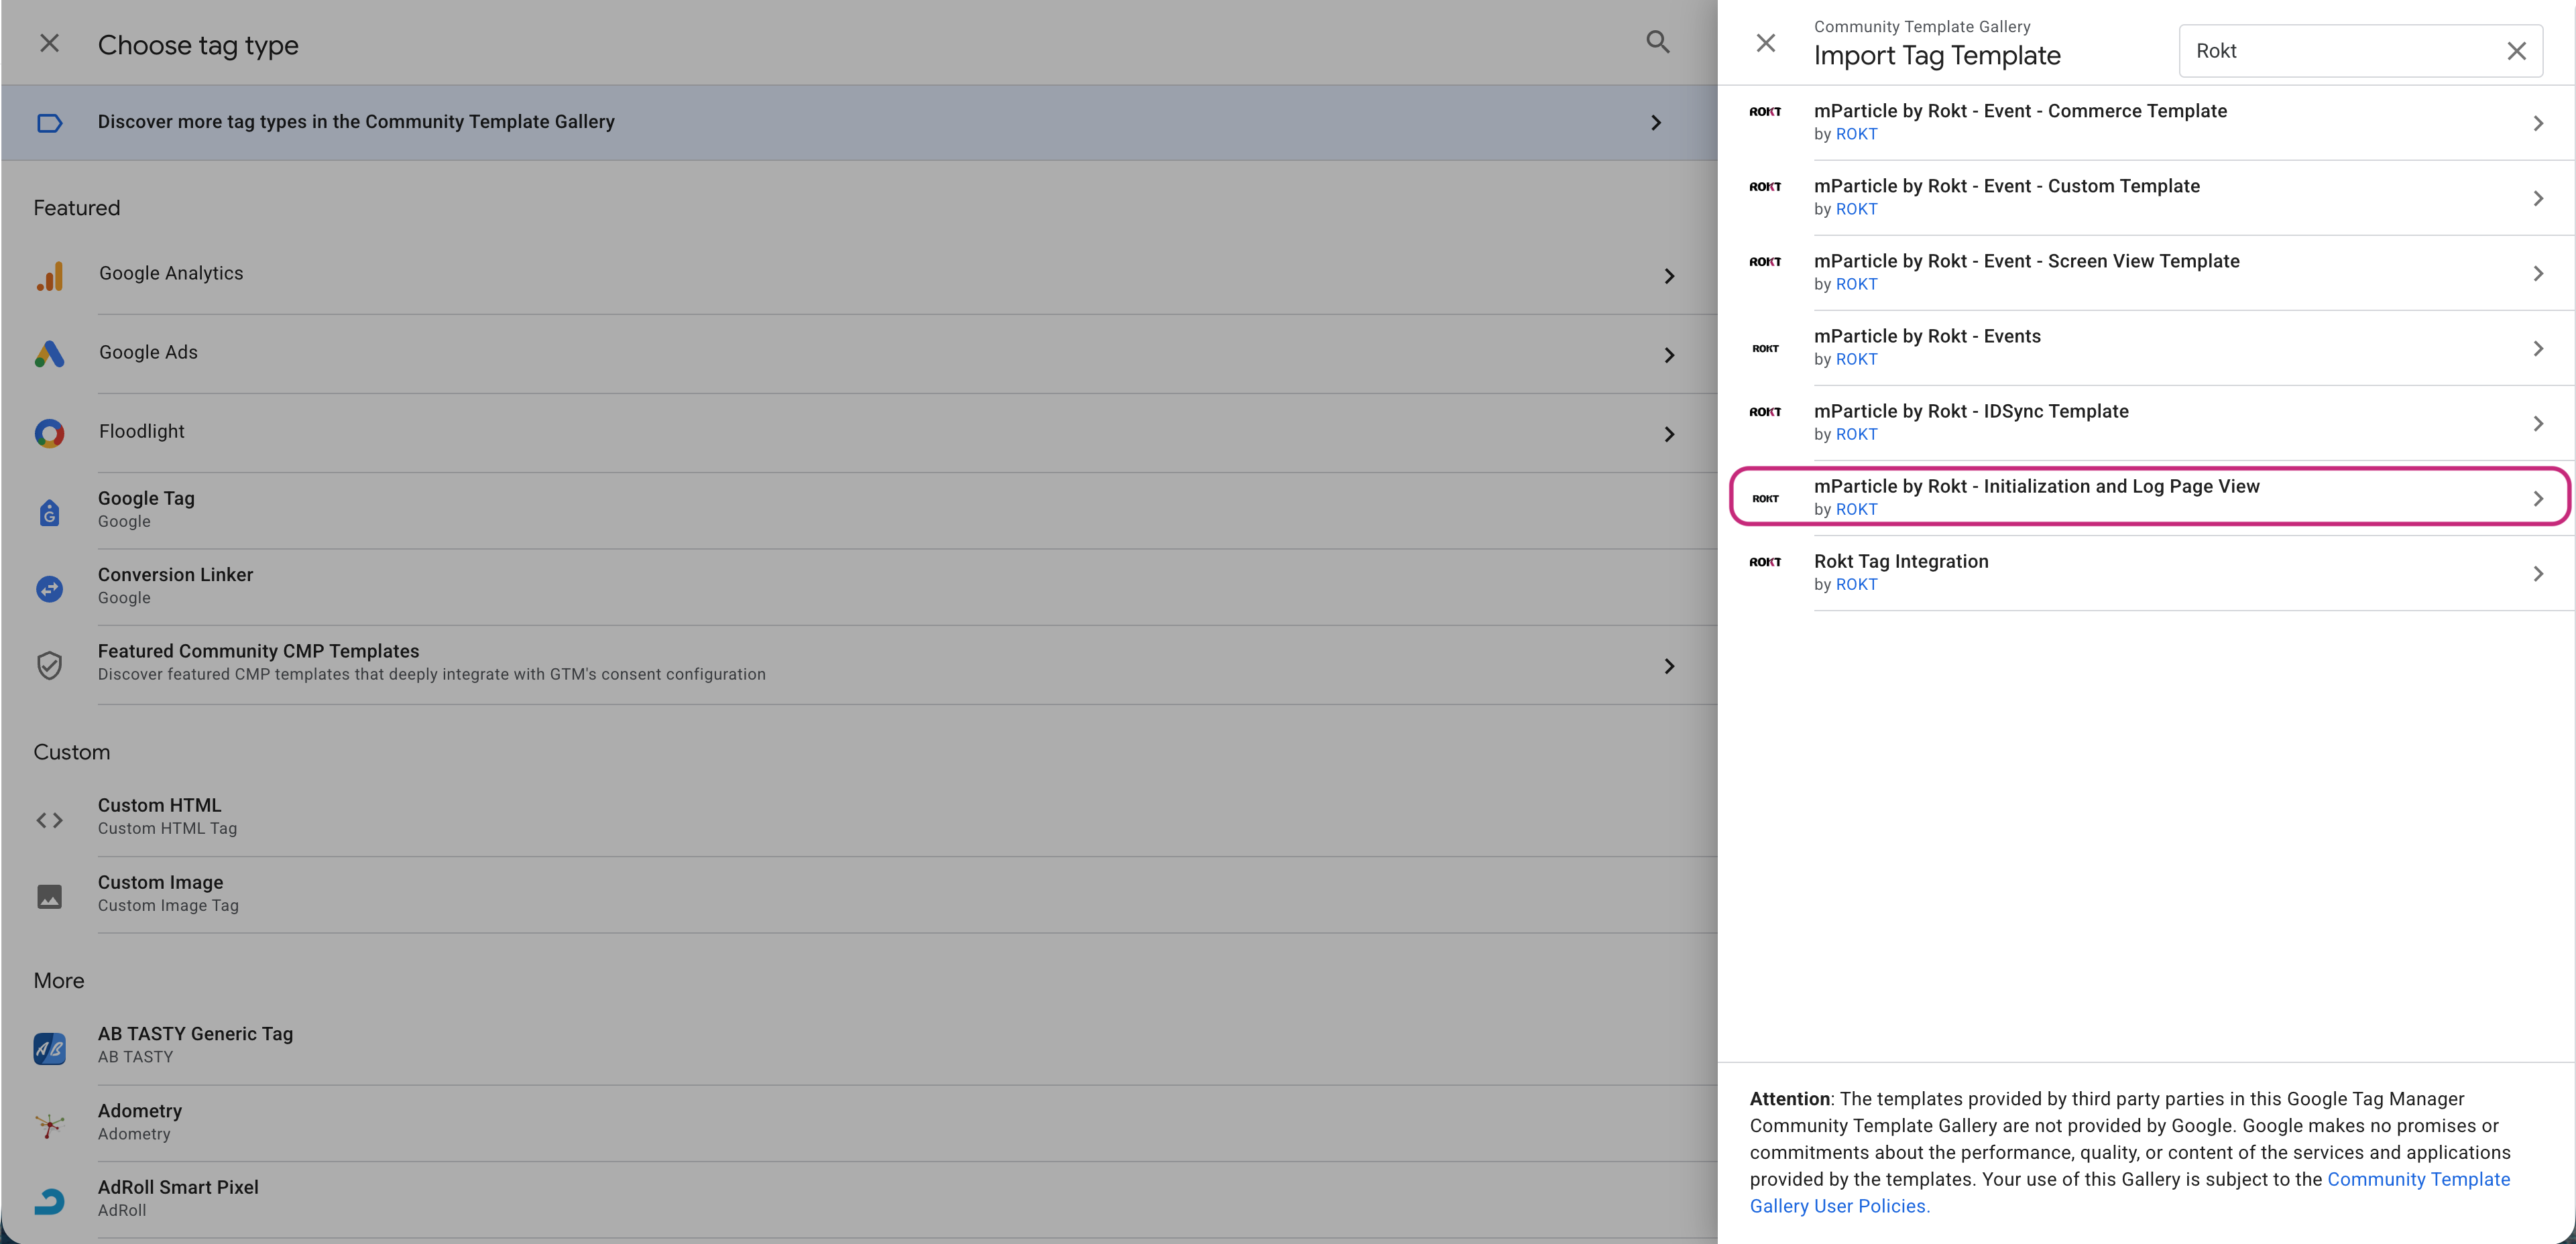
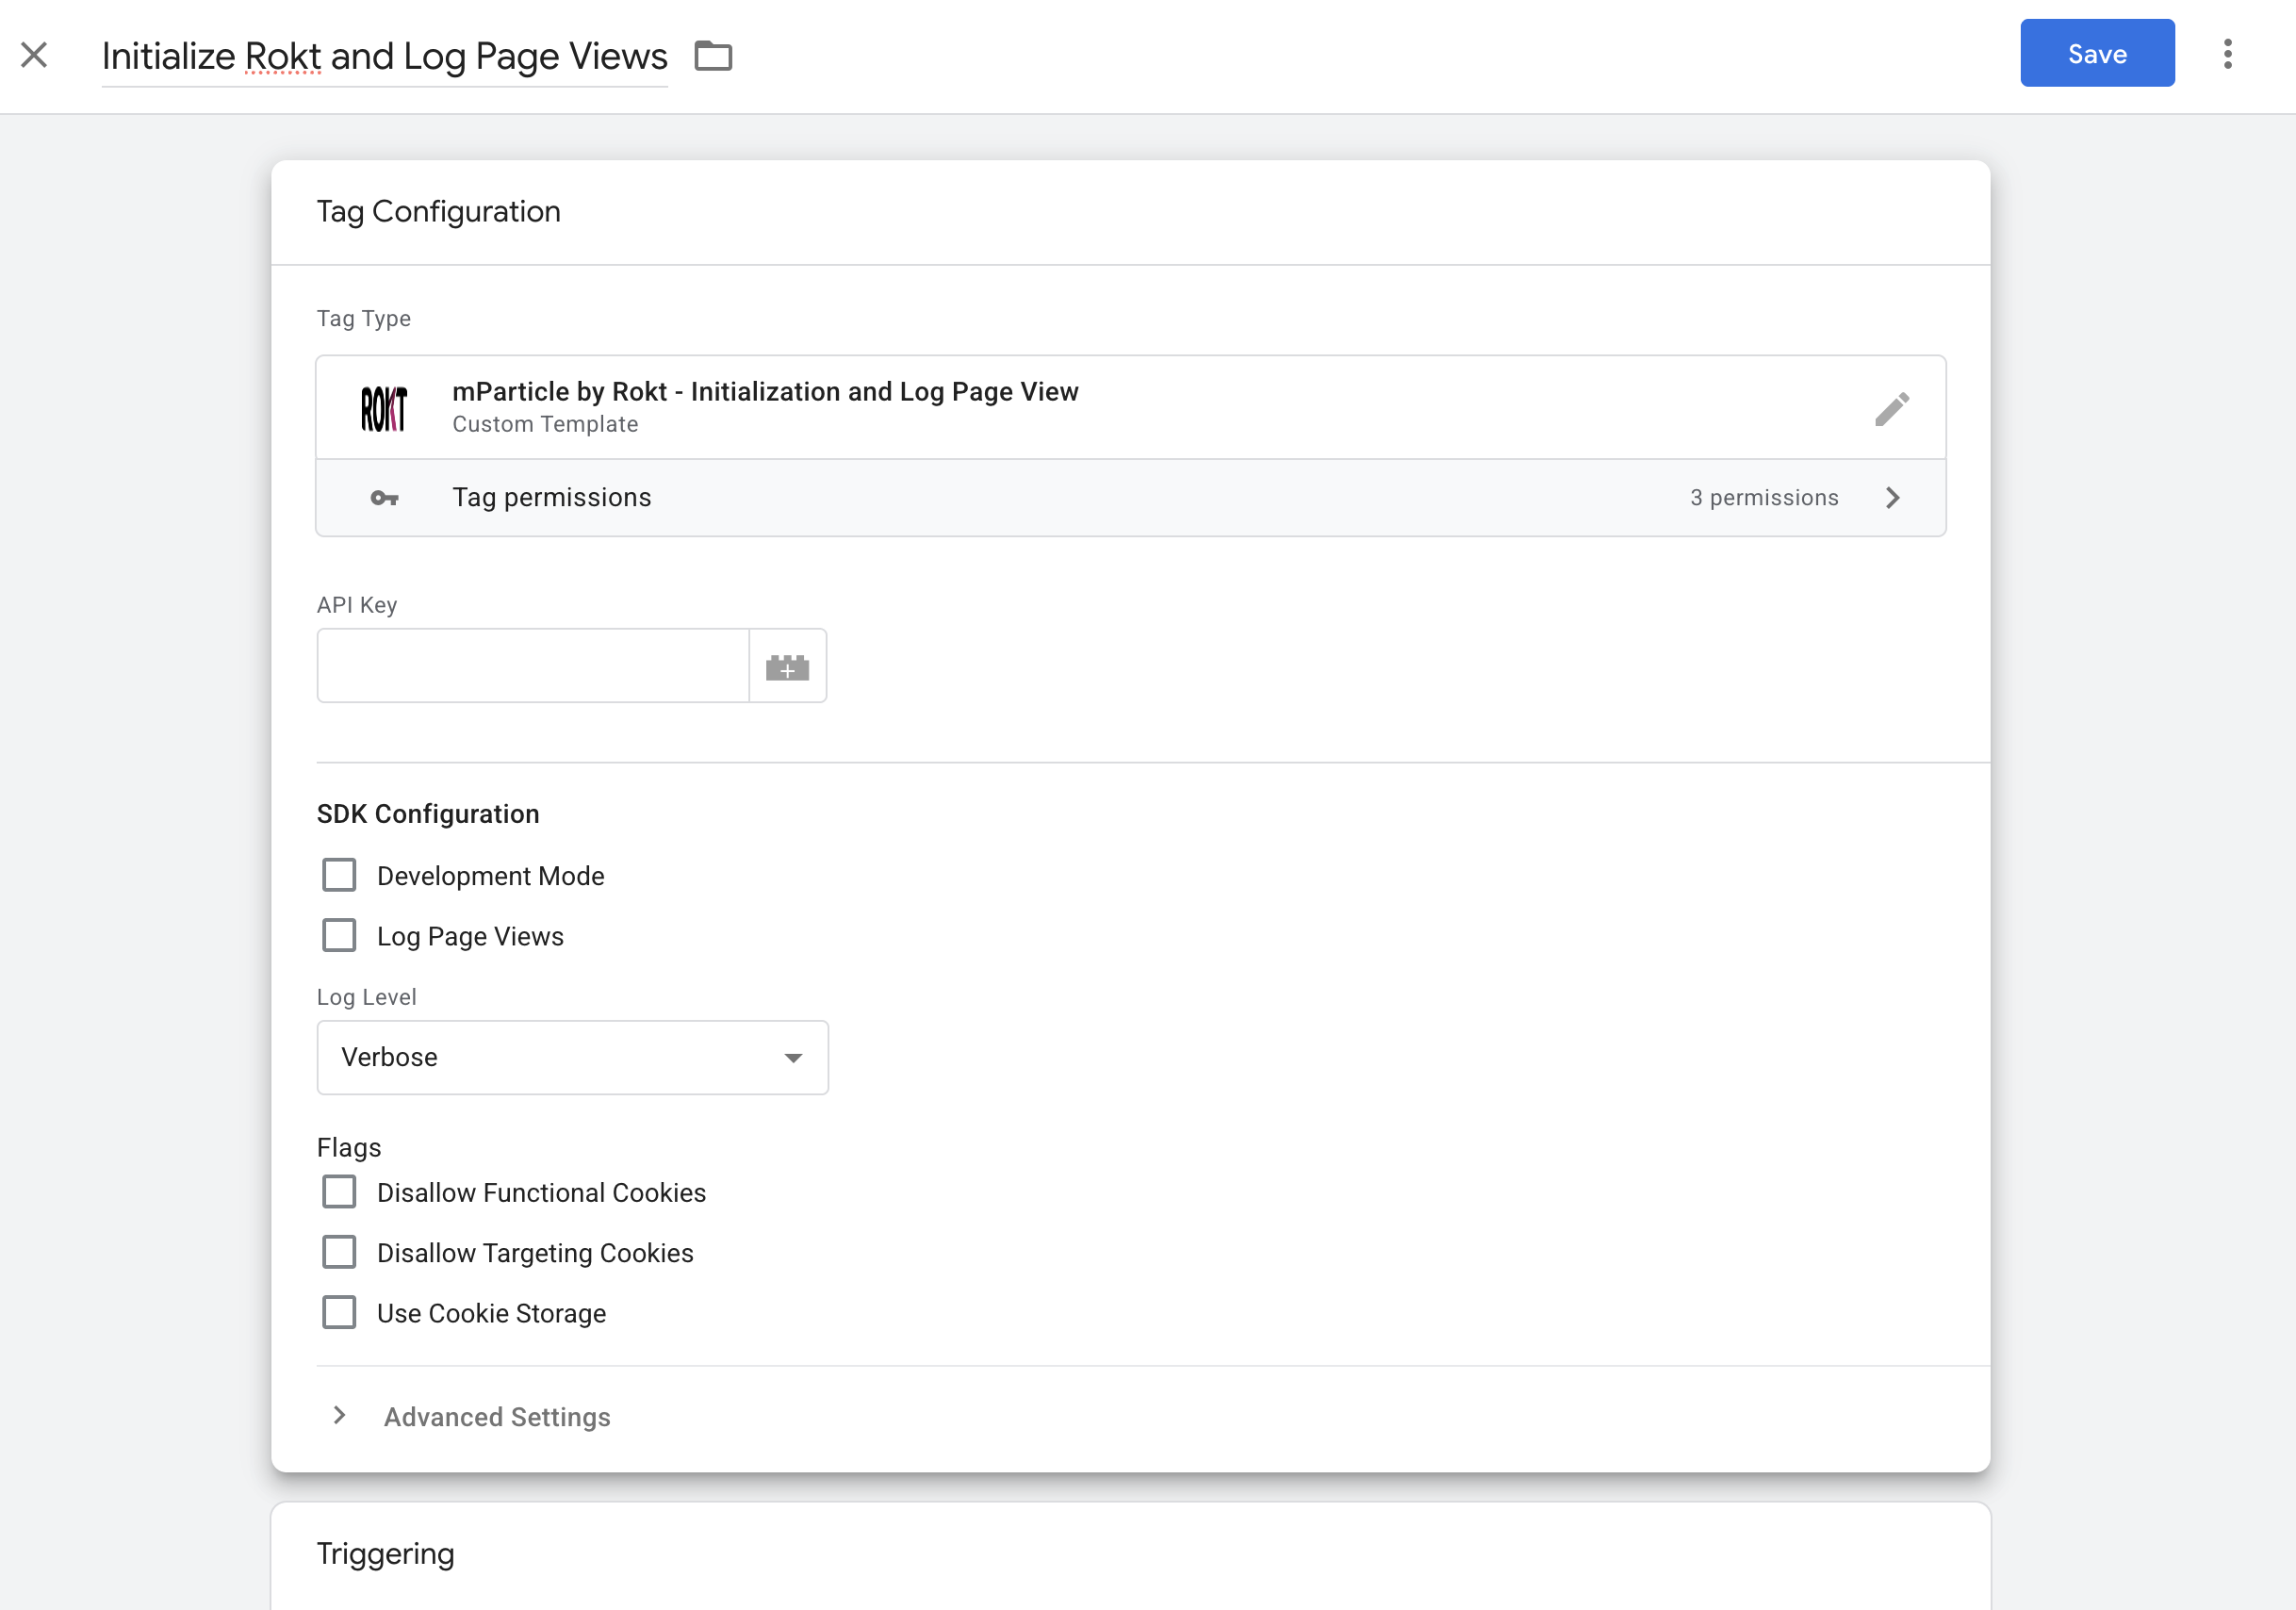
- Entrez un nom descriptif pour votre balise (par exemple,
[Rokt] Initialiser et Journaliser les Vues de Page). - Entrez les paramètres de configuration :
- Clé API : Entrez votre clé API Rokt (fournie par votre gestionnaire de compte Rokt).
- Mode Développement : Si vous testez votre intégration, cochez la case Mode Développement. Si vous êtes prêt à utiliser votre balise en production, décochez cette case.
- Journaliser les Vues de Page : La journalisation des vues de page enregistre un événement de vue de page (avec des attributs comme nom_écran, url, et page_de_référence) dès que chaque page se charge.
- Les attributs de votre événement de vue de page correspondront aux attributs de votre site (par exemple, si vous êtes sur l'écran "paiement", votre
nom_écranserapaiement). - Vous devriez journaliser les vues de page dès que chaque page dans le parcours de transaction de l'utilisateur est chargée.
- Les attributs de votre événement de vue de page correspondront aux attributs de votre site (par exemple, si vous êtes sur l'écran "paiement", votre
- Niveau de Journalisation : Dans le menu déroulant, sélectionnez votre niveau de journalisation préféré (Verbeux, Avertissement, Aucun).
- Interdire les Cookies Fonctionnels : Les cookies fonctionnels sont utilisés pour améliorer la convivialité et la performance d'un site ou d'une application. Pour plus de détails, voir préférences de cookies.
- Interdire les Cookies de Ciblage : Les cookies de ciblage sont utilisés pour permettre la publicité, le reciblage, et la personnalisation marketing. Pour plus de détails, voir préférences de cookies.
- Utiliser le Stockage de Cookies : Le stockage de cookies pour une intégration SDK est utilisé pour conserver les valeurs clés (comme les identifiants ou l'état de consentement) afin que le SDK puisse maintenir la continuité entre les pages et les sessions.
- Configurez le déclencheur pour cette balise GTM. Les étapes suivantes varient selon que votre site est une application multi-pages (MPA) ou une application à page unique (SPA) :
- Configuration du déclencheur pour les applications multi-pages
- Sélectionnez Toutes les Pages dans la liste.
- Configuration du déclencheur pour les applications à page unique
- Sélectionnez Toutes les Pages et Changement d'Histoire dans la liste.
La balise d'Initialisation & Journalisation des Vues de Page doit être chargée sur toutes les pages. La configuration exacte du déclencheur peut varier en fonction de votre implémentation. Si vous avez des questions sur la stratégie d'implémentation, contactez votre gestionnaire de compte Rokt.
- Entrez un nom descriptif pour votre déclencheur, comme Toutes les Pages ou Changement d'Histoire.
- Ajoutez des exceptions si nécessaire.
- Cliquez sur Enregistrer.
Dans le cadre de l'exécution de la balise d'Initialisation & Journalisation des Vues de Page, un événement personnalisé roktInitComplete sera poussé dans la couche de données lorsque l'initialisation sera terminée. Il est fortement recommandé d'utiliser un déclencheur Événement Personnalisé GTM avec le nom d'événement roktInitComplete pour les balises mParticle par Rokt - Événements suivantes.
Configurer la balise d'événementsLien direct vers Configurer la balise d'événements
La balise mParticle by Rokt - Events peut :
- Identifier les utilisateurs
- Enregistrer les événements de conversion
- Envoyer des attributs d'utilisateur et d'événement à Rokt
Bien que vous puissiez activer plusieurs actions dans une seule balise d'événements, certaines implémentations nécessitent une balise GTM par action (par exemple, une balise pour l'identité et une balise pour l'enregistrement d'événement). Si vous avez des questions sur la stratégie d'implémentation, contactez votre gestionnaire de compte Rokt.
Assurez-vous que la balise d'initialisation et de journalisation de la vue de page s'exécute avant toute balise d'événements. Utilisez l'événement de couche de données roktInitComplete dans vos déclencheurs pour que les balises d'événements se déclenchent uniquement après l'initialisation.
Suivez ces étapes chaque fois que vous créez une nouvelle balise d'événements (par exemple, une pour l'identité et une pour l'enregistrement d'événement) :
- Cliquez sur Balises dans la navigation de gauche de votre conteneur et cliquez sur Nouveau.
- Sélectionnez Configuration de la balise.
- Sélectionnez Découvrez plus de types de balises dans la Galerie de modèles communautaires.
- Recherchez
Roktet sélectionnez mParticle by Rokt - Events.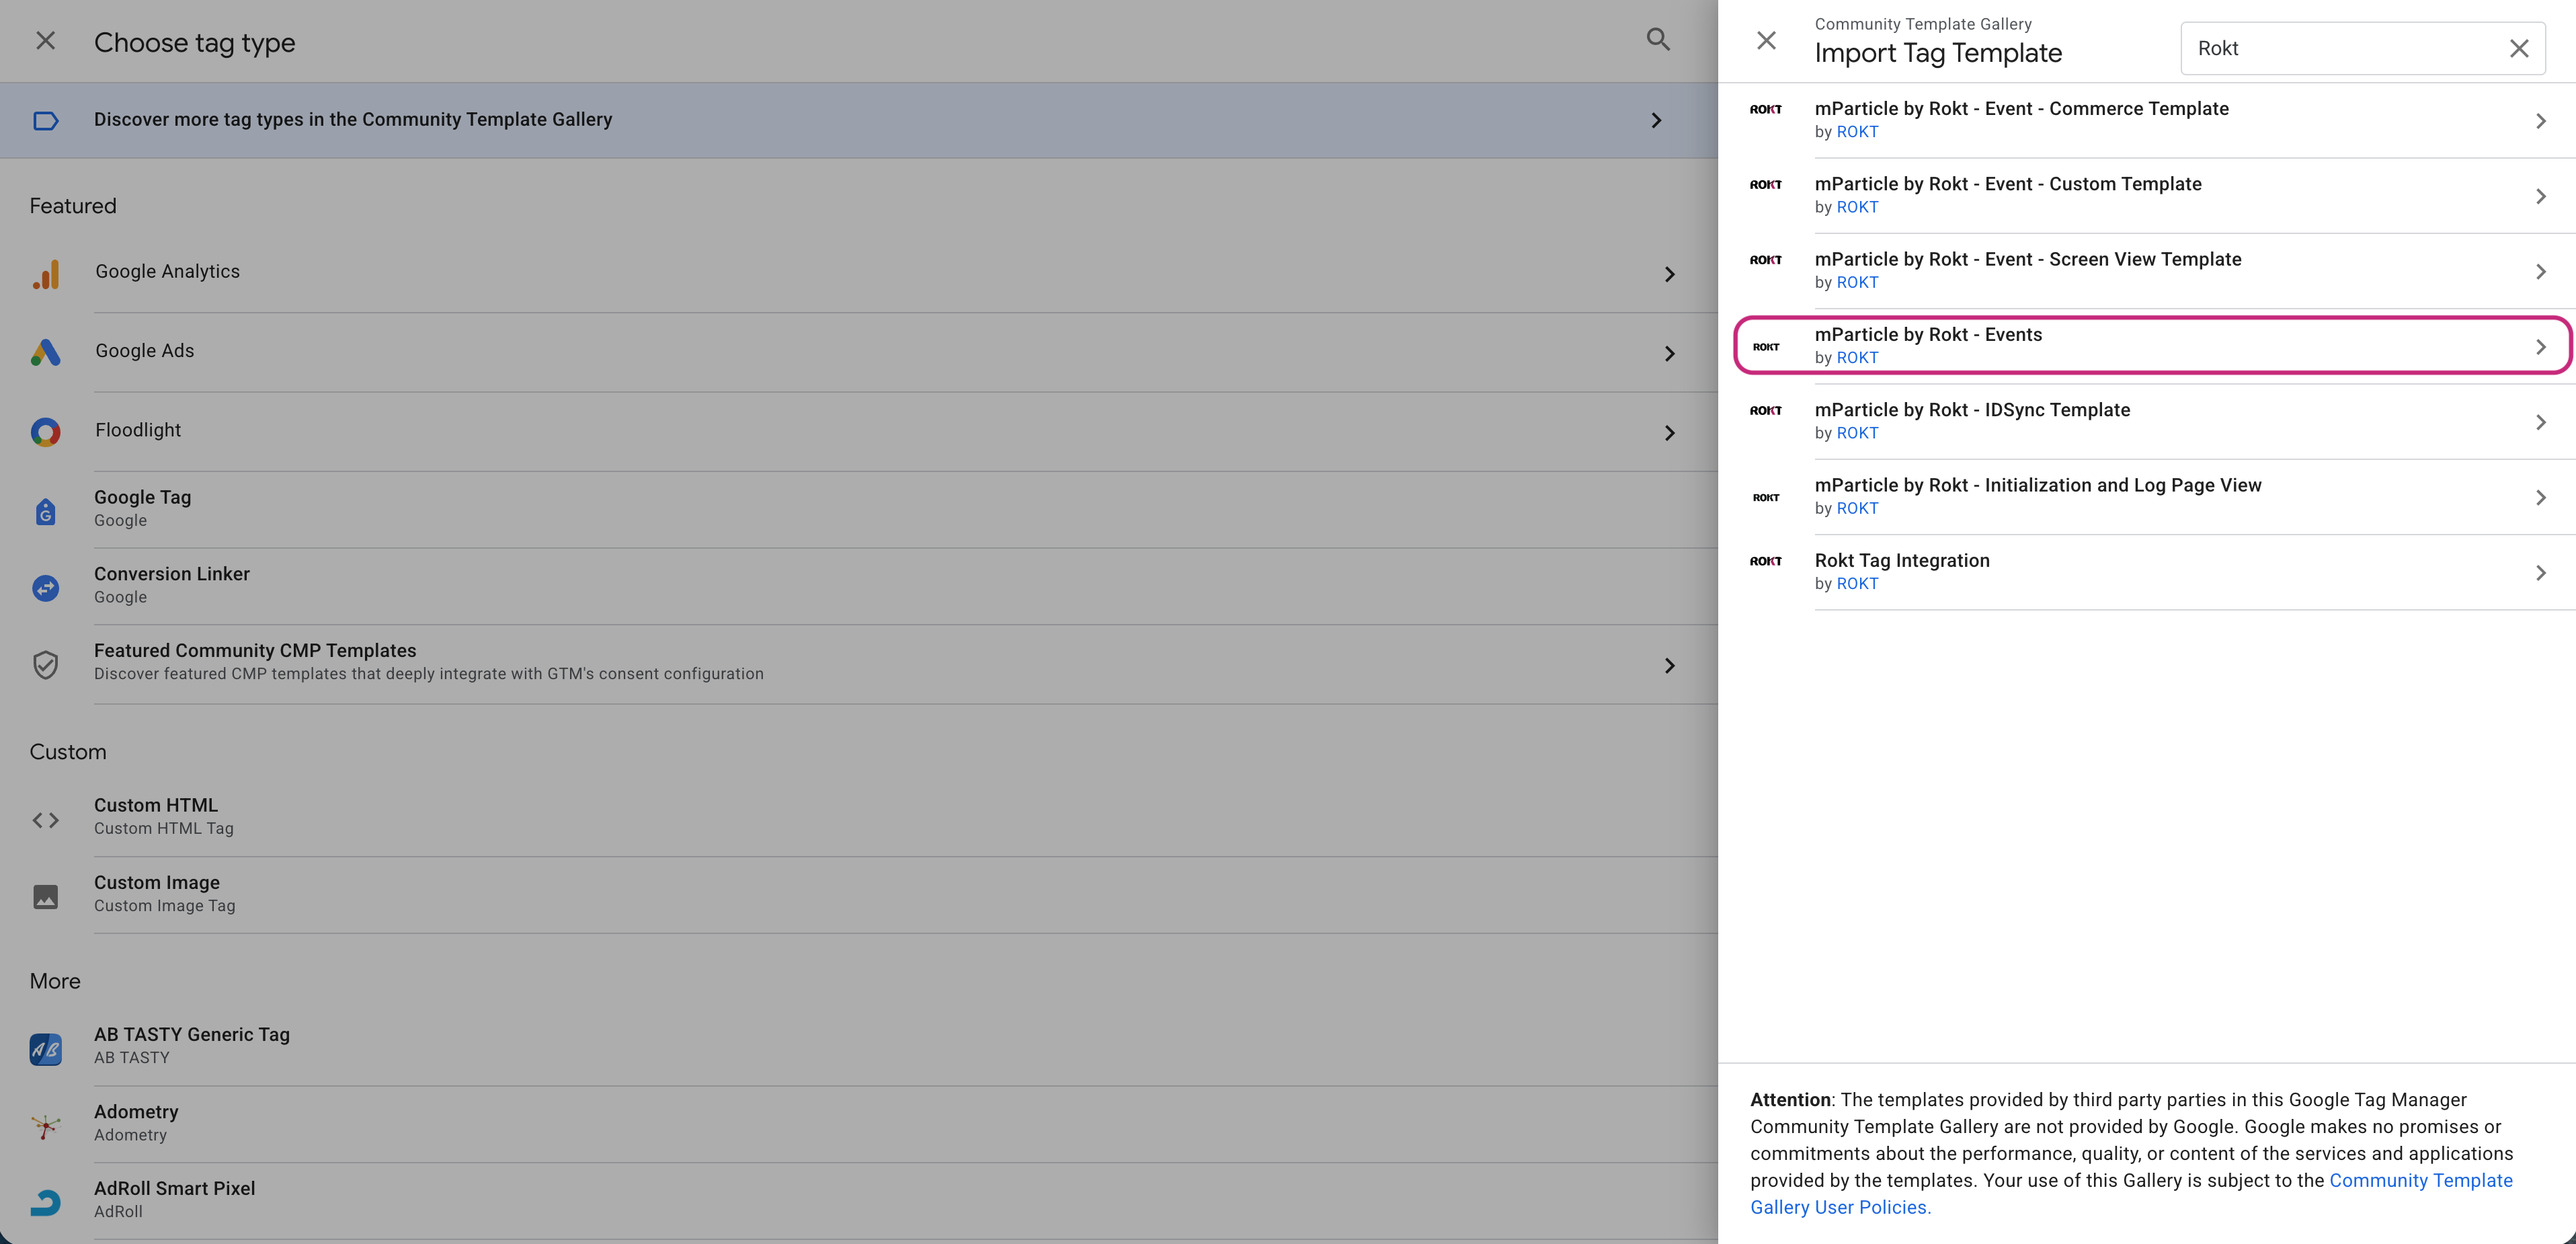
- Entrez un nom descriptif pour votre balise (par exemple,
[Rokt] Identifier l'utilisateur,[Rokt] Enregistrer la conversion).
Vous pouvez activer une ou plusieurs actions dans une seule balise d'événements (Identité, Enregistrement d'événement et/ou Sélection de placements). Configurez d'abord toutes les actions souhaitées pour cette instance de balise, puis cliquez sur Enregistrer lorsque vous avez terminé.
Si vous avez besoin que la balise se déclenche plusieurs fois (par exemple, une fois pour identifier un utilisateur et plus tard pour enregistrer un événement), créez plusieurs balises GTM en utilisant le même modèle d'événements.
Identifier l'utilisateurLien direct vers Identifier l'utilisateur
Rokt recommande d'identifier l'utilisateur actuel (par exemple, par email) afin que les événements de conversion puissent être attribués correctement. Configurez cette balise pour se déclencher dès que l'email de l'utilisateur est disponible dans votre couche de données.
- Dans la balise mParticle by Rokt - Events, accédez à la section Identité et sélectionnez Activer l'identité.
- Sous le menu déroulant Méthode IDSync, sélectionnez Identifier.
- Sous Type d'identité, cliquez sur Ajouter une ligne et sélectionnez le type d'identité souhaité :
- Si vous envoyez une adresse email brute, sélectionnez
Emaildans le menu déroulant Clé et entrez votre variable GTM pour l'email brut.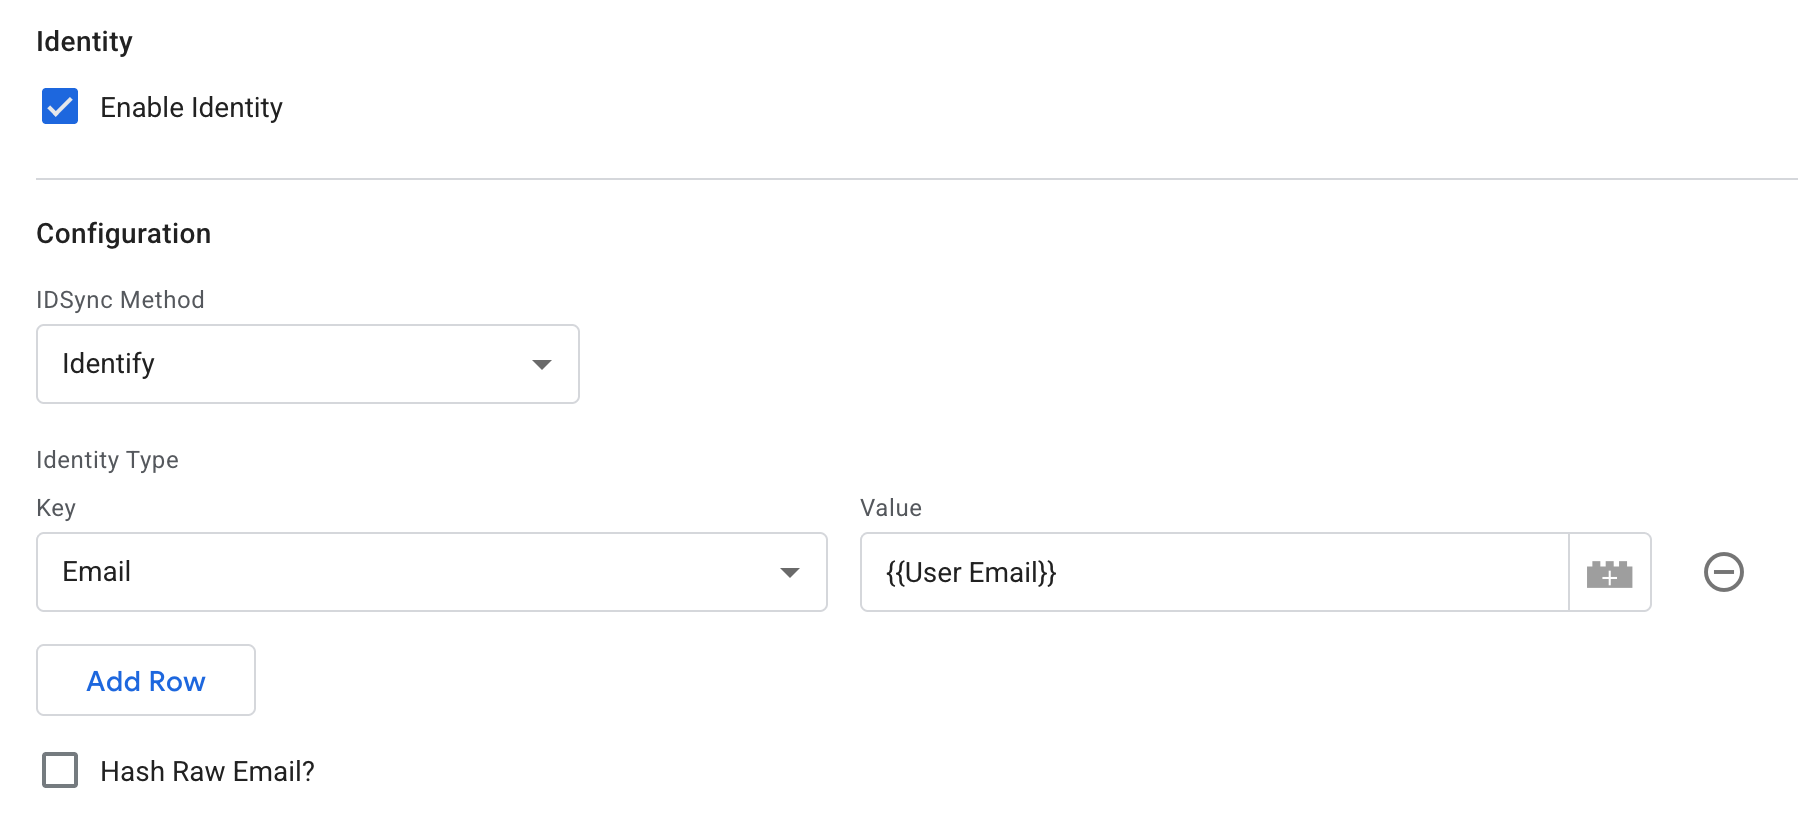
- Si vous envoyez une valeur d'email hachée, sélectionnez
Autredans le menu déroulant Clé et entrez votre variable GTM pour l'email haché.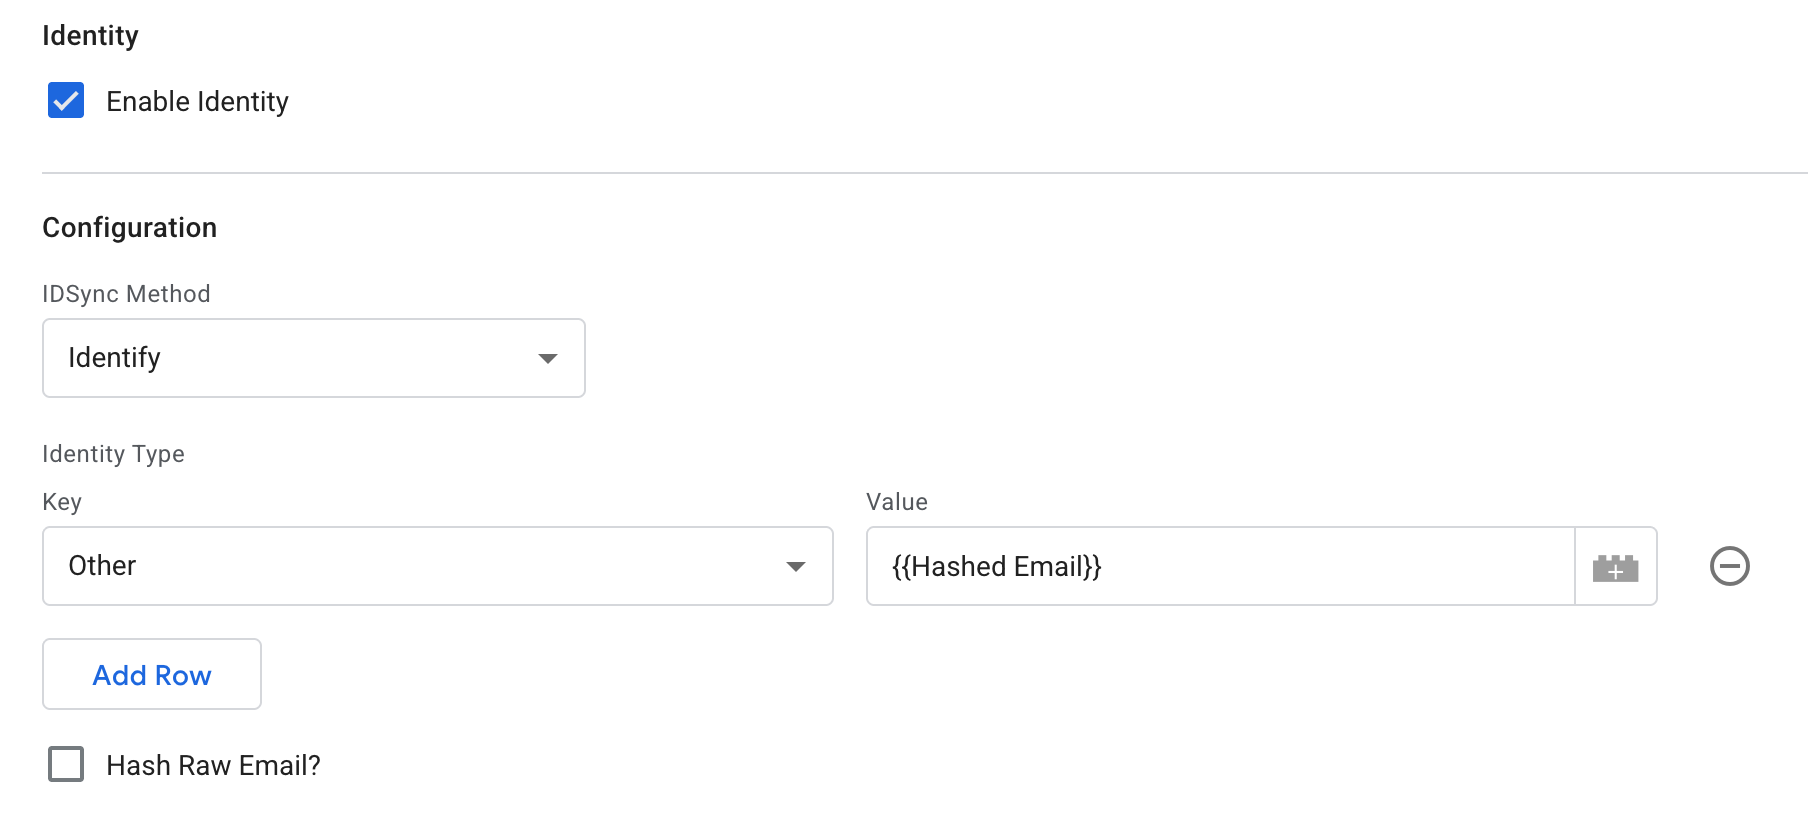
- Si vous envoyez une adresse email brute, sélectionnez
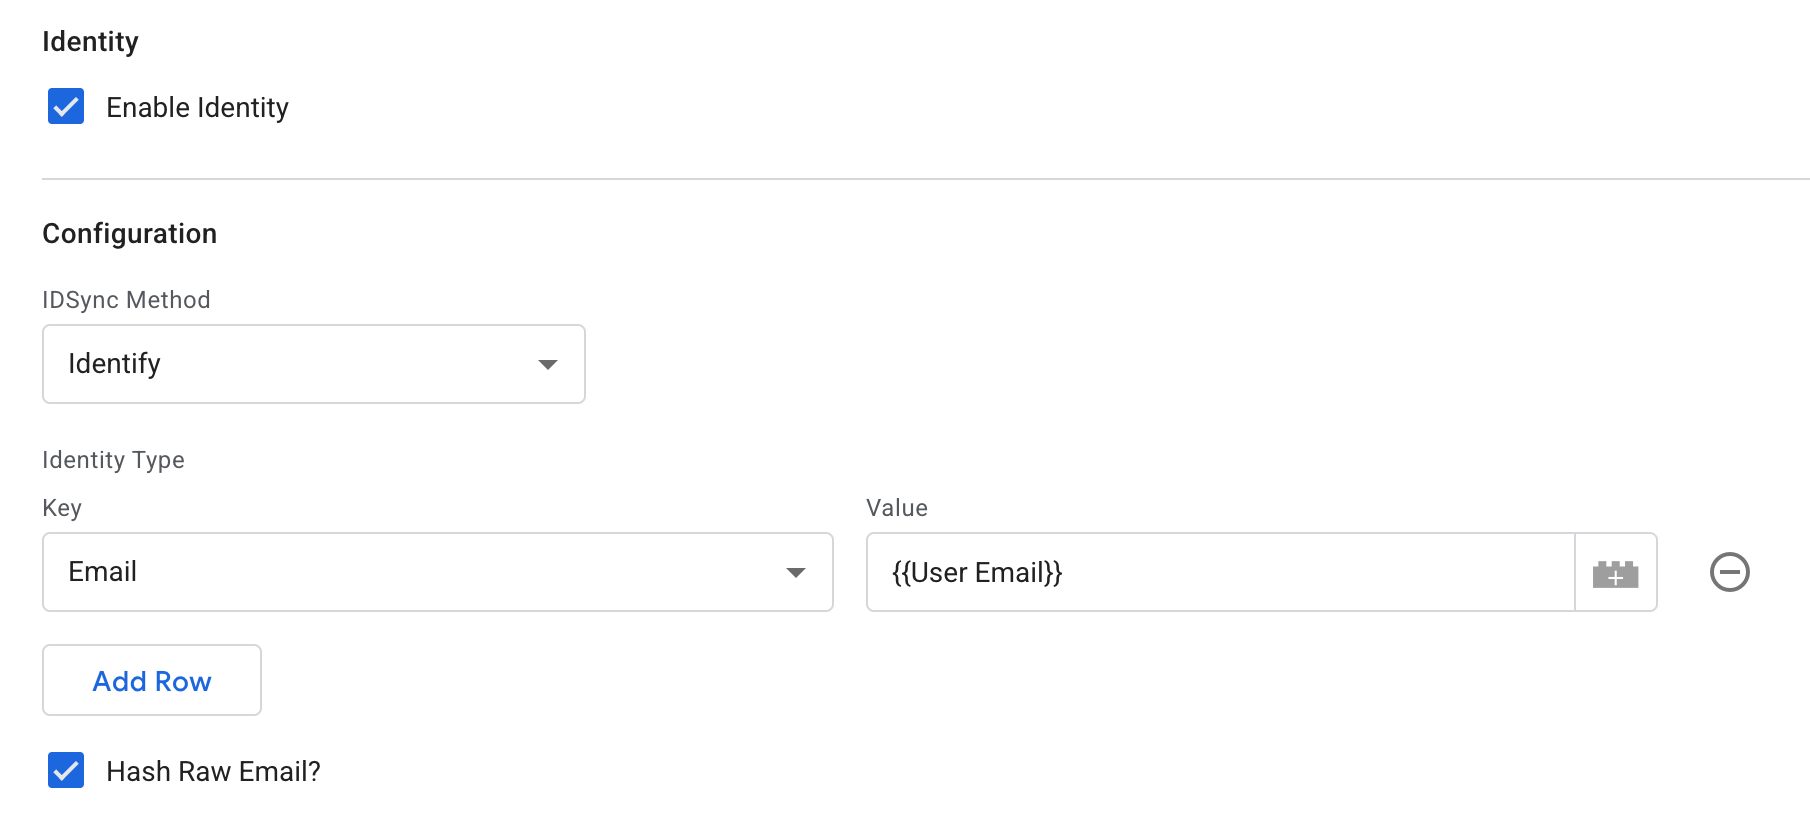
- (Optionnel) Sélectionnez Hacher l'email brut ? si vous souhaitez que la balise hache la valeur de l'email brut avant qu'elle ne soit envoyée à Rokt.
- Configurez le Déclenchement pour que la balise se déclenche uniquement après l'initialisation et uniquement lorsque la valeur de l'email est disponible.
- Exemple (l'email est déjà présent lors du chargement d'une page de paiement) :
- Dans Déclenchement, cliquez sur + pour créer un nouveau déclencheur.
- Sous Configuration du déclencheur, sélectionnez Événement personnalisé.
- Définissez Nom de l'événement sur
roktInitComplete. - Configurez le déclencheur pour se déclencher sur Certains événements personnalisés.
- Ajoutez des conditions qui correspondent à votre implémentation, par exemple :
- URL de la page contient
checkout {{User Email}}correspond à RegEx.+@.+\..+
- URL de la page contient
- Cliquez sur Enregistrer pour enregistrer le déclencheur.
- Exemple (l'email est déjà présent lors du chargement d'une page de paiement) :
 6. Lorsque vous avez terminé d'ajouter des actions à cette balise d'événements, cliquez sur Enregistrer.
Enregistrer un Événement de ConversionLien direct vers Enregistrer un Événement de Conversion
L'action Enregistrer un Événement envoie des événements de conversion à Rokt. Configurez cette balise pour qu'elle se déclenche sur la page (ou l'événement) qui se produit après une conversion, telle qu'une confirmation d'achat ou une page de "remerciement".
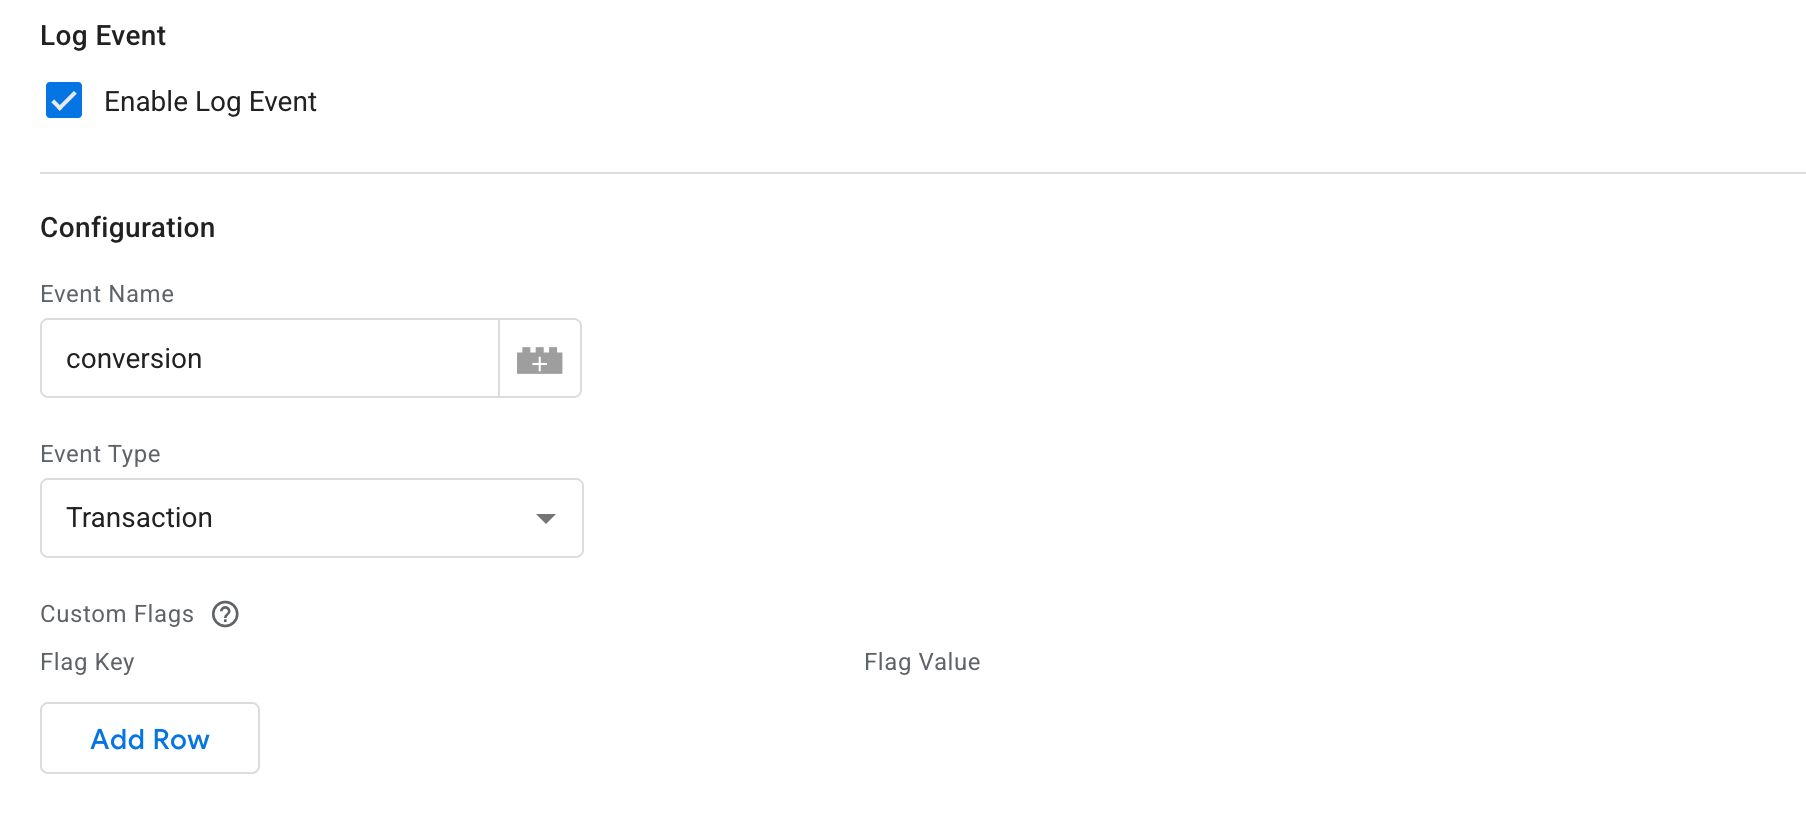
- Dans la balise mParticle par Rokt - Événements, naviguez vers la section Enregistrer un Événement et sélectionnez Activer Enregistrer un Événement.
- Sous Configuration, entrez
conversioncomme Nom de l'Événement et sélectionnezTransactioncomme Type d'Événement. - (Optionnel) Ajoutez tous les indicateurs personnalisés dont vous avez besoin sous Indicateurs Personnalisés.
- Un indicateur personnalisé est une paire clé/valeur contenant des informations sur la page/événement, généralement spécifique à un partenaire technologique (par exemple,
SnapchatConversions.ClickId). Les indicateurs personnalisés sont envoyés uniquement au partenaire spécifique pour lequel ils sont destinés, contrairement aux attributs personnalisés.
- Un indicateur personnalisé est une paire clé/valeur contenant des informations sur la page/événement, généralement spécifique à un partenaire technologique (par exemple,
 4. Configurez le déclencheur pour cette balise GTM. Les étapes suivantes varient selon que votre site est une application multipage (MPA) ou une application à page unique (SPA) :
- Configuration du déclencheur pour les applications multipages
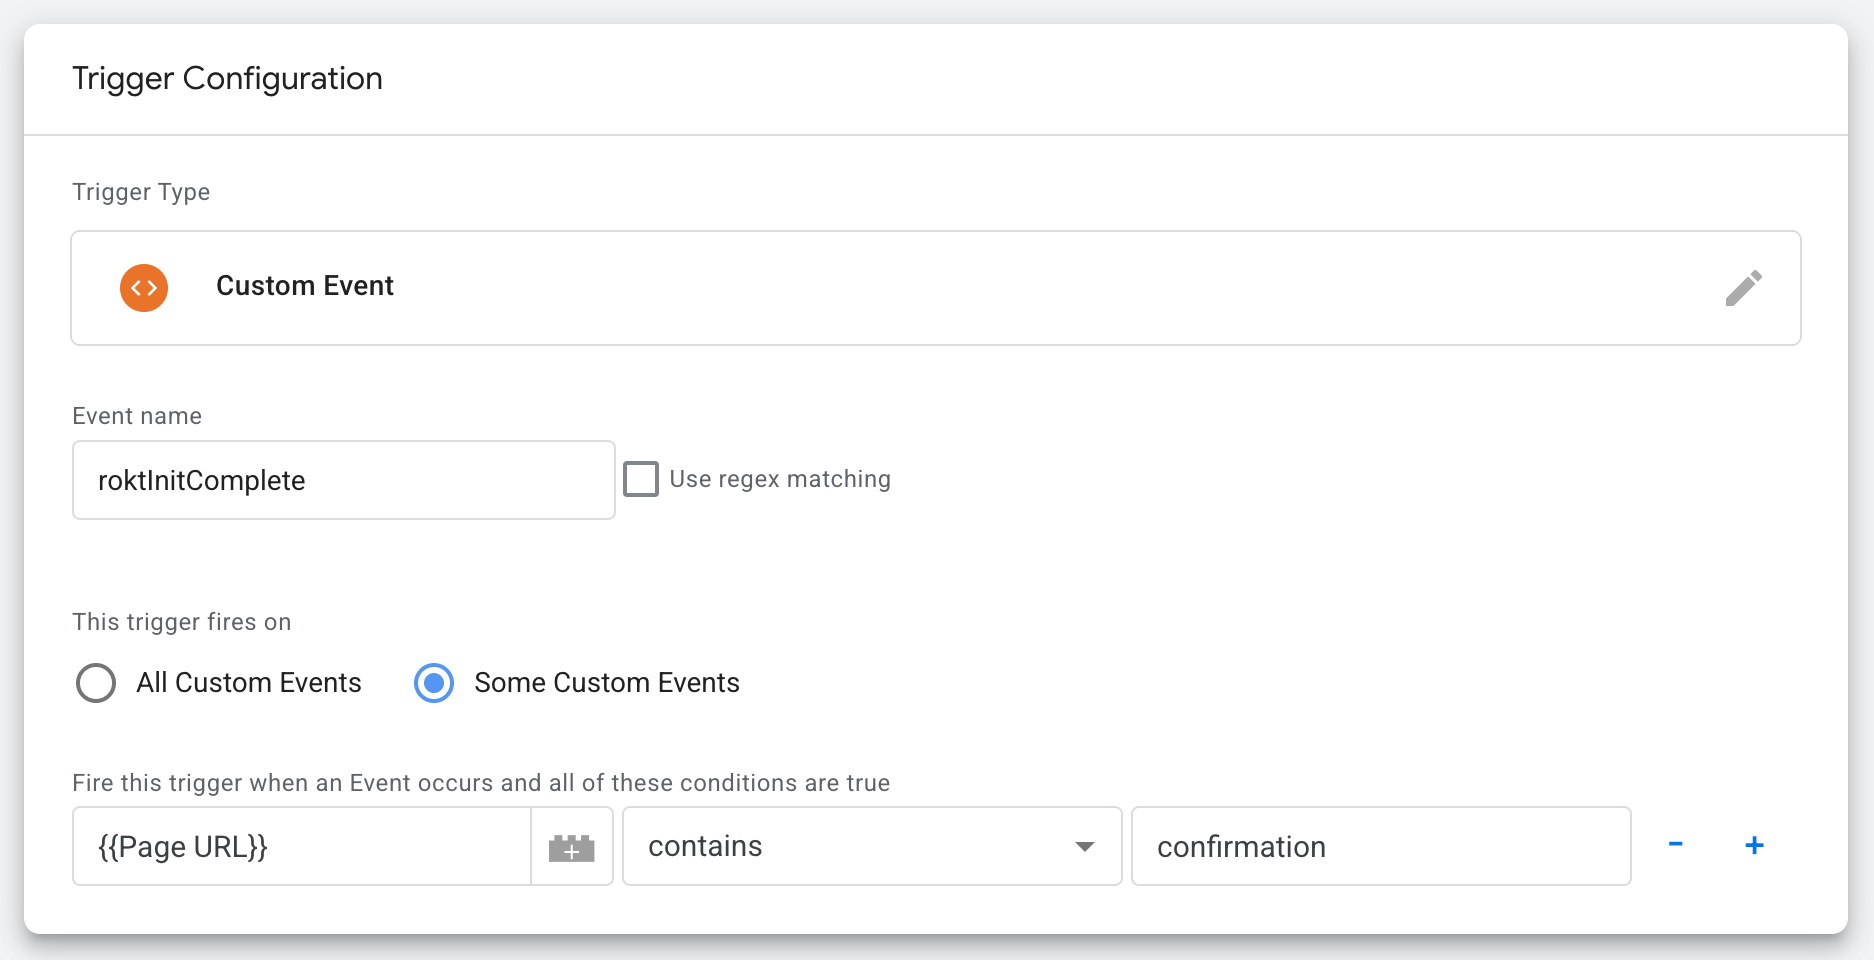
- Sélectionnez Événement Personnalisé dans la liste.
- Entrez
roktInitCompletecomme nom de l'événement. - Modifiez les règles de déclenchement pour Certains Événements Personnalisés.
- Entrez le(s) paramètre(s) URL qui identifient chaque page unique où la balise doit se déclencher. Par exemple, si votre page de confirmation est
example.com/cart/payment/confirmation, le paramètre d'identification peut être n'importe lequel decart,payment, ouconfirmation.
- Configuration du déclencheur pour les applications à page unique
- Sélectionnez Changement d'Historique dans la liste.
- Modifiez les règles de déclenchement pour Certains Changements d'Historique.
- Entrez le paramètre URL qui identifie la page où la balise doit se déclencher. Par exemple, si votre page de confirmation est
example.com/cart/payment/confirmation, le paramètre d'identification peut être n'importe lequel decart,payment, ouconfirmation.
- Cliquez sur Enregistrer pour enregistrer le déclencheur.
- Lorsque vous avez terminé d'ajouter des actions à cette balise d'Événements, cliquez sur Enregistrer.
Ajout d'AttributsLien direct vers Ajout d'Attributs
En plus d'identifier un utilisateur et d'enregistrer des événements de conversion, Rokt recommande d'envoyer des attributs supplémentaires pour améliorer l'optimisation des campagnes.
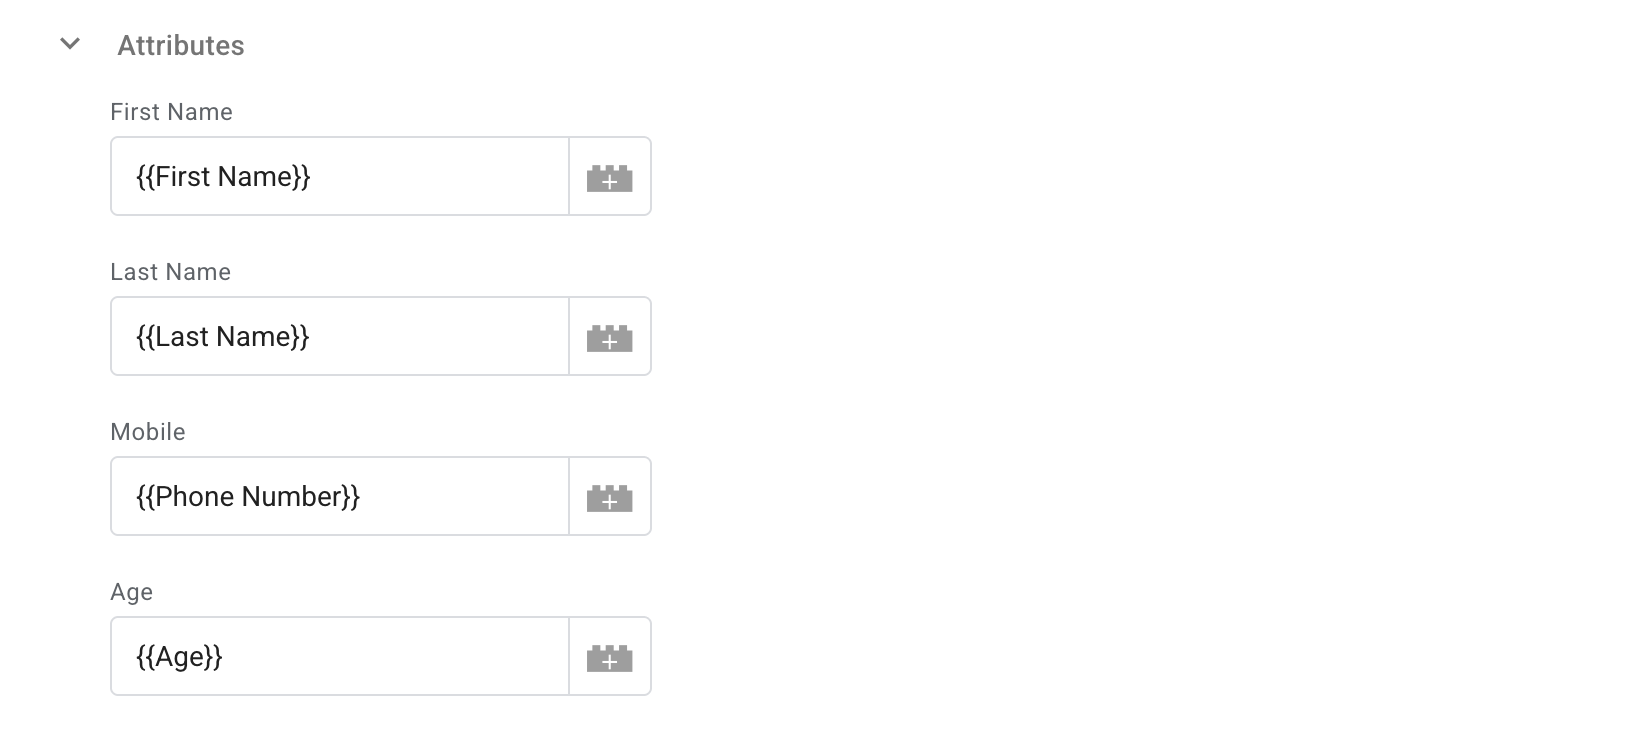
- Dans la balise mParticle par Rokt - Événements, naviguez vers la section Attributs.
- Entrez autant d'attributs que vous avez disponibles qui sont liés à l'utilisateur ou à l'événement. Pour les attributs prédéfinis, Rokt les catégorisera automatiquement comme un attribut utilisateur ou un attribut événement, comme indiqué ci-dessous.
Attributs PrédéfinisLien direct vers Attributs Prédéfinis
| Clé d'Attribut | Valeur Exemple | Attribut Utilisateur | Remarques |
|---|---|---|---|
| Prénom | John | ✓ | Le prénom du client. |
| Nom de Famille | Doe | ✓ | Le nom de famille du client. |
| Mobile | 3125551515 | ✓ | Les numéros de téléphone peuvent être formatés soit comme 1112345678 soit comme +1 (222) 345-6789. |
| Âge | 33 | ✓ | L'âge du client. |
| Date de Naissance | 19900717 | ✓ | Date de naissance. Formatée comme aaaammjj. |
| Sexe | M | ✓ | Le sexe du client. Par exemple, M, Male, F, ou Female. |
| Type de Paiement | Carte de Crédit | Méthode de paiement utilisée pour la transaction. Par exemple, Carte de Crédit, PayPal, Apple Pay. | |
| Référence de Confirmation/ID de Transaction | ORD-123456 | ID unique de transaction ou de référence de confirmation pour l'achat. | |
| Montant | 52.25 | Le montant total de la transaction. | |
| Type de Conversion | Achat | Type d'événement de conversion. Par exemple, Achat, Inscription, Lead. | |
| ID de Suivi de Conversion Passback | TRACK-789 | ID de Clic Rokt. | |
| Adresse Ligne 1 | 123 Main Street | ✓ | La ligne d'adresse principale du client. |
| Adresse Ligne 2 | Apt 4B | ✓ | La ligne d'adresse secondaire du client (appartement, suite, etc.). |
| Ville | Brooklyn | ✓ | La ville du client. |
| État | NY | ✓ | L'état ou la province du client. |
| Code Postal | 11201 | ✓ | Le code postal ou ZIP du client. |
| Pays | US | ✓ | Le pays du client. |
| Titre | Mr | ✓ | Le titre du client. Par exemple, Mr, Mrs, Ms, Dr. |
| Langue | en | ✓ | Langue associée au client ou à l'achat. |
Les attributs Type de Conversion et Référence de Confirmation/ID de Transaction permettent à Rokt d'optimiser efficacement votre campagne et de dédupliquer les événements et conversions de manière appropriée. Ce sont des attributs de lancement requis.
Veuillez confirmer les attributs avec votre gestionnaire de compte Rokt avant de finaliser l'intégration.
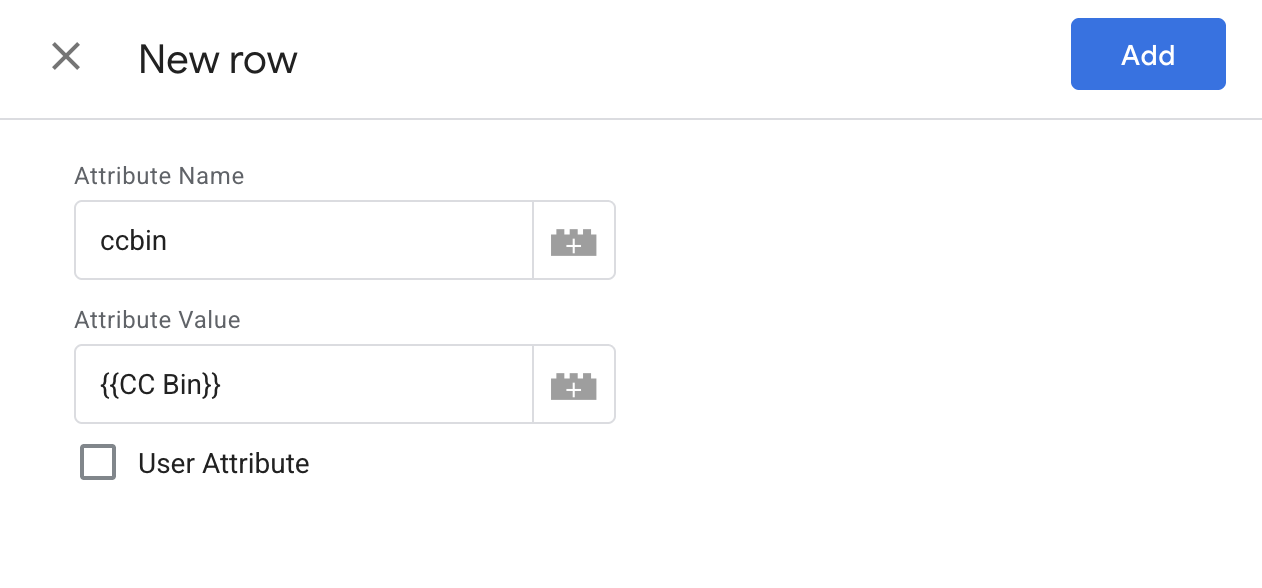
- Si vous souhaitez envoyer des attributs supplémentaires qui ne sont pas déjà définis, cliquez sur Ajouter une Ligne sous Attributs Personnalisés.
- Entrez le nom et la valeur de l'attribut sous Nom de l'Attribut et Valeur de l'Attribut.
- Si l'attribut est lié à l'utilisateur (et non à l'événement de conversion), sélectionnez Attribut Utilisateur.
- Lorsque vous avez terminé d'ajouter des actions à cette balise d'Événements, cliquez sur Enregistrer.