Access referral data
import Tooltip from "@site/src/components/Tooltip";
You can always access your
Metadata
The following table contains a list of accessible data attributes (if available and requested by an advertiser), once customers opt in to a campaign for both of Rokt’s campaign types. Remember, advertisers do not have access to any partner data in any circumstance.
The list of attributes available may vary based on the partner site where the offer was displayed.
| Attribute | Data format | Description | Example value |
|---|---|---|---|
| ZIP/postal code | Integer | The customer's ZIP or postal code | 10010 |
| Country | Text | The customer's country | Australia |
| Gender | Text | The customer's gender | Male |
| Age | Integer | The customer's age | 25 |
| Date/time | Date/Time | The date and time that the customer opted in to the offer | 43765.07083 |
| State | Text | The customer's state | CA |
| Suburb | Text | The customer's city | Seattle |
| Bid price | Decimal | The amount the client was charged for the referral | 2.50 |
| Birth date | Date/Time | The customer's birth date | 33569 |
| Ad response | Text | The positive response text that the customer clicked on to opt in to the offer | Yes, please |
| Ad text | Text | The offer text the customer was presented | Receive a call today to hear about our great value. |
| Ad text (HTML) | Text | The offer text in HTML format | <p>Receive a call today to hear about our great value.<p> |
| Audience ID | Integer | Rokt internal identifier for the audience that the customer was part of Length and format of this ID is subject to change. | 2581697744617019994 |
| Audience name | Text | The name of the audience that the customer belongs to | M/F: 25+ |
| Browser | Text | The customer's browser | Chrome Mobile |
| Browser version | Integer | The customer's browser version (major release) | 52 |
| Browser version (full) | Decimal | The customer's browser version (including major and minor release information) | 52.109 |
| Campaign ID | Integer | Rokt internal identifier for the offer that the customer opted in to. Length and format of this ID is subject to change. | 1112223334445556667 |
| Campaign name | Text | The name of the offer that the customer opted in to | Brand name, Rokt, Hybrid, 2019 |
| Country code | Text | The customer's country (in ISO two-digit format) | AU |
| Coupon code | Text | The coupon code issued to the customer (only applicable if campaign contained coupons) | ROKT1234 |
| Creative ID | Integer | Rokt internal identifier for the creative that customer opted in to. Length and format of this ID is subject to change. | 2.26E+18 |
| Date/time (UTC) | Date/Time | The date and time that the customer opted in to the offer (UTC timezone) | 43765.2375 |
| Device | Text | The device platform of the customer when they opted in to the offer | Mobile |
| Device manufacturer | Text | The manufacturer of the device the customer used they opted in to the offer. Only applicable where Device is Mobile. | Samsung |
| Environment | Text | The environment the partner's widget was shown on | Purchase |
| Experience | Text | The experience the partner's widget was shown on | Overlay |
| Placement | Text | The placement of the offer the customer opted in to | Prime |
| Referral type | Text | The referral type of the offer the customer opted in to | Email |
| Rokt identifier | Text | Rokt internal identifier for a specific referral. Length and format of this ID is subject to change. | aa169abb-6552-3638-82b1-224b389fce5b |
Referral export templates and custom fields
This option is only available for use alongside the email and SFTP refferal export option.
You can create and manage templates for referral exports using the following instructions:
Create a template
-
Go to the Campaigns > Customer Data page from the left navigation menu, and ensure you are on the Referrals tab.
-
From the Template drop down menu, select Create custom template.
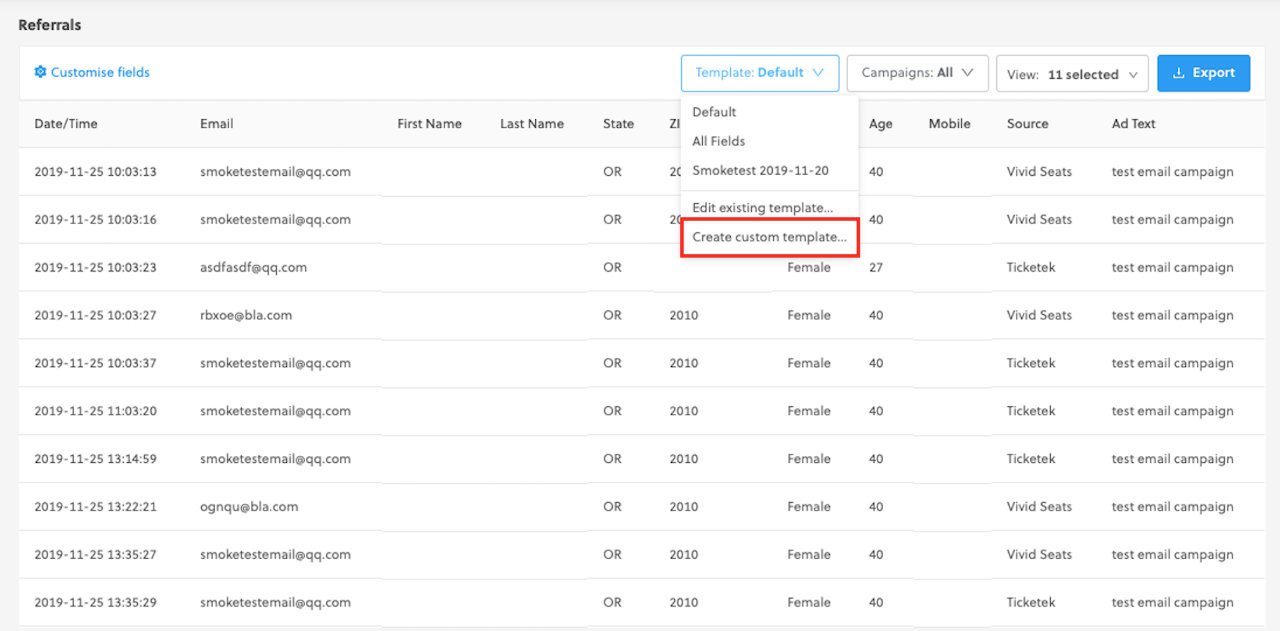
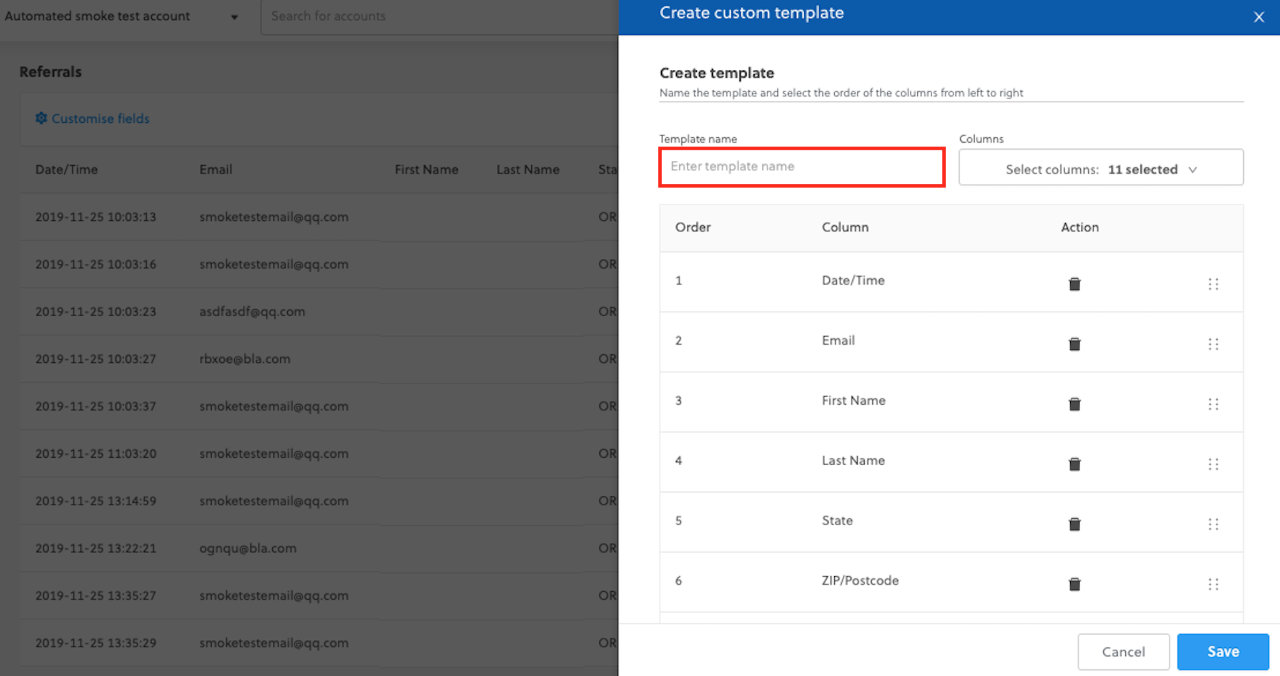
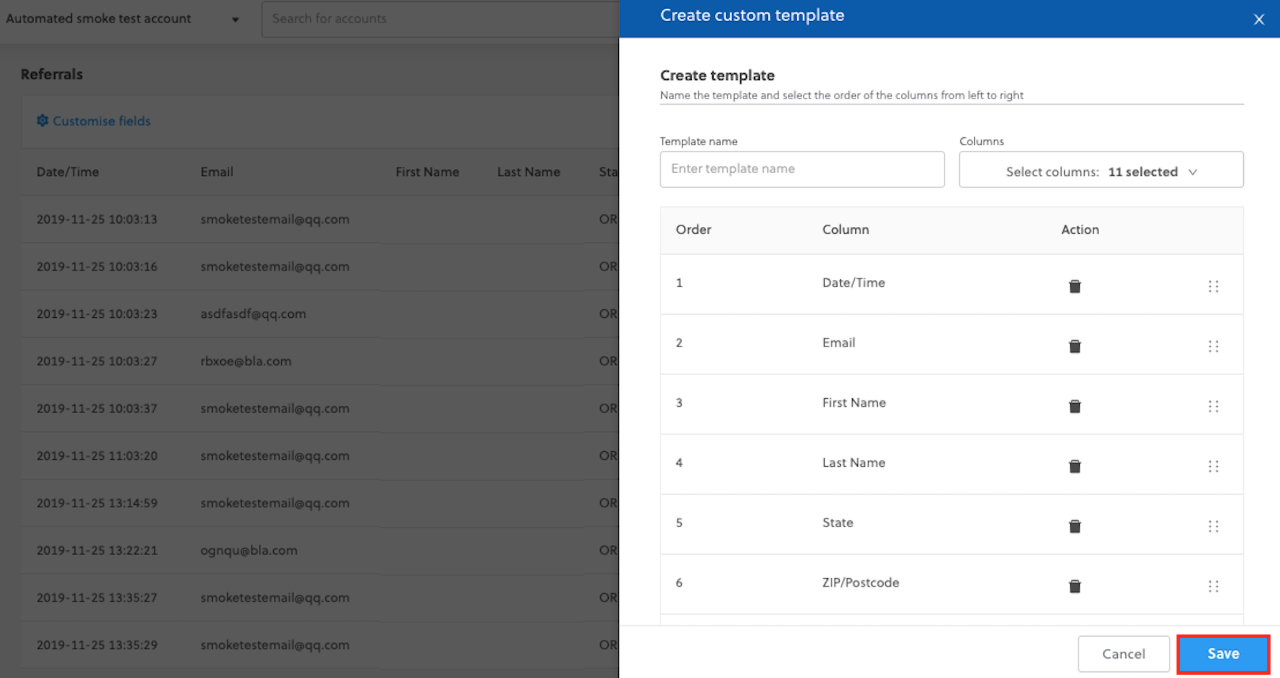
- Enter a name for your custom template.
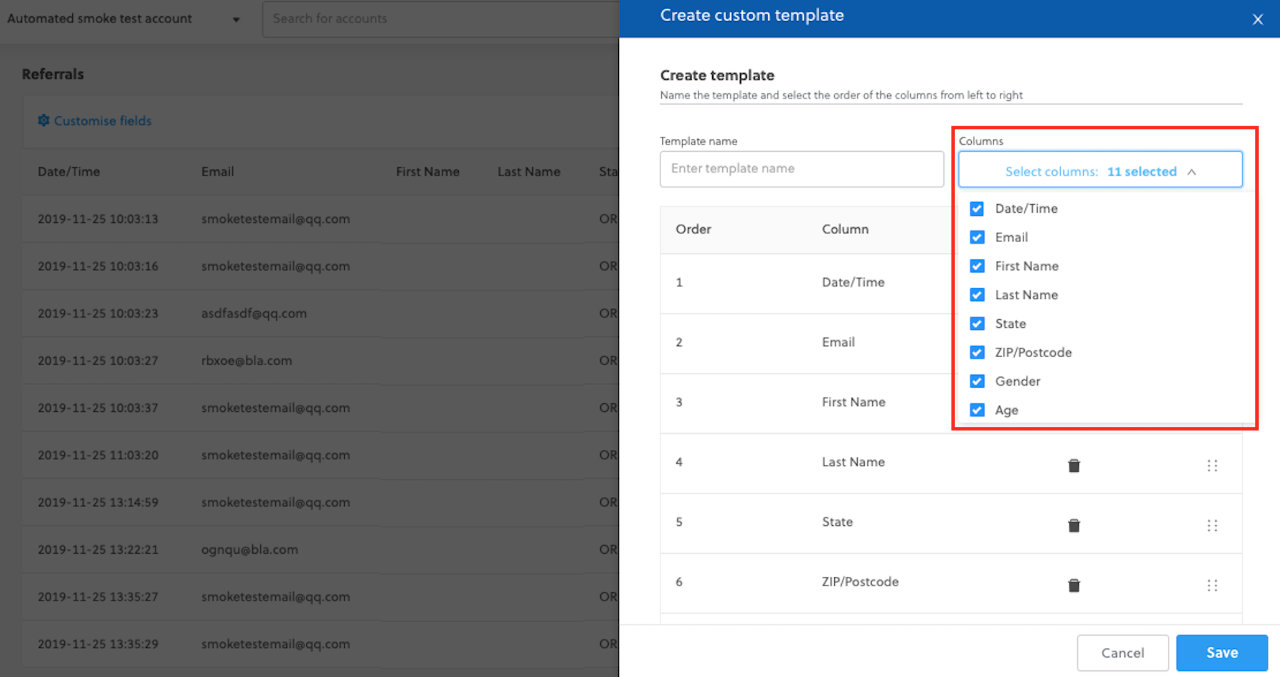
- Select the required fields for your template.
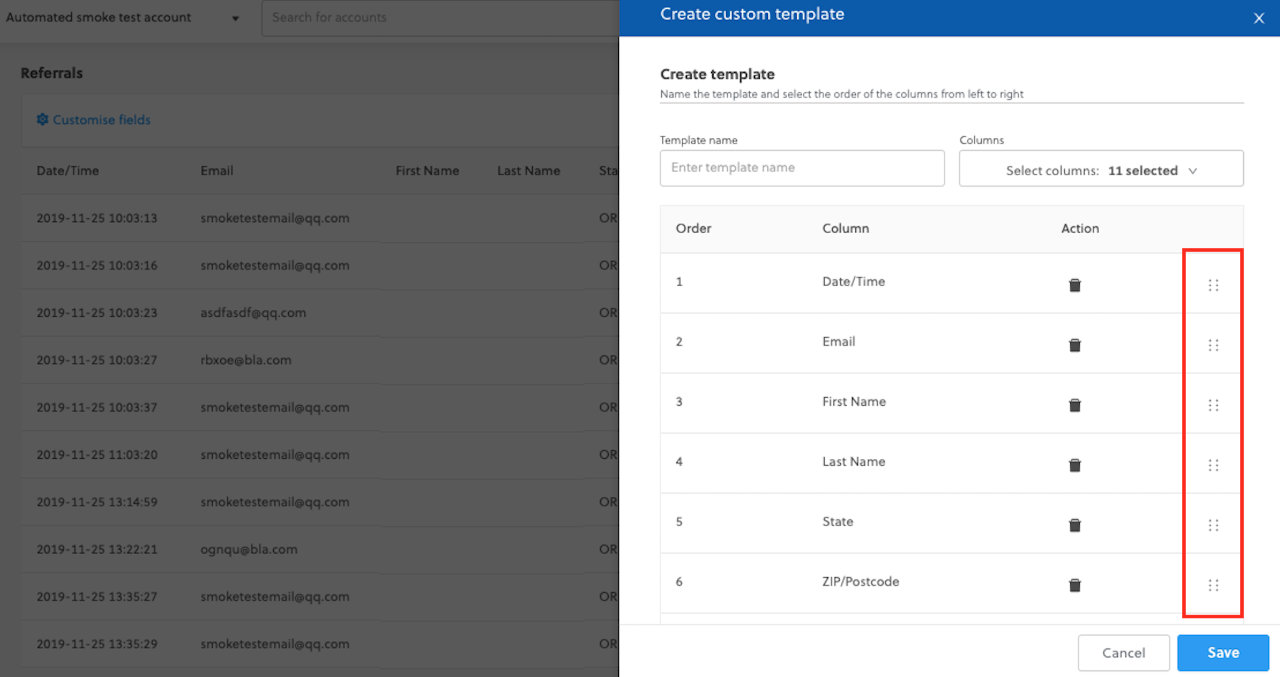
- Reorder your fields in your template as desired.
- Click Save.
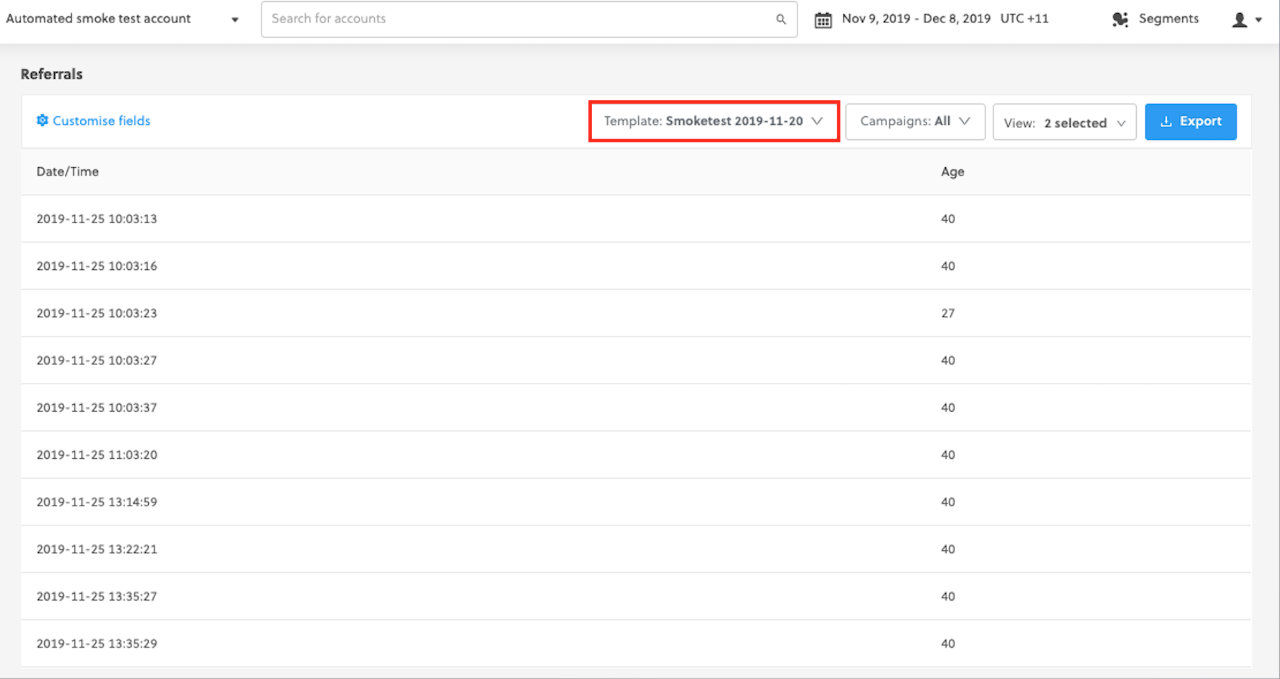
- Select your new custom template from the template dropdown.
Edit a template
-
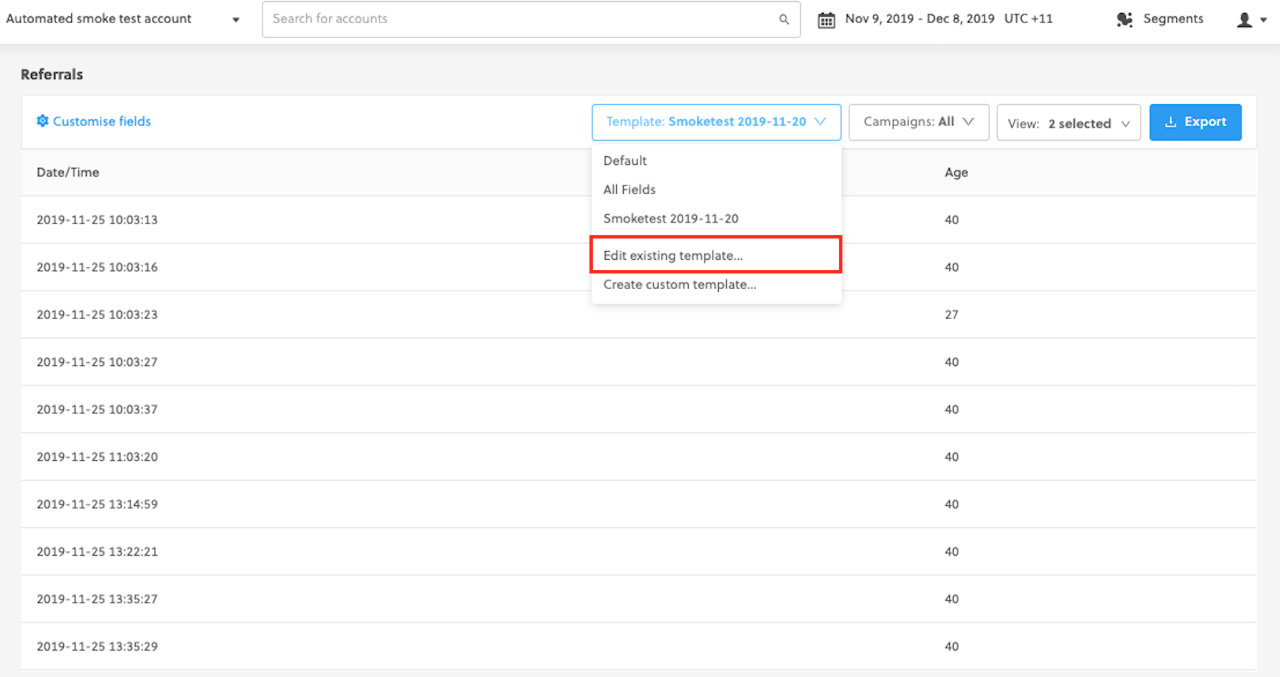
Select the custom template you want to edit.

-
Click Edit existing template.
-
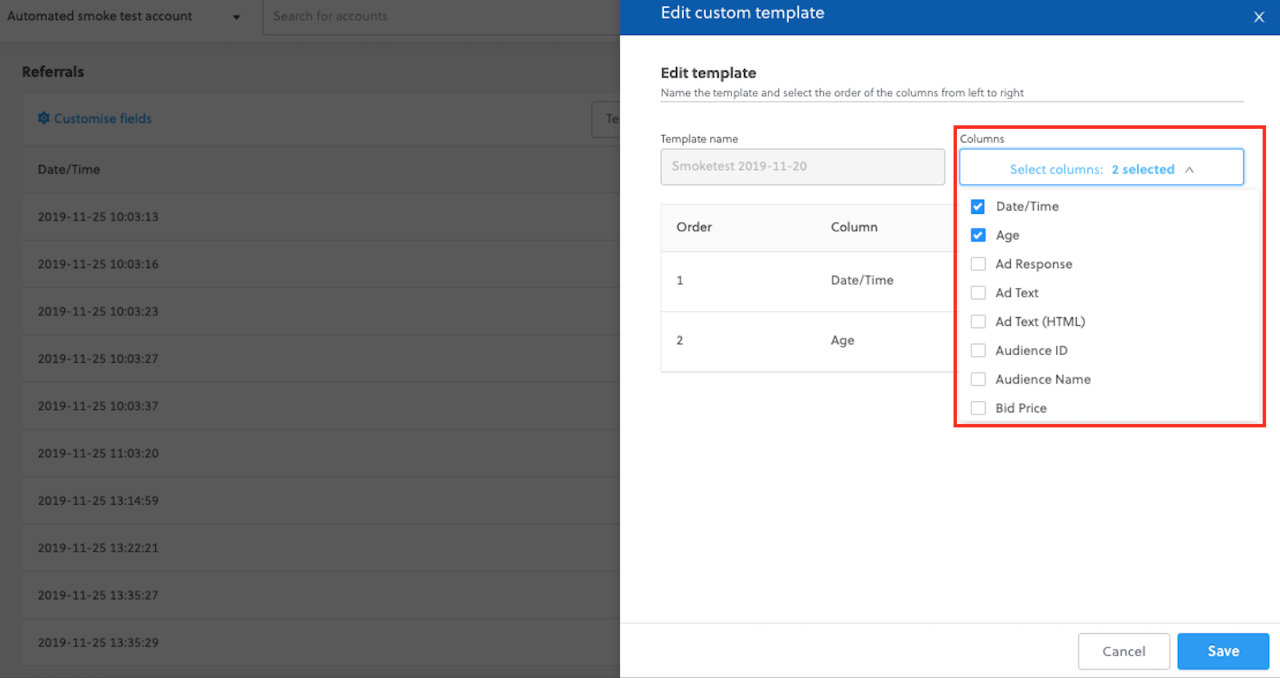
Add or remove fields to your existing custom template.
-
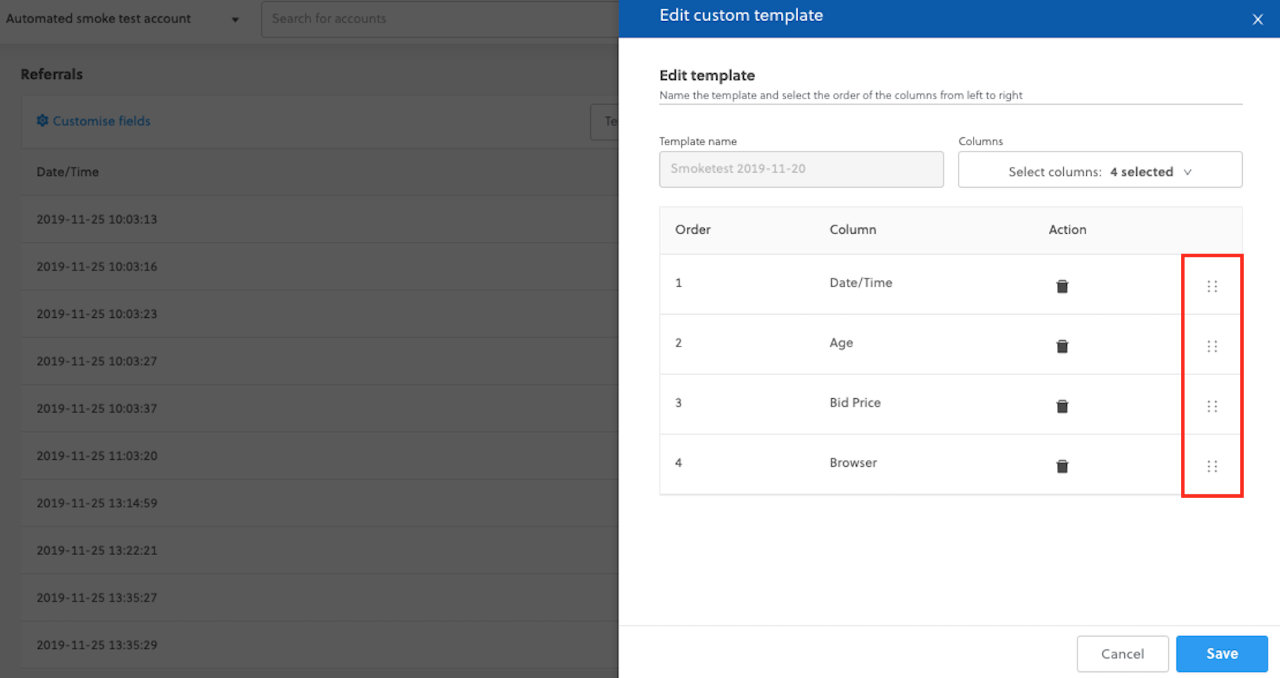
Reorder your fields in your template in the desired order.
-
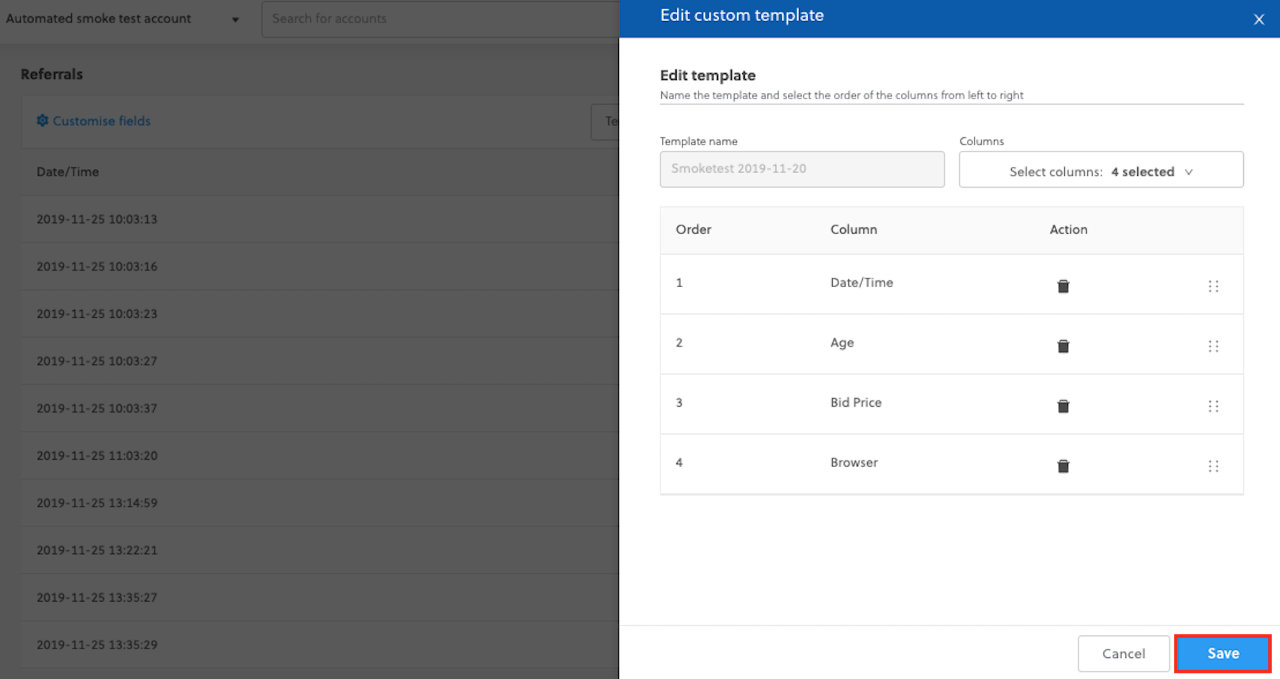
Click Save.
-
Select your new custom template from the template dropdown.

Custom fields
To create a custom field for referral exports, you need to:
-
From the left navigation menu, go to Campaigns > Customer Data, and ensure you are on the Referrals tab.
-
Click Customize fields.
-
Click New custom field.
-
Select a field to transform and enter a name for your custom field.
-
Select a condition: equals or contains.
-
Enter the value you want to map and the new field name.
-
Select how the custom field should be handled if empty.
-
Select the default value in case no match is found.
-
Click Save.
Via API
Our data management platform provides the ability for you securely access referral data for your campaigns. One of the popular options is integrating directly with your CRM via API.
An API is the most efficient way for Rokt to deliver referral data to you. This is because it works in real-time, meaning that as soon as a referral is generated for your campaign, Rokt can communicate the lead to you. There are a few technical pieces required to get this completed, which are outlined below.
Requirements
To begin the API setup, Rokt requires a few pieces of information.
The following details should be sent to your account manager:
- Full API documentation on how to create subscribers in your system.
- Technical contact details to help troubleshoot setup queries.
- Endpoints for any relevant environments (production, testing, staging, etc.).
- Method (e.g., GET, POST, PUT)
- Authentication (if any)
- Request body encoding (e.g., JSON, XML, URL Encoded)
- Required API parameters (Learn about what attributes Rokt can share).
- Expected API responses to help Rokt accurately categorize leads delivered successfully versus those that were rejected.
API documentation
API documentation can encompass some or all of the points listed as requirements such as:
- Endpoint
- Method
- Body
This should detail exactly how Rokt can deliver leads to your system.
The API documentation as well as a technical contact should be sufficient to start the API setup process.
For a good example of API documentation, check out the Mailchimp API documentation.
Technical contact details
Provide the relevant contact (either yourself or someone else on your team) who's best suited to address any questions about the API setup process.
The technical contact should be able to help with:
- Verifying that test leads have been recorded successfully in your system
- Explaining why we're receiving a response status of 403
For example:
John Smith
Technical Support
Endpoint
This is the location where Rokt should deliver data. If you have a staging or testing endpoint, this will help the Rokt team during the setup and testing process so that no test leads are delivered to your live CRM.
For example:
https://us9.api.mailchimp.com/3.0/lists/abcdefghij/members
Method
This is the HTTP request type that Rokt uses to deliver data to your list. The majority of the time, this is a POST request.
Rokt supports the following submit methods:
- GET
- POST
- PUT
Authentication
Provide any authentication details necessary for Rokt to call your API. This could come in many forms, such as:
- User name and password combination
- An API key
- Client ID and secret
API parameters
Provide a list of parameters for Rokt to include through in each API request. If possible, specify any:
- Required attributes (attributes that must be sent in order for the request to succeed)
- Optional attributes
- Parameter names for each attribute (whether to use
firstname,FirstName, orfirst-name, for example)
Common attributes include:
- First name
- Last name
- Source
- Country
For reference, Rokt can share any of these attributes.
Rokt supports the following body encoding:
- JSON
- URL encoded
- Plain text
- XML
Expected API responses
By providing a list of possible API responses, Rokt can set up response handling logic to quickly identify leads that were delivered successfully, versus those that failed to deliver or were labelled as duplicates.
The response handling could be created based on the status code we receive or the response body, depending on how your API is set up.
Example status codes:
- 201 (lead created successfully)
- 400 (unauthorized)
- 500 (server error)
Example response body values:
"successfully delivered"{"status": "duplicate"}{"success": false}
Work with your Rokt account manager to complete the API setup process described below.
Setting up the API connection
-
Log into One Platform, and click on your account on the Home page.
-
Go to the Integrations > Connections page in the left navigation menu.
-
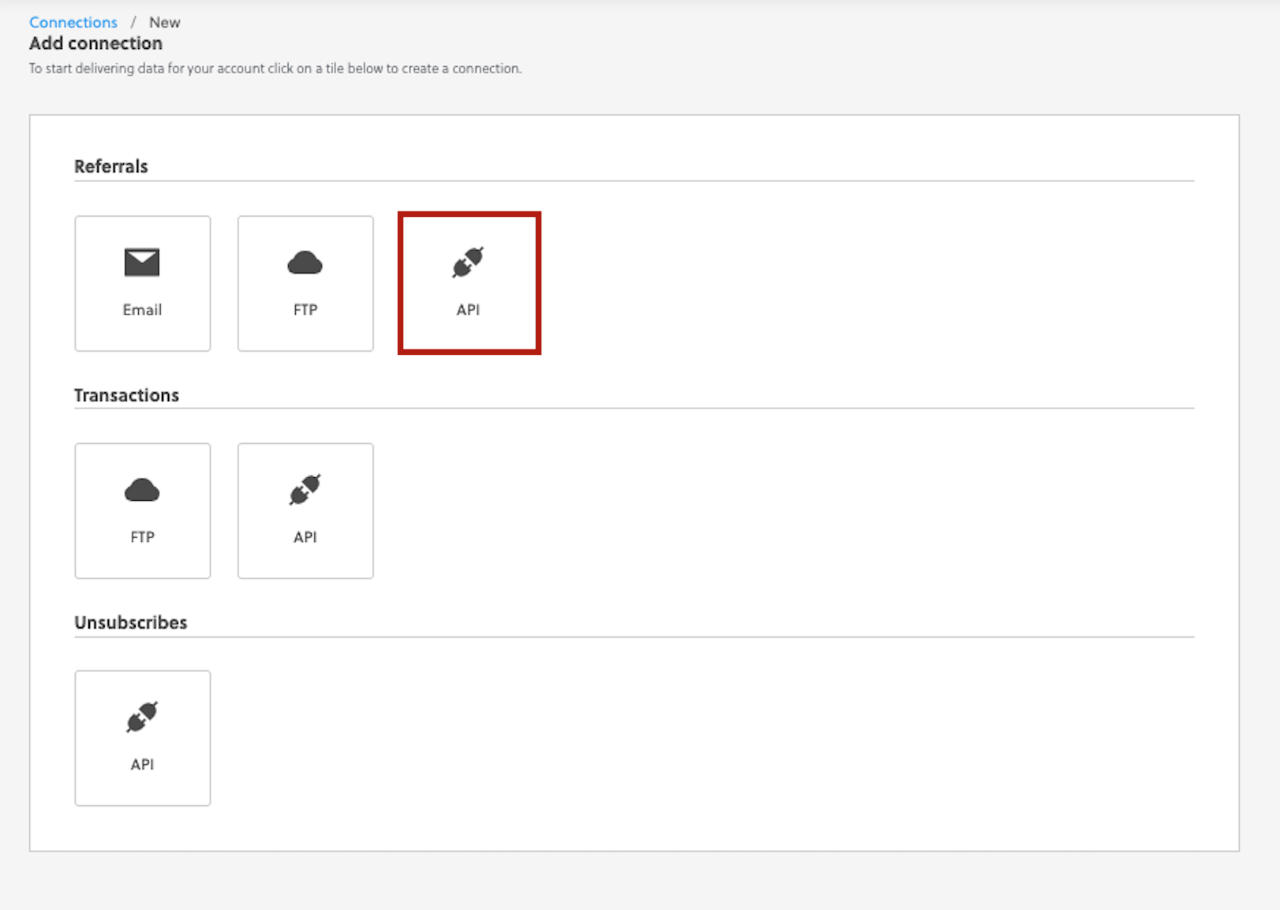
Click Add connection.
-
Under Referrals, click API.
-
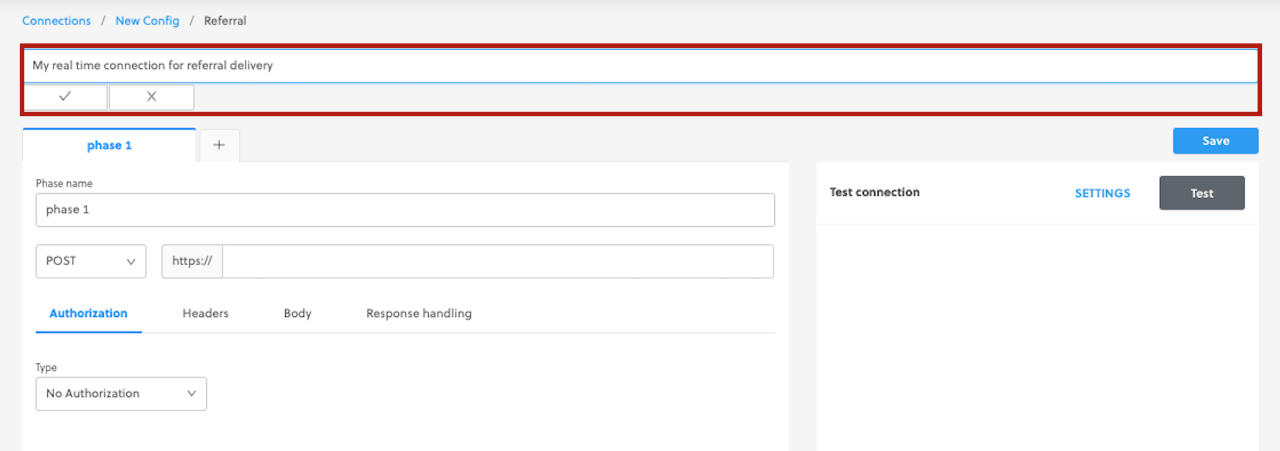
Give your connection a name.
-
Enter the endpoint for your connection.

-
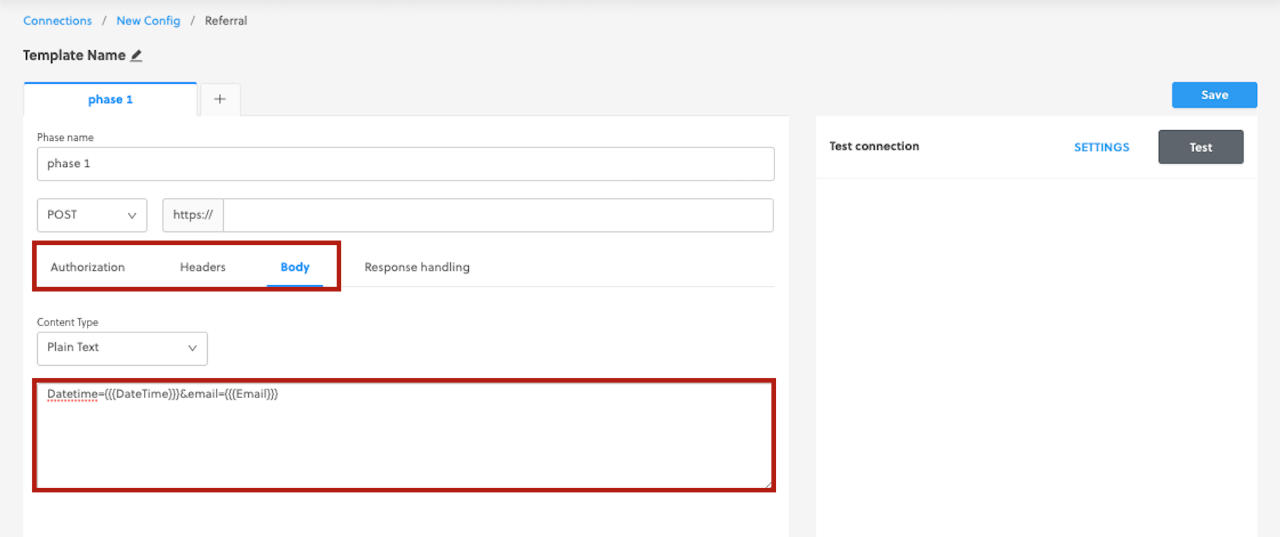
Enter all the required information under Authorization, Headers, and Body.
-
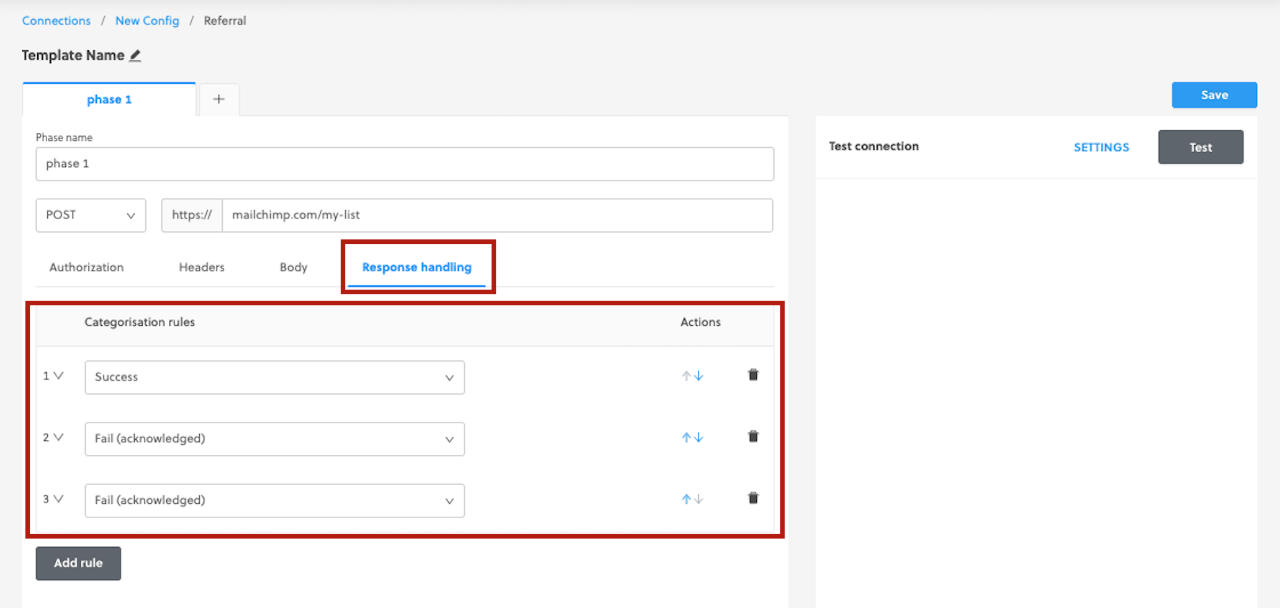
Enter all your Response handling rules.
Testing your API connection
-
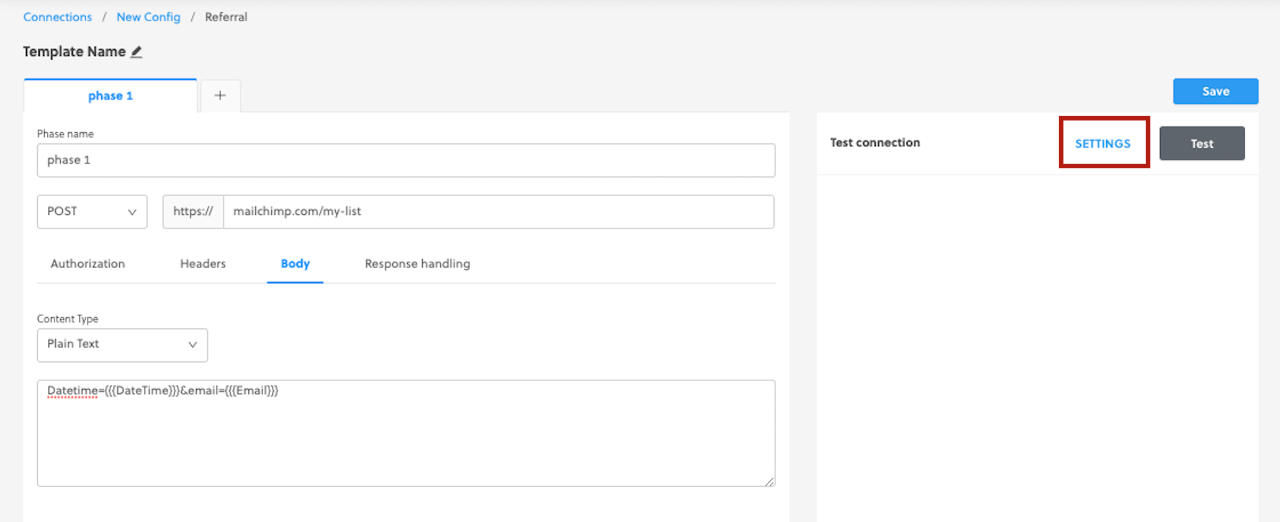
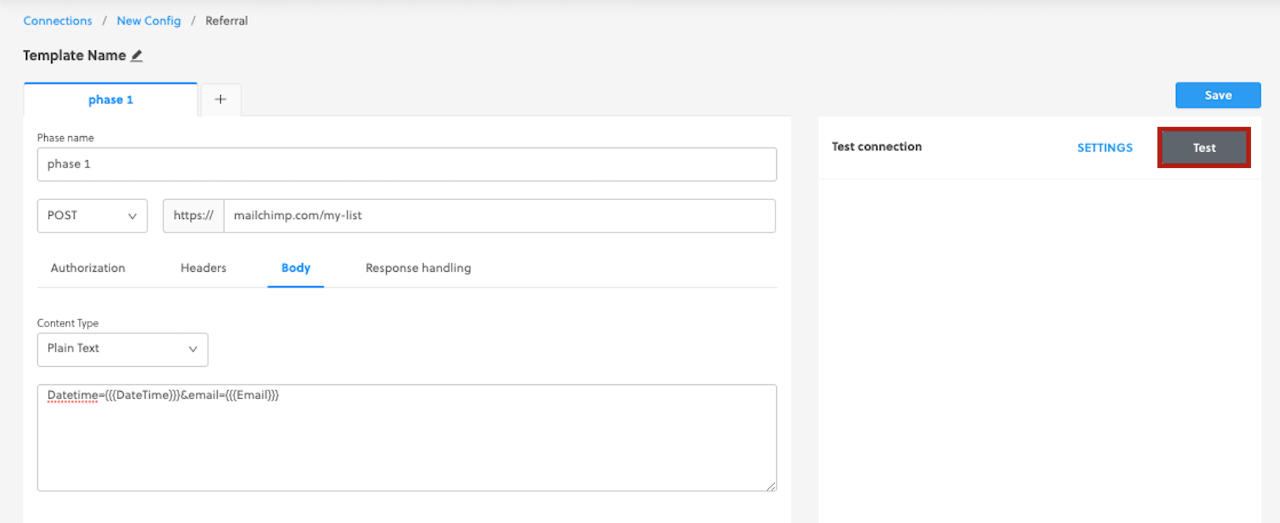
Once your API connection is set up (endpoint, authorization, headers, body, and response handling), click Settings.
-
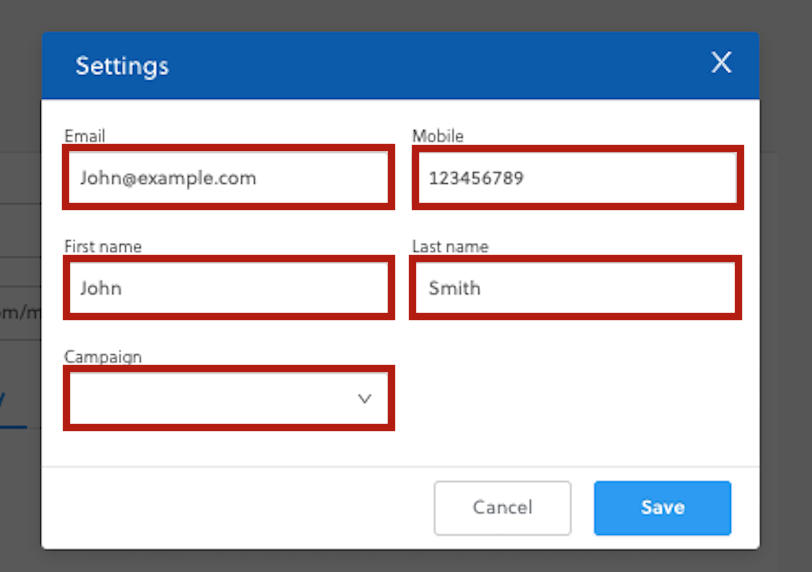
Edit the testing settings according to your test criteria.
-
Click Save.
-
Click Test.
-
Check your test result.
-
Repeat tests until you've achieved your desired outcome.
Linking campaigns to your API connection
-
Go to the Real-time referral page.
-
Expand the connection that you want to link a campaign to.

-
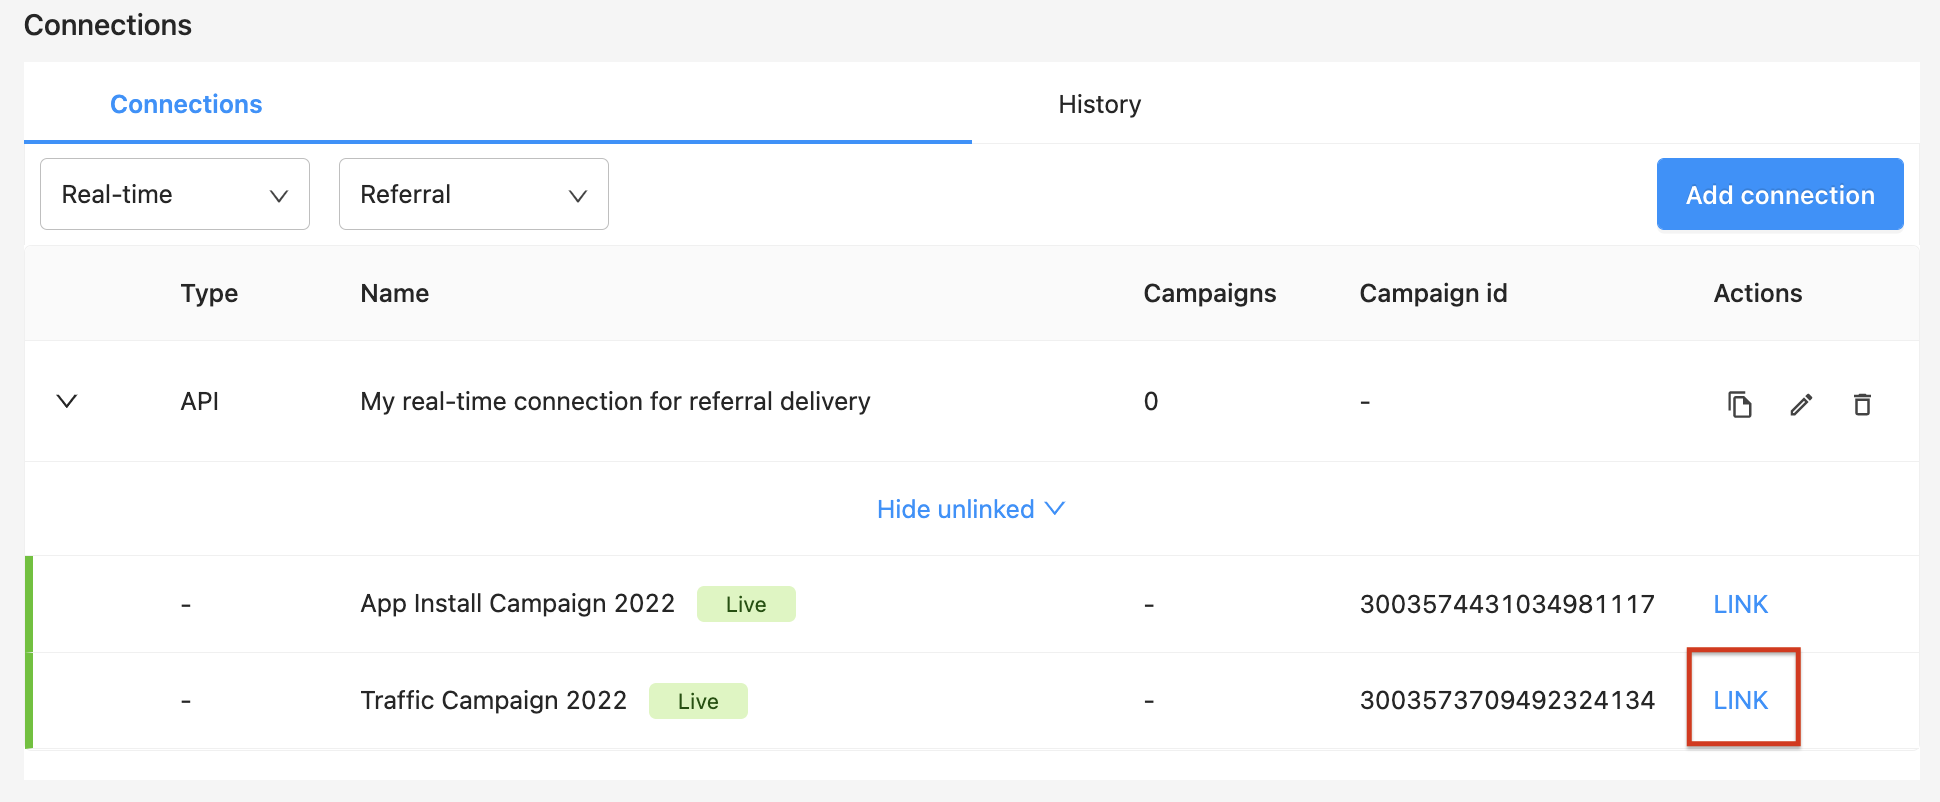
Click Show unlinked.

-
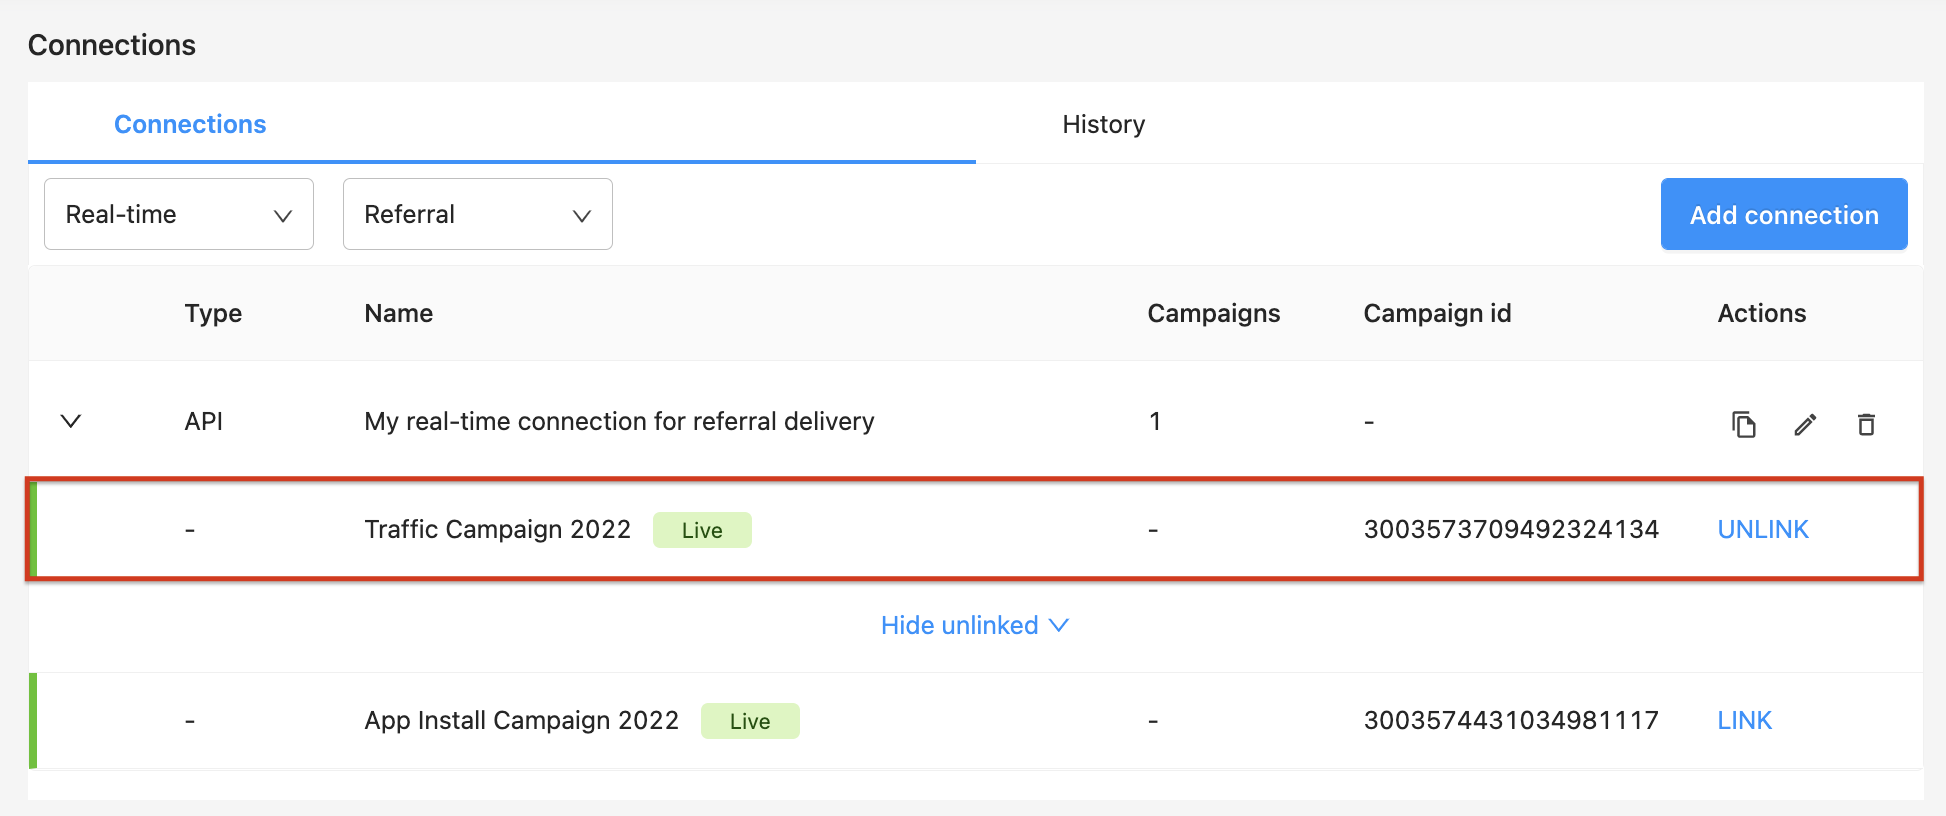
Find the campaign that you want to link to your connection and click Link.
-
The campaign is now linked to your connection.
Unlinking campaigns from your API connection
-
Go to the Real-time Referral page.
-
Expand the connection that you want to link a campaign to.

-
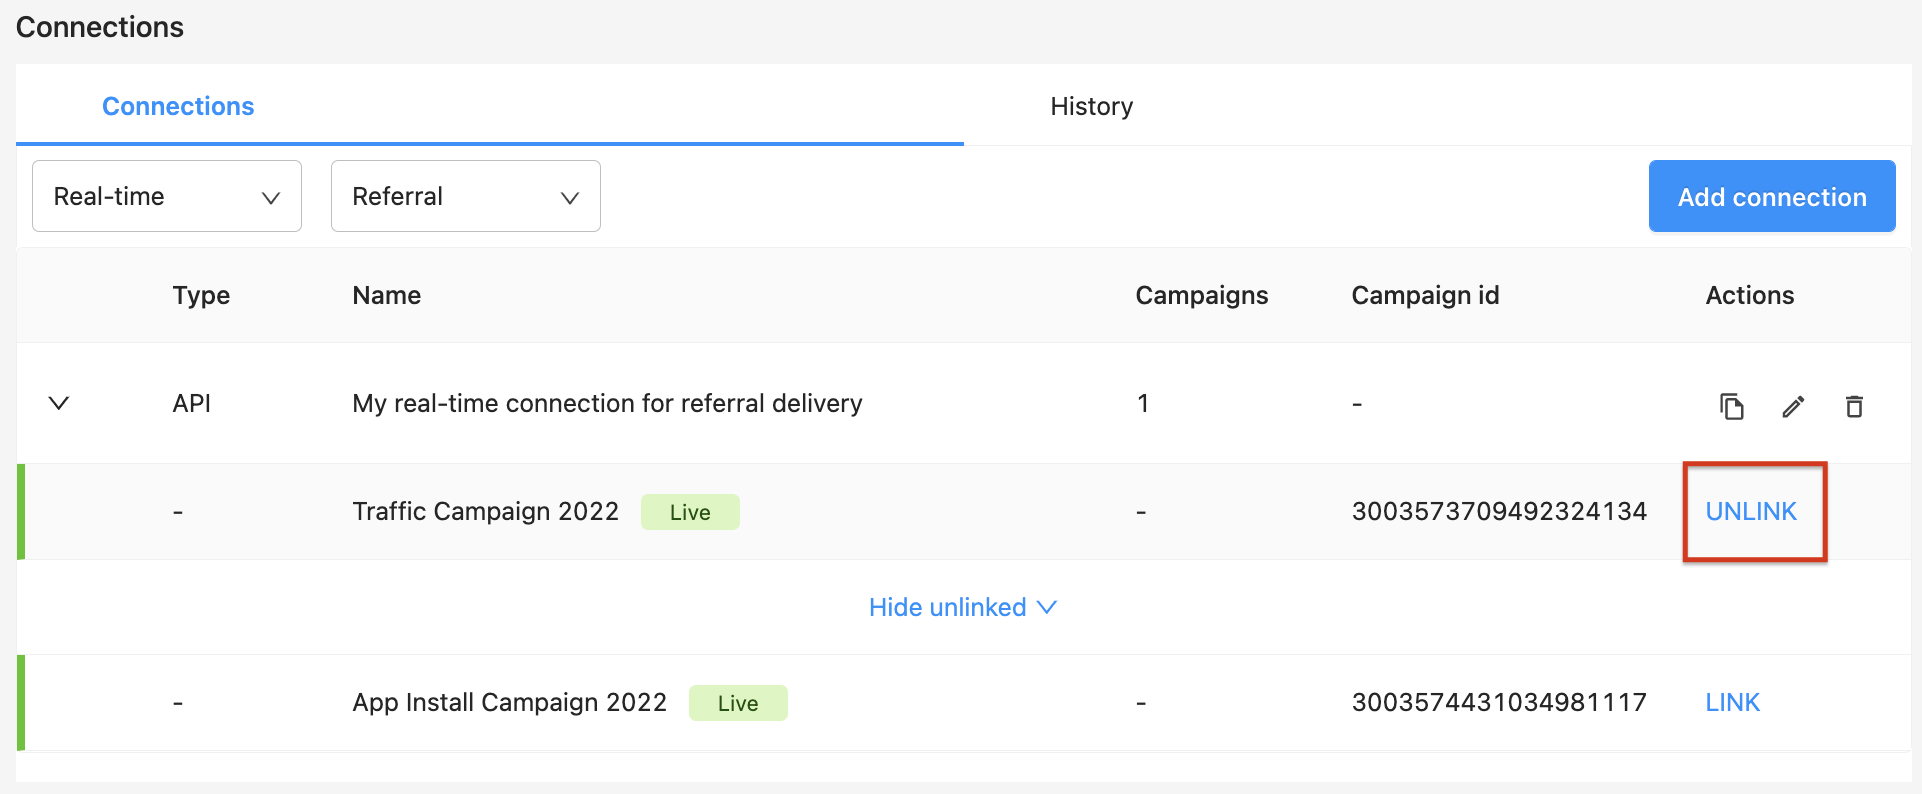
Find the campaign that you want to unlink from your connection and click Unlink.
-
Click Show unlinked.

-
Confirm that your campaign is now unlinked from your connection.

Via SFTP
Secure File Transfer Protocol (FTP) connections allow you to automate your referral deliveries and require little effort to set up. All you need are your SFTP credentials, and you’re ready to go!
Once you set up an SFTP connection, you can routinely receive an email with a .csv file containing all of your new referrals and associated metadata.
You can either use your own SFTP connection, or Rokt's connection.
Rokt's FTP connection
Before you begin
Make sure you have access to the Rokt SFTP. If you don't, reach out to your account manager to have access provisioned.
You should also have the following information ready before setting up your connection to the Rokt SFTP:
- Delivery frequency—how often and at what times referrals should be uploaded to the SFTP server.
- Required parameters—the most common being email, first name, last name, source, and state. Learn more about the metadata Rokt can provide.
Establishing a connection from a host computer (e.g., your laptop) to a secure FTP server requires third-party client software. This tutorial suggests the popular and free client FileZilla which is available for Windows, Mac, and Linux operating systems.
- In your browser, navigate to https://filezilla-project.org/ and click Download FileZilla Client.
- Install FileZilla on your computer. If you already have FileZilla installed, ensure you are running the latest version.
- Reach out to your Rokt Account Manager to request access to the Rokt SFTP. Once you've been granted access, you should receive an email from Rokt with the subject "You've been granted access to Rokt's SFTP server."
- Download the attached file and unzip the encrypted file using the password provided in a second email "Email for password for file with instructions."
- The encrypted file you have just unzipped contains a
.pemfile which is your key file to access Rokt's SFTP folder.
The following steps are the same for Windows, Mac, and Linux operating systems and are based on the latest version of FileZilla.
- Open FileZilla and navigate to
File > Site Manager
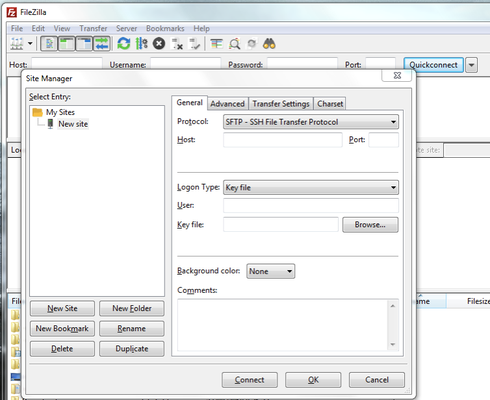
- On the left, click New Site and fill in the following:
-
Protocol: SFTP – SSH File Transfer Protocol
-
Host: ftp.rokt.com
-
Port: 22
-
Key file: Browse to your local key file (
.pem) and select it from your local drive (see image below).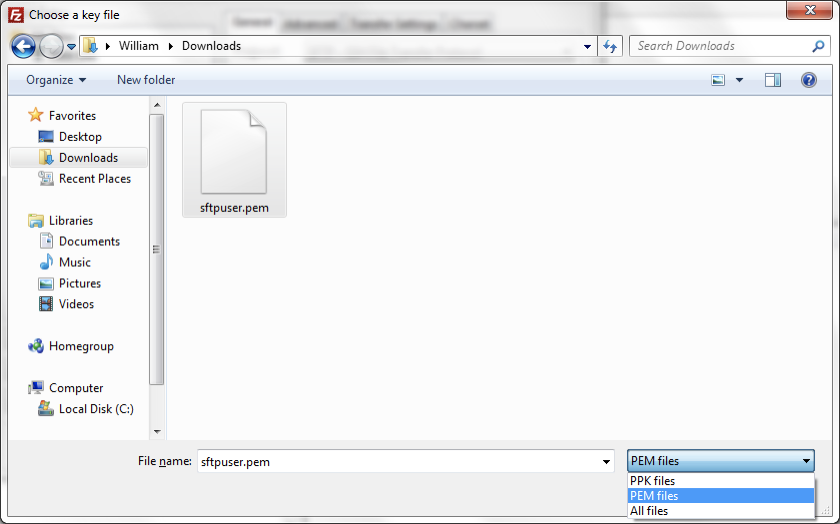
- Click Connect. You should be connected and able see your accessible folders to upload files.
File path and requirements
Referral files are placed in the following file path:
| File path | Purpose |
|---|---|
| /downloads | Download the referral data provided by Rokt |
Referral files are automatically deleted from this folder after 14 days.
Using your own SFTP connection
Establishing the connection
-
Log in to One Platform, then click on your account on the Home page.
-
Go to the Integrations > Connections page from the left navigation menu.
-
Click Add connection.
-
Under Referrals, select FTP.
-
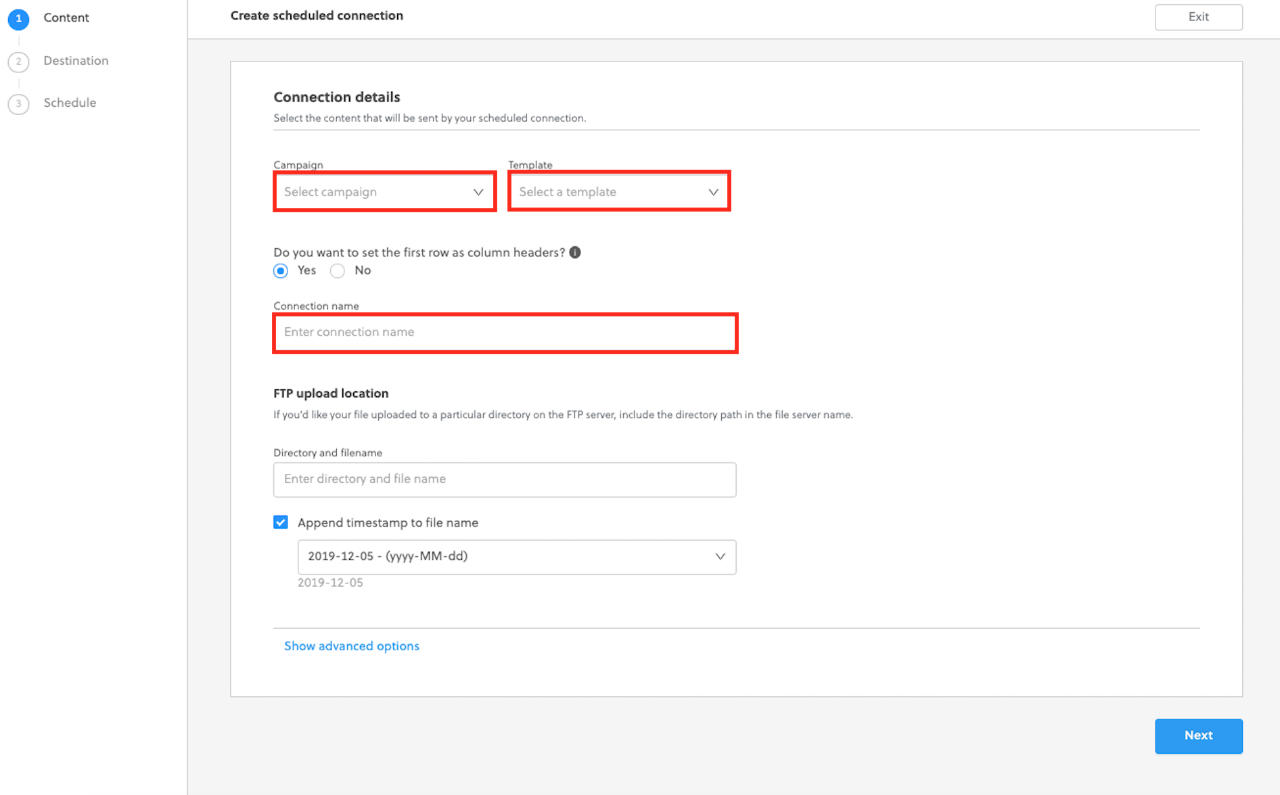
Select the Campaign and Template for this connection, then give your connection a name.
-
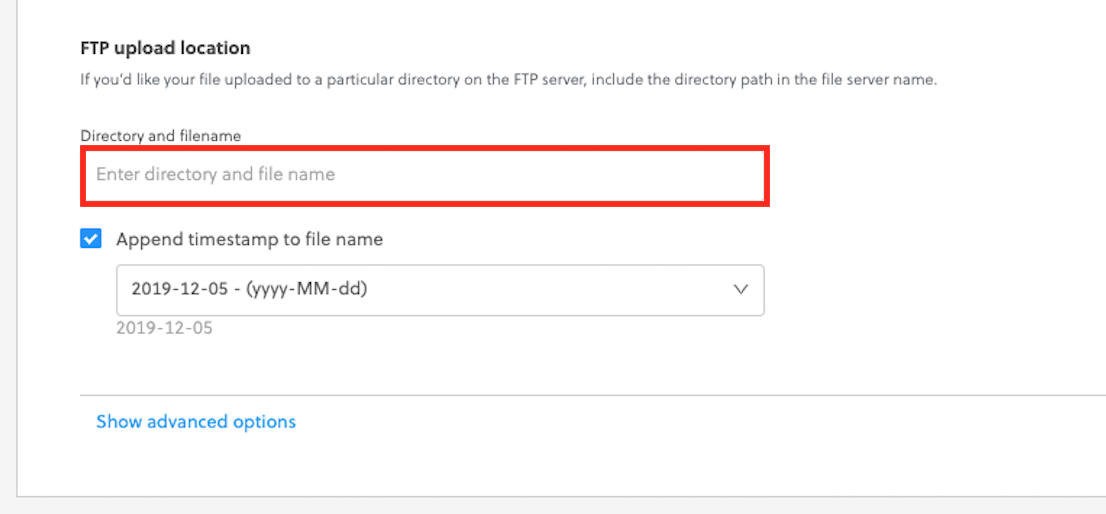
Enter Directory and file name.
-
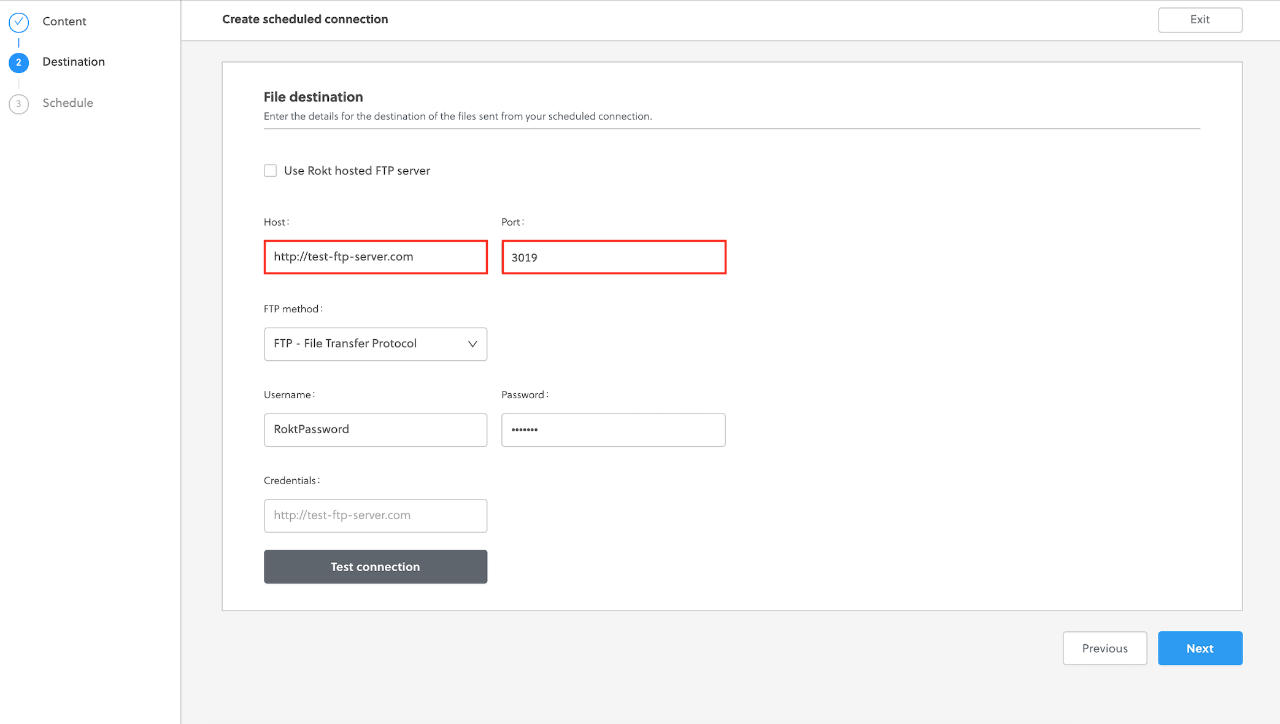
Enter your FTP server host details and port.
-
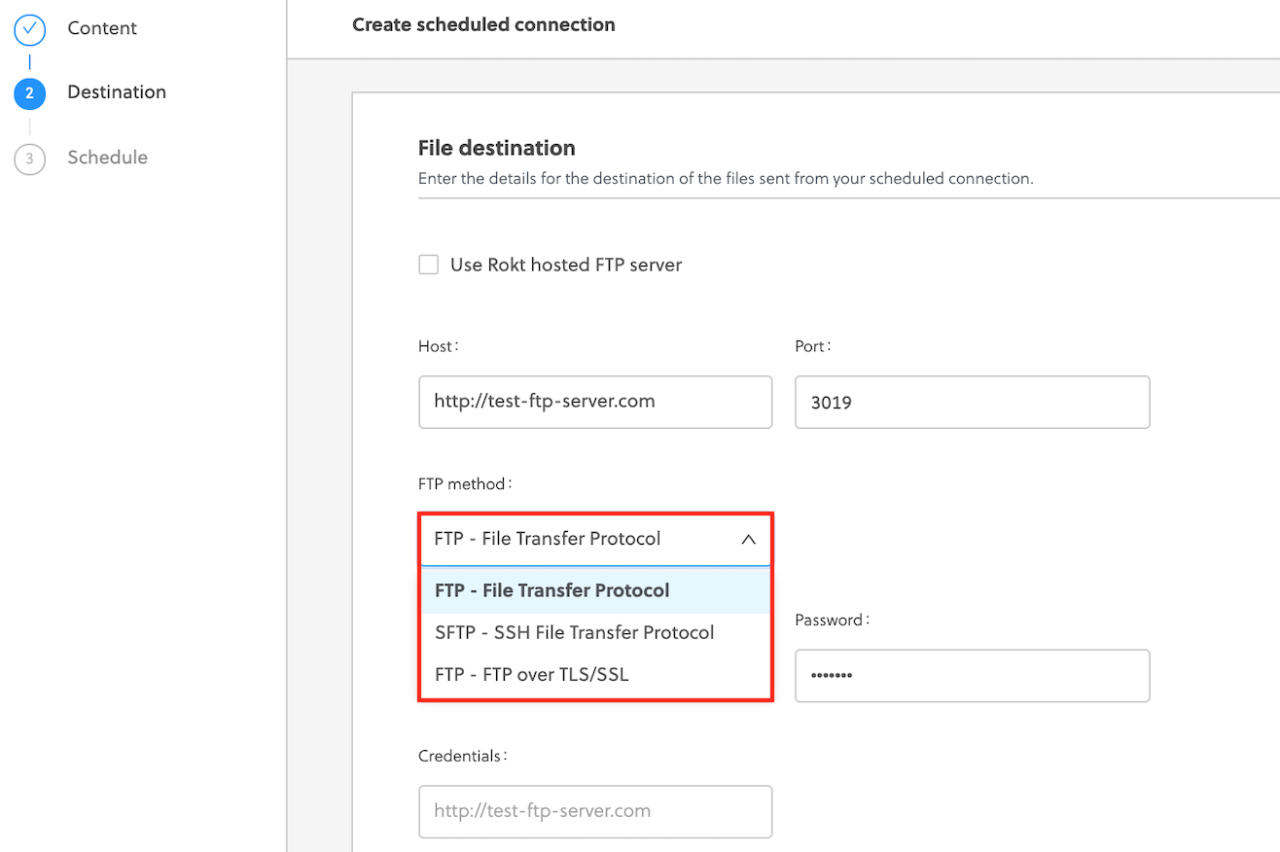
Select your desired FTP method.
-
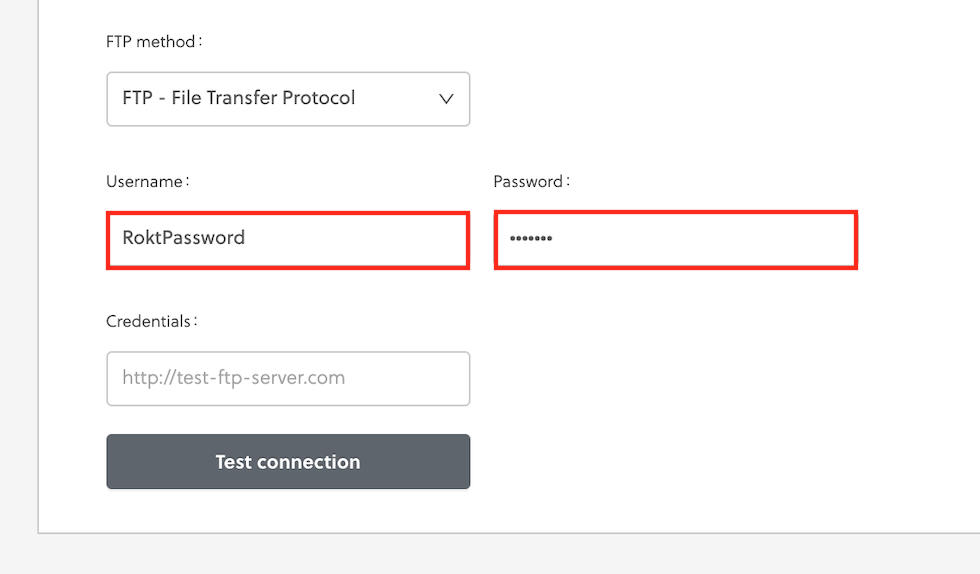
Enter your Username and Password, or enter your username and upload your key file if using SFTP.
-
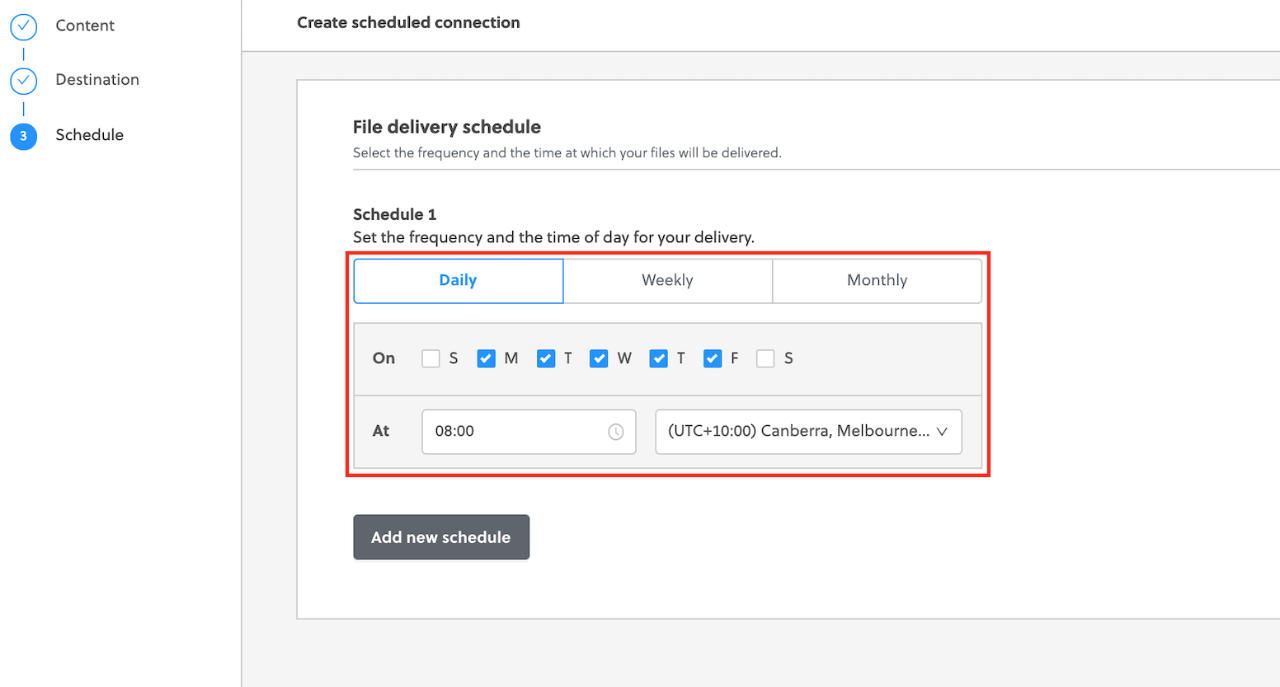
Select your schedule and click Save.
 11. Your connection has been created.
Disabling your FTP connection
-
Go to the Connections tab and select Scheduled from the leftmost drop-down menu.

-
Under Actions, click the pause icon.

-
Your connection is disabled.

-
You can reverse these steps to enable your connection.
Via email
Rokt can schedule delivery of referral files (in .csv format) to you via email. While this method is less secure and requires manual processing to download the files from your email account, it can be a useful way to get started getting referral data from One Platform. You can always switch to an SFTP or an API solution in the future.
Before you begin
An email delivery setup only requires the following pieces of information:
- Email address (or a list of multiple email addresses) where the referrals should be delivered.
- Delivery frequency—which specifies how often and at what times you want to receive referral emails.
- Required parameters—the most common being email, first name, last name, source, and state. Learn more about the attributes Rokt can provide.
Setting up an email connection
-
Navigate to your account in One Platform.
-
Go to Integrations > Connections in the left navigation.
-
Click Add connection.
-
Under Referrals, click Email.
-
Select the campaign and template for this connection.
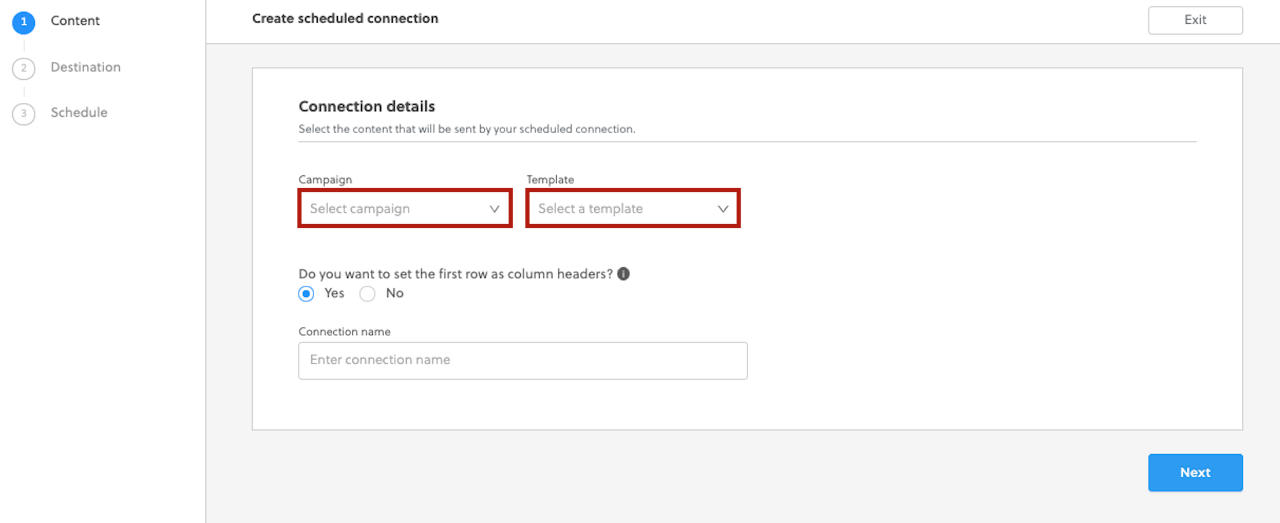
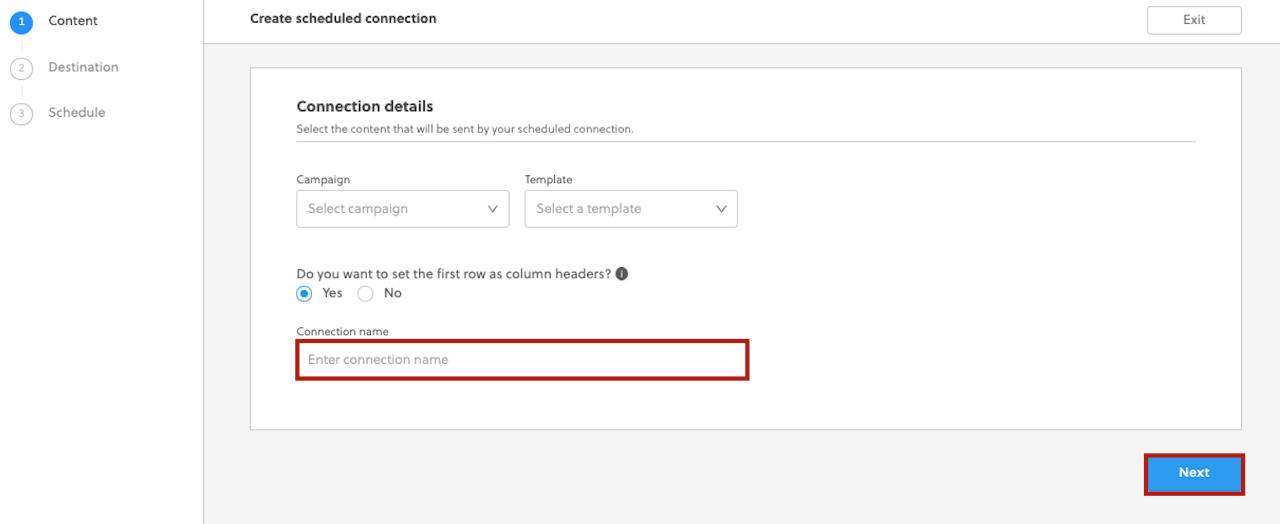
- Give your connection a name and click Next.
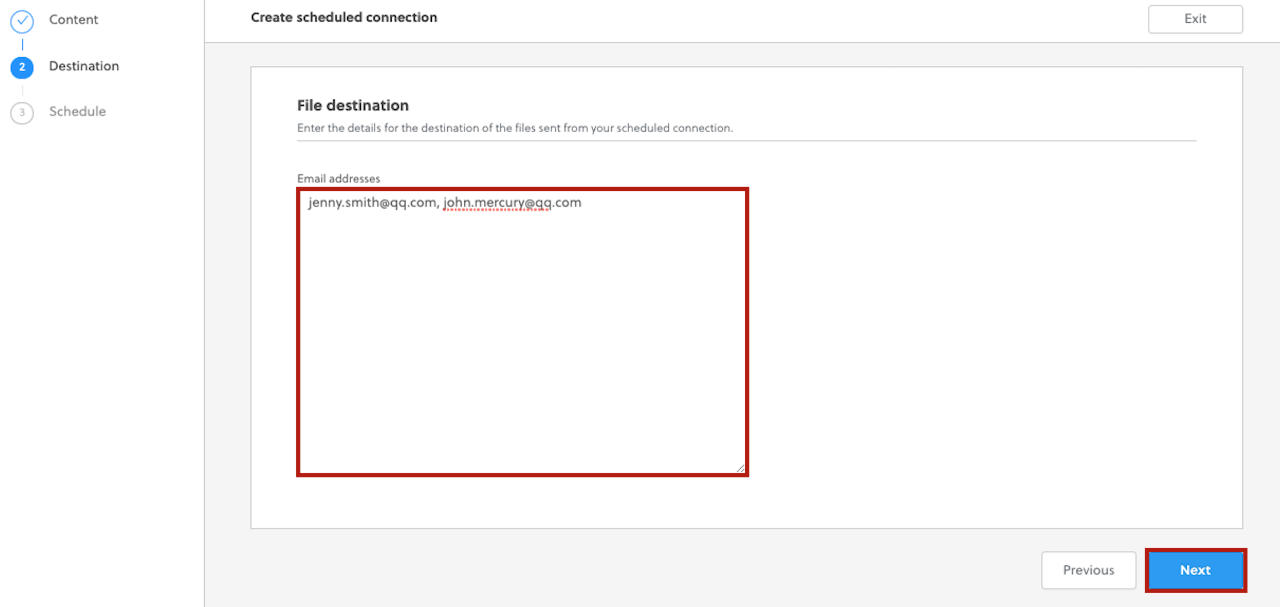
- Enter the destination email addresses and click Next.
- Select your desired schedule and click Save to create your email connection.
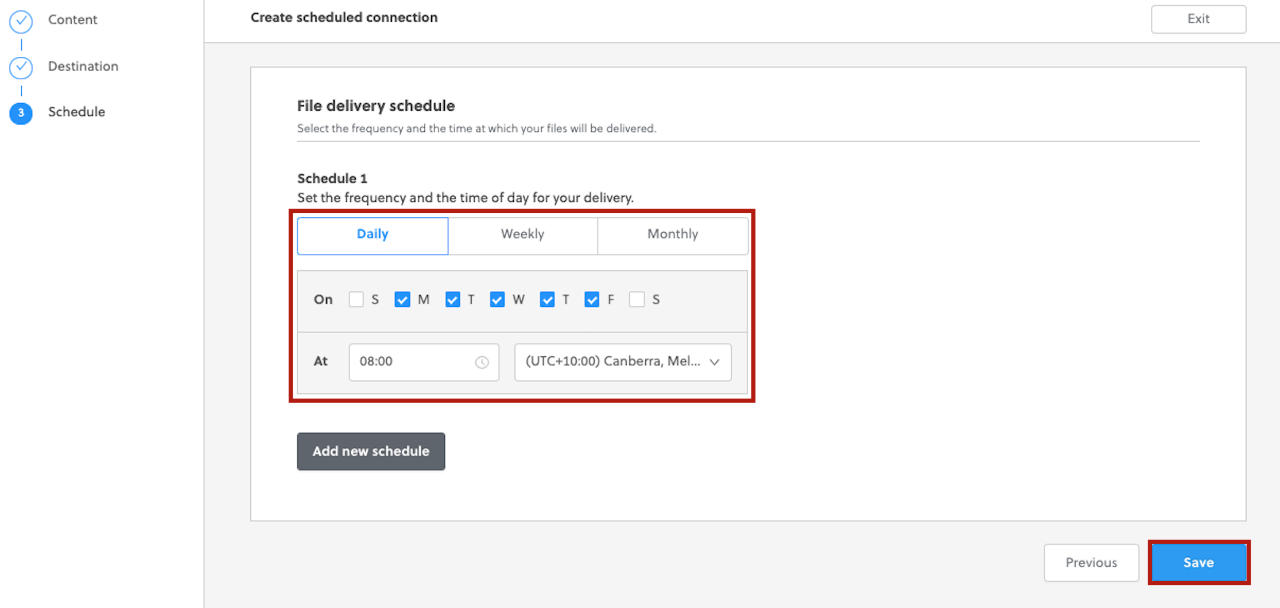
- Your email connection has been created for the linked campaign.

Disabling an email connection
-
From the left navigation menu, go to the Integrations > Connections page and select Scheduled from the drop-down menu.

-
Click the pause icon.
 3. Your email connection is disabled.

- You can reverse these steps to enable your connection.
Via Mailchimp
You can integrate Rokt with Mailchimp, an email service provider and marketing automation platform specializing in ecommerce businesses. This keeps your Mailchimp CRM data as current as possible (Rokt posts new referrals every five minutes) so you can focus more energy on strategizing for your campaigns and less on managing them.
A more complex API setup is available under the API option on the Connections page. You will still be required to set up a referral delivery task in addition to the API configuration. Find the instructions here. There is a separate setup for importing custom audience lists via Mailchimp which you can find here.
Retrieving API keys from Mailchimp
-
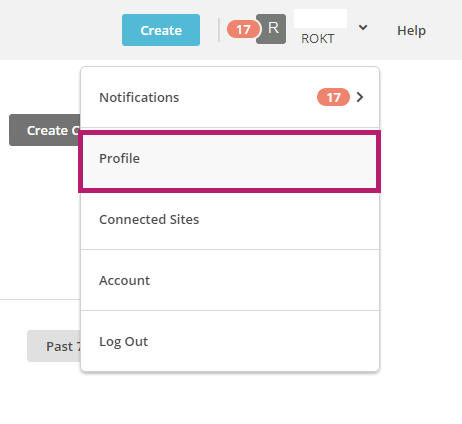
Log in to your Mailchimp account. Click on your name in the top right corner. From the drop-down menu, choose Profile.
-
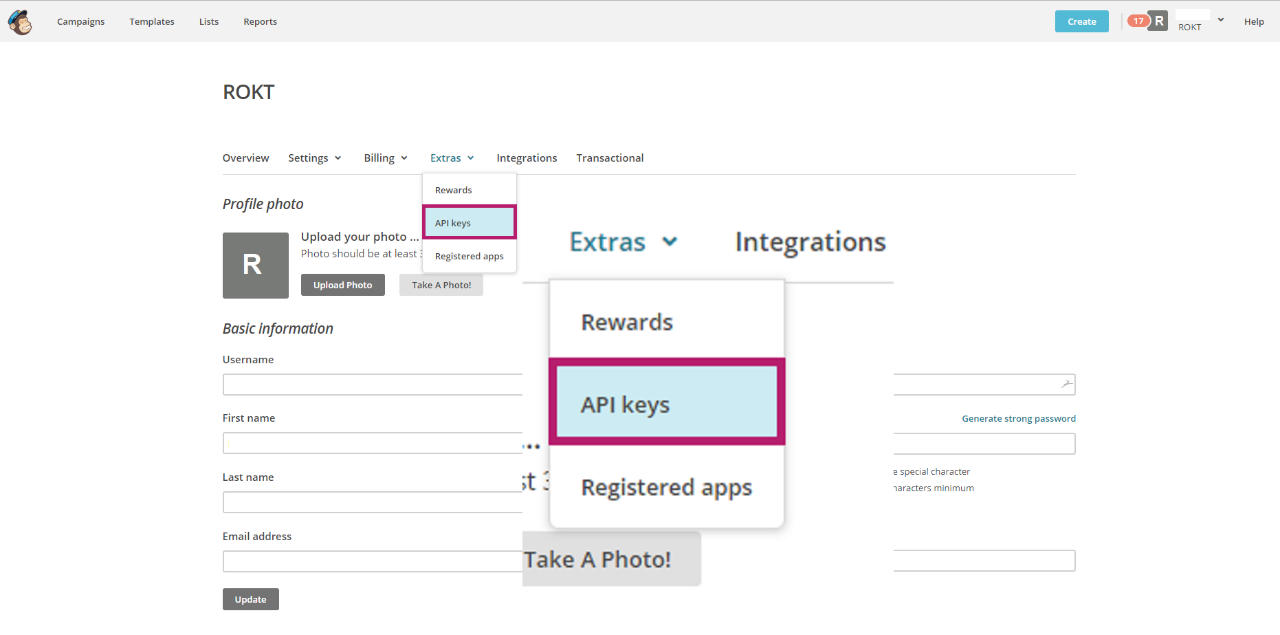
Go to the Extras drop-down menu and choose API keys.
-
You can either use an API key you have already created, or create a new one by clicking Create a key.
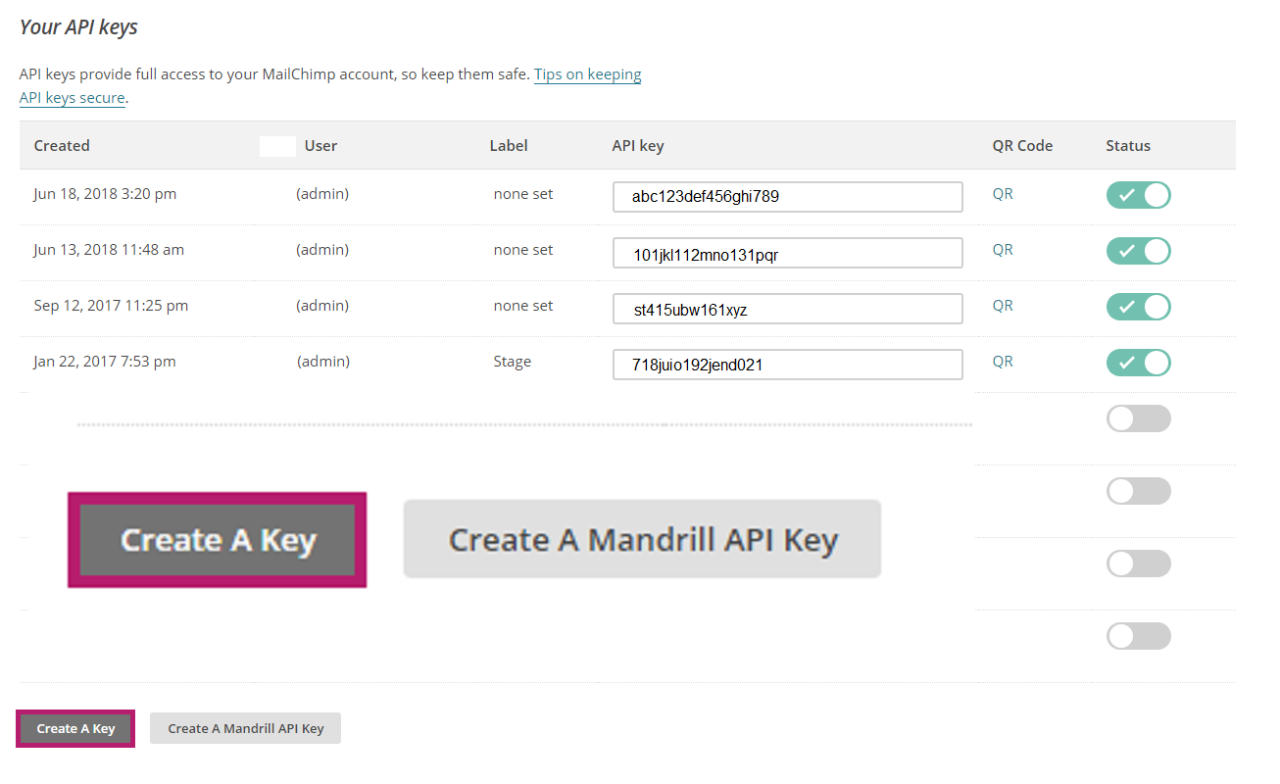
- Take note of the API key Mailchimp has generated for you.
-
Reach out to your Rokt account manager to complete the setup.
Manually
Your data is always accessible on the Rokt platform. This is useful if you want to look at all of your referrals over a certain timeframe, or if you need to do some ad-hoc troubleshooting.
If something goes wrong with an existing connection, such as an API failure or an email that got deleted, don’t worry! You can always log in to the Rokt platform and download the referral data for your campaigns.
Getting set up to access your referral data within the Rokt platform is simple and straightforward:
- Let your account manager know you would like access, and they will send an invitation to your email address.
- Log in to the platform and click on your account on the Home page.
- Go to Campaigns > Customer Data in the left navigation menu.
- On the Referrals tab, select any filters such as the time range, campaigns, or data attributes that you’d like to view.
- Download the data by clicking Export. You can also select Export Via Email if you don’t want to wait for the referral file to download. Rokt will send a
.csvfile to your email upon completion.

A maximum of 100,000 records can be downloaded at once.