プレースメントを追加する (レガシー)
始める前に始める前に への直接リンク
Rokt iOS SDKが、こちらに記載されている手順に従って、すでにアプリケーションに統合されていることを確認し�てください。
オーバーレイプレースメントオーバーレイプレースメント への直接リンク
ご希望のViewControllerでRokt iOS SDKを実行し、適切な顧客属性をすべて追加します。以下のコード例では、ViewDidLoadを使用してRoktオーバーレイプレースメントを表示します。
SDKは、ビューがロードおよびアンロードされるときのオプションのコールバックイベントを提供します。
- Swift
- Objective-C
- SwiftUI
import Rokt_Widget

class OrderConfirmationViewController: UIViewController {

    // プレースメントを表示する必要があるときにこの関数を呼び出します
    func showWidget() {
        let attributes = ["email": "j.smith@example.com",
                "firstname": "Jenny",
                "lastname": "Smith",
                "mobile": "(555)867-5309",
                "postcode": "90210",
                "country": "US"]

        Rokt.execute(viewName: "RoktExperience", attributes: attributes, onLoad: {
            // Roktプレースメントがロードされたときのオプションのコールバック
        }, onUnLoad: {
            // Roktプレースメントがアンロードされたときのオプションのコールバック
        }, onShouldShowLoadingIndicator: {
            // ローディングインジケーターを表示するためのオプションのコールバック
        }, onShouldHideLoadingIndicator: {
            // ローディングインジケーターを非表示にするためのオプションのコールバック
        })
    }
}
#import <Rokt_Widget/Rokt_Widget-Swift.h>

// 配置を表示する必要があるときにこの関数を呼び出します
- (void)showWidget {
    NSDictionary *attributes = @{
        @"email" : @"j.smith@example.com",
        @"firstname": @"Jenny",
        @"lastname": @"Smith",
        @"mobile": @"(555)867-5309",
        @"postcode": @"90210",
        @"country": @"US"
    };
    [Rokt executeWithViewName:@"RoktExperience"
                   attributes:attributes
                   placements:nil
                       onLoad:^{
        // Rokt配置がロードされたときのオプションのコールバック
    } onUnLoad:^{
        // Rokt配置がアンロードされたときのオプションのコールバック
    } onShouldShowLoadingIndicator:^{
        // ローディングインジケーターを表示するためのオプションのコールバック
    } onShouldHideLoadingIndicator:^{
        // ローディングインジケーターを隠すためのオプションのコールバック
    } onEmbeddedSizeChange:^(NSString *selectedPlacement, CGFloat widgetHeight) {
        // フルスクリーンオーバーレイには必要ありません
    }];
}
import SwiftUI
import Rokt_Widget
class OrderConfirmationViewController: View {

    func showPlacement() {
       let attributes = ["email": "j.smith@example.com",
               "firstname": "Jenny",
               "lastname": "Smith",
               "mobile": "(555)867-5309",
               "postcode": "90210",
               "country": "US"]

       Rokt.execute(viewName: "RoktExperience",
                    attributes: attributes,
                    onLoad: {
                       // Rokt配置がロードされたときのオプションのコールバック
                    }, onUnLoad: {
                       // Rokt配置がアンロードされたときのオプションのコールバック
                    }, onShouldShowLoadingIndicator: {
                       // ローディングインジケーターを表示するためのオプションのコールバック
                    }, onShouldHideLoadingIndicator: {
                       // ローディングインジケーターを隠すためのオプションのコールバック
                    })
   }
}
オプション機能オプション機能 への直接リンク
| 機能 | 目的 |
|---|---|
Rokt.close() | オーバーレイ配置を自動的に閉じるために使用されます。 |
埋め込み配置埋め込み配置 への直接リンク
ストーリーボードの変更ストーリーボードの変更 への直接リンク
SwiftUIを使用している場合は、以下のSwiftUIテーブルの指示を参照してください。SwiftUIを使用していない場合は、次の指示を使用してください。
ストーリーボードにビューを追加し、それをViewControllerに配置します:
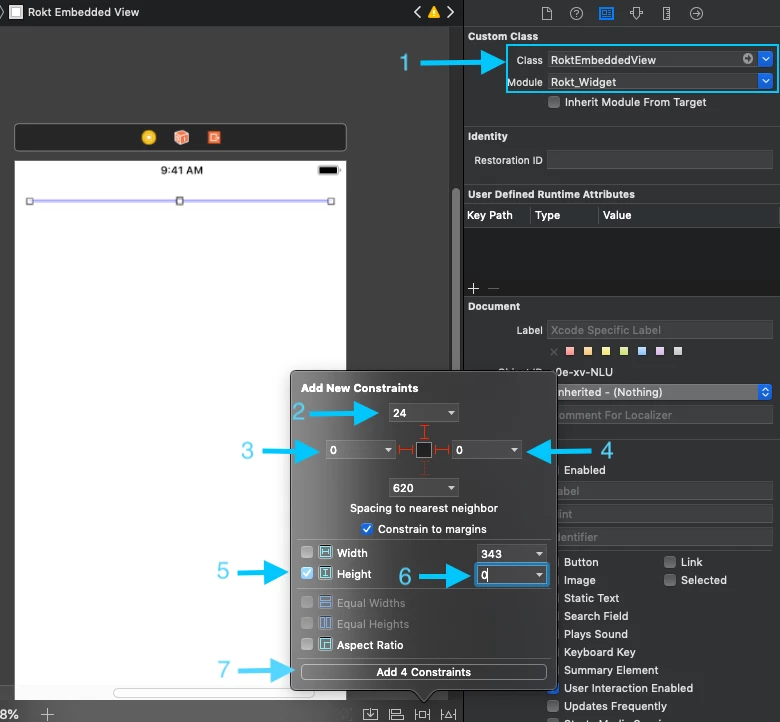
customクラスで、ビューのクラスとしてRoktEmbeddedViewを設定します。次に、埋め込み配置が表示される場所に一致するように、上部、先頭、および末尾の制約を定義します。高さについては、高さ制約をゼロに設定することをお勧めします。
RoktEmbeddedViewは、配置のコンテンツに応じて自身の高さのみを変更できます。高さが変更されたときに通知し、新しい高さを返すコールバックがexecuteメソッドにあります。
以下の画像は、オートレイアウトを使用してRoktEmbeddedViewを定義する最も簡単な方法を示しています。
-
ビューのClassとしてRoktEmbeddedViewを、ModuleとしてRokt_Widgetを設定します。
-
上部の制約を定義します。
-
先頭の制約を定義します。
-
末尾の制約を定義します。
-
高さと幅の制約を選択します。
-
高さの制約を設定します。
-
ビューに制約を追加します。
RoktEmbeddedViewはコード内で作成し、レイアウトに動的に含めることもできます。
Rokt SDKの実行Rokt SDKの実行 への直接リンク
iOS用のRokt SDKを、目的のViewControllerで実行し、適切な顧客属性をすべて追加します。以下のコード例では、ViewDidLoadを使用してプレースメントを起動します。
SDKは、ビューがロードおよびアンロードされるときのオプションのコールバックイベントを提供します。
- Swift
- Objective-C
- SwiftUI
import Rokt_Widget
class OrderConfirmationViewController: UIViewController {
// ステップ5で作成されたRoktEmbeddedViewにリンクされているか、プログラムで作成することもできます
@IBOutlet weak var roktEmbeddedView: RoktEmbeddedView!
...
// プレースメントを表示する必要があるときにこの関数を呼び出します
func showWidget() {
let attributes = ["email": "j.smith@example.com",
"firstname": "Jenny",
"lastname": "Smith",
"mobile": "(555)867-5309",
"postcode": "90210",
"country": "US"]
let placements: [String : RoktEmbeddedView] = ["RoktEmbedded1": roktEmbeddedView]
Rokt.execute(viewName: "RoktEmbeddedExperience", attributes: attributes, placements: placements, onLoad: {
// Roktプレースメントがロードされたときのオプション�のコールバック
}, onUnLoad: {
// Roktプレースメントがアンロードされたときのオプションのコールバック
}, onShouldShowLoadingIndicator: {
// ローディングインジケーターを表示するためのオプションのコールバック
}, onShouldHideLoadingIndicator: {
// ローディングインジケーターを非表示にするためのオプションのコールバック
}, onEmbeddedSizeChange: { selectedPlacement, widgetHeight in
// プレースメントの高さが変わるたびに選択されたプレースメントと必要な高さを取得するためのオプションのコールバック
})
}
}
#```objective-c
import <Rokt_Widget/Rokt_Widget-Swift.h>

// 配置を表示する必要があるときにこの関数を呼び出します
- (void)showWidget {
    NSDictionary *attributes = @{
        @"email" : @"j.smith@example.com",
        @"firstname": @"Jenny",
        @"lastname": @"Smith",
        @"mobile": @"(555)867-5309",
        @"postcode": @"90210",
        @"country": @"US"
    };

    // roktEmbeddedView は .h 内で @property (weak, nonatomic) IBOutlet RoktEmbeddedView *roktEmbeddedView; として定義されており、ステップ5で定義された roktEmbeddedView を指しています。またはプログラムで作成することもできます
    NSDictionary<NSString *, RoktEmbeddedView *> *placements= [NSDictionary dictionaryWithObject:self.roktEmbeddedView forKey:@"RoktEmbedded1"];

    [Rokt executeWithViewName:@"RoktExperience"
                   attributes:attributes
                   placements:placements
                       onLoad:^{
        // Rokt 配置がロードされたときのオプションのコールバック
    } onUnLoad:^{
        // Rokt 配置がアンロードされたときのオプションのコールバック
    } onShouldShowLoadingIndicator:^{
        // ローディングインジケーターを表示するためのオプションのコールバック
    } onShouldHideLoadingIndicator:^{
        // ローディングインジケーターを非表示にするためのオプションのコールバック
    } onEmbeddedSizeChange:^(NSString *selectedPlacement, CGFloat widgetHeight){
        // 配置の高さが変更されるたびに、selectedPlacement と配置に必要な高さを取得するためのオプションのコールバック
    }];
}
import Rokt_Widget
import SwiftUI

// UIKit と SwiftUI を接続するための UIViewRepresentable を作成
struct RoktEmbeddedSwiftUIView: UIViewRepresentable {
   typealias UIViewType = RoktEmbeddedView
   var embedded: RoktEmbeddedView

   init() {
       embedded = RoktEmbeddedView()
   }

   func makeUIView(context: Context) -> RoktEmbeddedView {
       return embedded
   }

   func updateUIView(_ uiView: RoktEmbeddedView, context: Context) {

   }
}

struct OrderConfirmationViewController: View {

   // Rokt 埋め込みビューを作成
   let roktEmbedded1 = RoktEmbeddedSwiftUIView()
   @State private var embeddedSize: CGFloat = 0
   @State private var placementDisplayed = false

   var body: some View {
       ScrollView {
           VStack(spacing: 0){
               // Rokt 埋め込みビューを配置したい場所に配置
```swift
roktEmbedded1
    .frame(height: self.embeddedSize, alignment: .center)
}
}.onAppear {
    if !placementDisplayed {
 // ビューが表示されたときにプレースメントを表示
        showPlacement()
    }
}
}

private func showPlacement() {

    var placements = [String: RoktEmbeddedView]()
    placements["RoktEmbedded1"] = roktEmbedded1.embedded

    let attributes = ["email": "j.smith@example.com",
                      "firstname": "Jenny",
                      "lastname": "Smith",
                      "mobile": "(555)867-5309",
                      "postcode": "90210",
                      "country": "US"]

    Rokt.execute(viewName: "RoktEmbeddedExperience",
                 attributes: attributes,
                 placements: placements,
                 onLoad: {
        // Roktプレースメントがロードされたときのオプションのコールバック
        self.placementDisplayed = true
    }, onUnLoad: {
        // Roktプレースメントがアンロードされたときのオプションのコールバック
    }, onShouldShowLoadingIndicator: {
        // ローディングインジケーターを表示するためのオプションのコールバック
    }, onShouldHideLoadingIndicator: {
        // ローディングインジケーターを非表示にするためのオプションのコールバック
    }, onEmbeddedSizeChange: { selectedPlacement, widgetHeight in
        embeddedSize = widgetHeight
    })
}
ビュー名 RoktExperience またはプレースメント名 RoktEmbedded1 を別の値に更新するには、Roktアカウントマネージャーに連絡して、Roktプレースメントが一貫して設定されていることを確認してください。
SwiftUI コンポーネントSwiftUI コンポーネント への直接リンク
Rokt iOS SDK のメジャーバージョン 4 から、RoktLayout コンポーネントを使用して Rokt レイ�アウトを追加できます。これにより、Rokt.execute を呼び出す必要がなくなり、SwiftUI を使用したよりモダンな宣言型の統合がサポートされます。
コンポーネントの追加コンポーネントの追加 への直接リンク
import SwiftUI
import Rokt_Widget

struct OrderConfirmationSwiftUI: View {
    let attributes: [String: String]
    let pageIdentifier: String
    let location: String
    @State var sdkTriggered = true

    var body: some View {
        VStack(alignment: .leading) {

            RoktLayout(sdkTriggered: $sdkTriggered,
                       viewName: pageIdentifier,
                       locationName: location, // 埋め込みレイアウトを使用する場合
                       attributes: attributes,
                       onLoad: {
                // Rokt プレースメントがロードされたときのオプションのコールバック
            }, onUnLoad: {
                // Rokt プレースメントがアンロードされたときのオプションのコールバック
            },onShouldShowLoadingIndicator: {
                // ローディングインジケーターを表示するためのオプションのコールバック
            }, onShouldHideLoadingIndicator: {
                // ローディングインジケーターを非表示にするためのオプションのコールバック
            })

        }.frame(maxWidth: .infinity, maxHeight: .infinity, alignment: .topLeading)
    }
}
RoktLayout コンポーネントは、埋め込みレイアウトとオーバーレイレイアウトの両方に使用できます。
イベントイベント への直接リンク
SDKは各ページのイベントをRokt.events APIを通じて提供します。
Rokt.events(viewName: "viewName") { roktEvent in
    print("Roktイベントを受信しました \(roktEvent)")
}
イベントオブジェクトイベントオブジェクト への直接リンク
| イベント | 説明 | パラメータ |
|---|---|---|
| ShowLoadingIndicator | SDKがRoktバックエンドを呼び出す前にトリガーされます | |
| HideLoadingIndicator | SDKがRoktバックエンドから成功または失敗を受信したときにトリガーされます | |
| OfferEngagement | ユーザーがオファーに関与したときにトリガーされます | placementId: String |
| PositiveEngagement | ユーザーがオファーに積極的に関与したときにトリガーされます | placementId: String |
| FirstPositiveEngagement | ユーザーが初めてオファーに積極的に関与したときにトリガーされます | placementId: String, setFulfillmentAttributes: func (attributes: [String: String]) |
| PlacementInteractive | プレースメントがレンダリングされ、対話可能になったときにトリガーされます | placementId: String |
| PlacementReady | プレースメントが表示準備ができているが、まだコンテンツがレンダリングされていないときにトリガーされます | placementId: String |
| PlacementClosed | ユーザーによってプレースメントが閉じられたときにトリガーされます | placementId: String |
| PlacementCompleted | オファーの進行が終了し、表示するオファーがなくなったときにトリガーされます。 また、キャッシュがヒットしたが、以前に却下されたため取得したプレースメントが表示されないときにもトリガーされます | placementId: String |
| PlacementFailure | 何らかの失敗によりプレースメントを表示できない場合、または表示するプレースメントがない場合にトリガーされます | placementId: String (optional) |
| OpenUrl | ユーザーがパートナーアプリに送信するように設定されたURLを押したときにトリガーされます | placementId: String, url: String |
コールバックコールバック への直接リンク
Rokt iOS SDKは、executeに渡される以下のコールバックをサポートしています:
onLoadonLoad への直接リンク
onLoadコールバックは、プレースメントが読み込まれ、インタラクティブになったときに呼び出されます。このコールバックは引数を提供せず、値を返しません。
onShouldShowLoadingIndicatoronShouldShowLoadingIndicator への直接リンク
onShouldShowLoadingIndicatorは、executeの呼び出しが成功した直後、SDKがRoktバックエンドへの呼び出しをトリガーする直前に呼び出されます。プレースメントの読み込みを待っている間に、読み込みインジケーターの進行ビューを表示するために使用できます。引数は必要なく、値を返しません。
このコールバックの動作は、Rokt iOS SDKのメジャーバージョン3とメジャーバージョン4の間で変更されています。コールバックが実行される前に1秒の遅延がなくなりました。メジャーバージョン3でこれらのコールバックを使用していて、メジャーバージョン4にアップグレードする場合は、ユーザーエクスペリエンスに影響がないことを確認するために動作をテストしてください。必要に応じて、アプリケーションのニーズに合った遅延動作を作成できます。
onShouldHideLoadingIndicatoronShouldHideLoadingIndicator への直接リンク
onShouldHideLoadingIndicator コールバックは、SDK が Rokt バックエンドから成功または失敗のレスポンスを取得したときに呼び出されます。これは、プログレスビューやローディングインジケーターをキャンセルするために使用できます。引数を必要とせず、値を返しません。
onUnloadonUnload への直接リンク
onUnload コールバックは、SDK がプレースメントを閉じたときに呼び出されます。また、execute 呼び出しが失敗した場合にもトリガーされます。引数を必要とせず、値を返しません。
onEmbeddedSizeChangeonEmbeddedSizeChange への直接リンク
onEmbeddedSizeChange は、選択された埋め込みプレースメントまたはレイアウトの高さが変化したときに呼び出されます。選択されたプレースメント/レイアウトと新しい高さの引数が含まれますが、値を返しません。